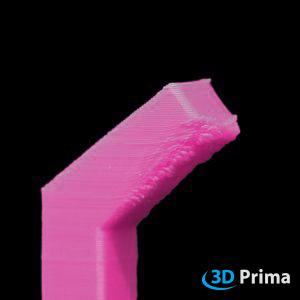
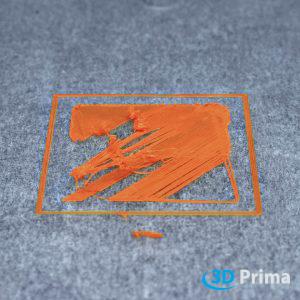
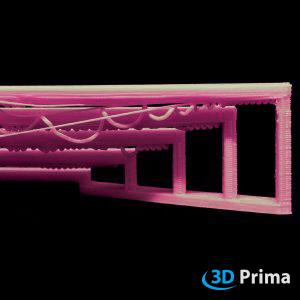
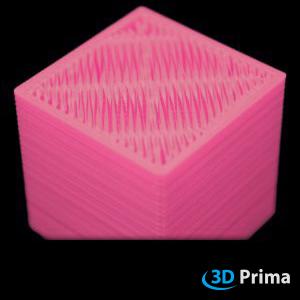
 1. BAD "SURGES" 1. BAD "SURGES"
It is not trivial to obtain a perfect result with "perfect" overhangs. It depends on the material, the printer used and the print settings, which overhang angles can be printed. Typically, you can print at an angle of about 45 degrees. In FDM/FFF 3D printing, each layer must be built on top of another. Obviously it is not possible to print in the air and that is why you need to consider some points before starting printing. Perfect positioning, adding a support structure, or splitting the part into multiple pieces are common tricks to optimize 3D printing. You can use an overhang test template, like the one from "make" magazine, download link: http://www.thingiverse.com/thing:533472/#files
ADD A SUPPORT STRUCTURE
An easy way to achieve better results is support structures.
We can't recommend what the best settings are, because they change when you change the layer height or material. We recommend starting with the standard settings in your slicer program, if you need to change them, try and repeat, you learn by making mistakes!
Keep in mind that support material requires additional printing time, and sometimes optimizing model placement is another solution.
REDUCE THE HEIGHT OF THE LAYER
To prevent printing of failed overhangs or to reduce the support structure, you can also reduce the layer height in the slicing software.
COOLING FAN
To achieve higher overhang angles, the material must cool quickly enough after printing. If your printer has a part cooling fan, you should turn it on or increase the fan speed. Also check if the fan and ventilation slot are in the correct position (check that the air is cooling your part and not going anywhere else).
Some materials have extremely low viscosity at printing temperatures and that is why you need to print them with high print speeds and part cooling fan.
ADJUST THE PRINT SPEED
It is often necessary to combine print speed and extruder temperature settings to get the best results in terms of overhangs. We cannot give you the complete solution, because it differs from material to material, printer and cooling fan of the piece. We recommend running overhang print tests to optimize your settings and find out which overhang angles are possible. You can use a protrusion test pattern, like the one from "make" magazine, download it.
Some additional tips: We recommend a slightly higher print speed when printing overhangs.
ADJUST THE NOZZLE TEMPERATURE
As is often the case, getting the best results in terms of overhangs requires a combination of print speed and nozzle temperature settings. We can't give you a general solution, because different materials, printers and cooling fans of the parts greatly influence the overhang result.
We recommend printing overhang tests to optimize your settings and to find out what overhang angles are possible.
|
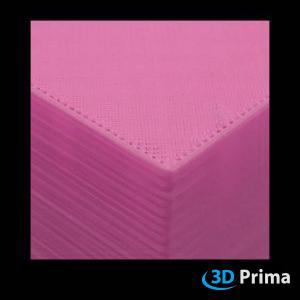
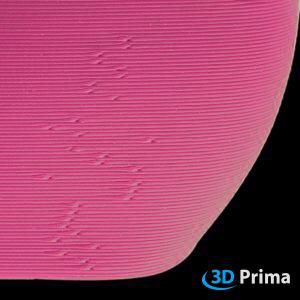 2. SPOTS, HOLES AND "PIMPLES" 2. SPOTS, HOLES AND "PIMPLES"
Your 3D printer must make many changes in extrusion and motion directions during the printing process. If the retraction settings are not optimized, defects may occur on the surface of the print. Sometimes these deformations are also called holes or pimples.
ADJUST THE RETRACTION
Retraction is the retreating of the filament during the printing process. When your 3D printer hotend moves to a new location (the extruder moves without extruding) strings may form as molten filament comes out of the nozzle. This can be improved by pulling the filament back the moment the hotend stops extruding.
First, make sure you have retraction enabled.
The second step will be to optimize the retraction settings, such as: distance and speed.
RETRACT DISTANCE
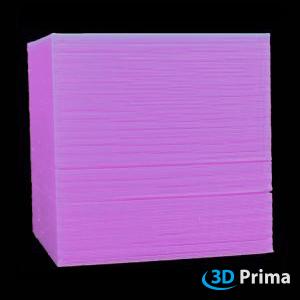
The distance defines how far the filament is pulled back from the nozzle. It depends on the printer what the best distance will be. Test it by printing two cubes 40mm apart from each other and increase the retraction distance by 0.5mm and monitor the best performance. For most printers, the retract distance should be between 1 and 5 mm.
RETRACTMENT SPEED
Retract speed is also an important setting that affects printing. If you retract the filament too quickly, the filament may separate from the melted part. Otherwise, if it retracts too slowly, the nozzle may lose material before it starts printing in the new position. For most printers, the retraction speed should be between 20-100 mm/s or 1200-6000 mm/min.
Test it by printing two cubes 40 mm apart from each other and increase the retraction speed in steps of 20 mm/s or 1200 mm/min and monitor the best performance.
CLEAN NOZZLE
Sometimes stains form if the nozzle has filament residue. Newly printed filament can catch debris and cause defects in the print.
SELECT YOUR STARTING POINT
The most common defects are small spots at the beginning or at the junction of the print layers. Eliminating them completely can be very difficult. A simple solution is to select a new starting point, one that doesn't attract much attention. Your slicer software just wants to optimize the process, it is not intelligent and cannot do the back or front of your print, so you have to choose the starting point.
|
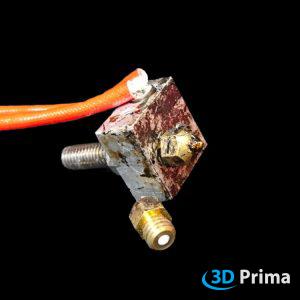 3. NOZZLE CLOGGED 3. NOZZLE CLOGGED
Over its useful life, a nozzle must extrude several kilograms of plastic. Over time, the nozzle is very likely to become clogged. These jams or clogs are usually due to something inside the nozzle that is preventing the plastic from extruding freely. While this can be discouraging the first time it happens, we will outline some simple troubleshooting steps that can be used to fix a stuck nozzle.
COLD PULL
A cold draw works best with slippery, soft materials, such as nylon filament.
Once again, heat the hotend to the working temperature of the nylon or polyamide filament, push it through the hotend as far as possible, ideally, until the previous material is cleaned off, which will obviously be a little harsh if the nozzle is completely clogged. Then let the hotend cool down.
What we recommend is to set the hotend to 110, 120°C and keep pulling the filament while the hotend heats up until the filament comes out in one piece. Then cut off the unclean end of the filament, heat the hotend completely again, and repeat the process until the pulled end of the filament comes out clean and you've restored good flow through the nozzle. Two or three coats should usually be enough.
NEEDLE METHOD
For this method you will need an acupuncture or hypodermic needle, so you can try to remove the blockage. You will obviously need a needle or thread small enough to fit into the nozzle hole, typically 0.4mm.
However, we do not recommend using a drill bit, as it breaks more easily than solid needles and, even worse, can permanently damage the nozzle if you are not careful.
Preheat the nozzle to the normal printing temperature for each material and start poking with the needle. Be careful not to burn yourself. The goal is to break up the clog so it slides through the nozzle. The next time you push the filament through the clog, the filament will slide through the nozzle along with the filament.
You may need to repeat the cycle a few times and manually push in some filament to see if you've managed to break the blockage enough. If this method doesn't work, try the cold extraction method.
|
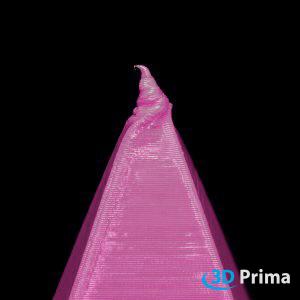
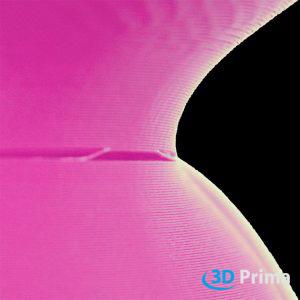
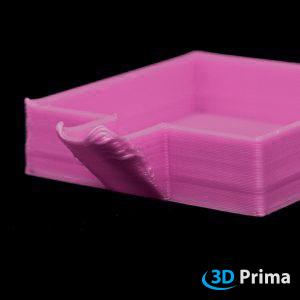 4. CURLED OR IRREGULAR CORNERS 4. CURLED OR IRREGULAR CORNERS
Small parts of the print have problems with protrusions. Strands or plastic castings hang from the object. This problem can also be called “Deformation at protrusions”. Appears if the part has not been cooled adequately and the extrusion temperature is too high.
ADJUST THE NOZZLE TEMPERATURE
Set the nozzle temperature 5-10°C lower and give the plastic time to cool. This way the hotend will not deform this layer and will be able to get to the next one without a hitch. For further advice, read the solutions for “Extrusion temperature too high”.
COOLING FAN
To avoid curling, a good thing is to increase the fan speed percentage. The plastic hardens more quickly, so the next layer does not deform before it has cooled.
|
 5. DEFORMATION 5. DEFORMATION
Deformation often occurs at the tip or thin ends. The main reason for this problem is a temperature that is too high for the chosen filament. Parts of the object appear overextruded. The entire print appears to have melted. If the temperature is too high, the plastic can stick to the inside wall of the nozzle and block it. You need a good balance of sufficient temperature, speed and cooling to get the plastic into the right shape.
ADJUST THE NOZZLE TEMPERATURE
Our print looks like melted chocolate. The layers are not well defined and partly can be heard above the other layer. In other cases, the plastic can also warp. Try lowering the nozzle temperature.
COOLING FAN
The temperature of the chosen filament is too high, but it is necessary to have it for this type of object. Try turning on the cooling fan and see if the problem is resolved.
ADJUST THE PRINT SPEED
If you print at a very slow speed, the plastic stays in the nozzle longer and degrades. The melt flow increases and too much plastic comes out of the printer nozzle. Try increasing the speed or lowering the temperature.
|
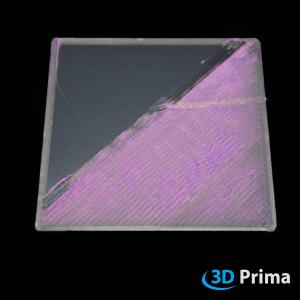
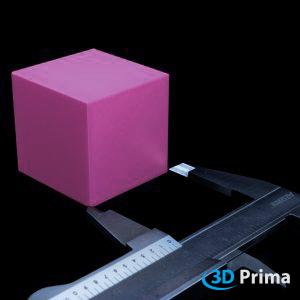 6. DIMENSIONAL ACCURACY 6. DIMENSIONAL ACCURACY
Dimensional accuracy is important if you want to build parts that must fit together perfectly. Polymer shrinkage also plays an important role in this part. To handle this issue, you can set the extrusion multiplier or extrusion width for a perfect result. Additionally, the height of the first layer or a constant dimensional error of the printer could be a problem.
ADJUST THE HEIGHT OF THE FIRST LAYER
For dimensional accuracy it is necessary to set the first layer correctly. Find out by editing in small steps. If it is set lower than the first layer should be, too much plastic will come out of the nozzle and this error will continue for the next 10-20 layers. The result will be oversized layers.
EXTRUSION MULTIPLIER
Regarding dimensional accuracy, the amount of extruded material is a limiting factor for success. Start with an extrusion multiplier of 1, and if too much plastic will be extruded, decrease it in 5% increments. It depends on the material used, the printer and the nozzle diameter, how easily the material flows.
MODIFY THE EXTRUSION WIDTH
A correct extrusion width is necessary for dimensional accuracy. If the extrusion is too large or too small, the entire part becomes larger or thinner than desired. To avoid this problem, try setting the extrusion width exactly the same as the nozzle diameter.
SCALE PART
To minimize the shrinking effect of a polymer, scale the part slightly. Previously, a part should be printed and measured.
HORIZONTAL DIMENSION COMPENSATION
This option can be used if the X and Y axis offset is not sized precisely. Accuracy can be tested with printed parts, which must be measured in X and Y dimensions. After adjusting the slicer settings.
|
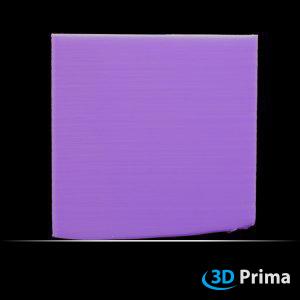
 7. ELEPHANT FOOT 7. ELEPHANT FOOT
The typical warped corner that has broken away from the plate is called “elephant's foot” or "warping".
ADJUST THE FIRST LAYER
You can use the slicer settings to increase the height or extrusion speed for the first layer only. Be careful, because the layer height also affects the adhesion on the print bed. Test with a 5% interval.
If the first layer height is too low or the extrusion speed is too high, the plastic will spread against the build bed and leak out of the gap between the nozzle and the build bed. The result is the typical arc coming out at the bottom of the print, close to the surface.
DESIGN A CHAMFER
You can use your construction program to add a chamfer to the edges at the bottom of your part. Keep in mind that the actual bottom of your part is not always placed on the build bed. Adjust the side of your part to place on the print bed.
To eliminate the elephant's foot this bevel should be quite small.
This solution is only for users who know how to build parts and create .stl files.
LEVELED PRINT PLATE
To level the print bed and set the nozzle height correctly, follow the instructions of your 3D printer.
To set the correct nozzle height or, more accurately, setting the correct zero position for the Z-axis helps reduce warping, eliminating elephant footing, but also helps extrude the right amount into the first layer. Most 3D printers cannot detect when the nozzle touches the print surface, they simply rely on a limit switch or separate sensor to probe the bed. In both cases, it is usually necessary to set the zero position manually. The exact procedure differs from printer to printer, but the general idea is usually the same:
make sure the nozzle is clean and, ideally, heated so that any boogers are blown off the paper.
Use a thin piece of paper for firmer beds (approximately 90g per m2 or 0.1mm thick) and a thicker paper for spring beds (approximately 300g per m2 or 0.25mm thick, for example a business card).
Adjust the sensor end stop or offset until you feel a slight resistance in the paper sliding when the printer is in the zero position for the Z axis. Most printers have a semi-automatic mode, in which the print head moves to several defined points on the printing surface and you need to manually set the nozzle height. If not, start in the center of the bed for a first rough adjustment, work around the bed and repeat for each adjustment point. Move the printhead as close to the adjusters as possible and adjust them until you get uniform resistance with the calibration cards on each.
|
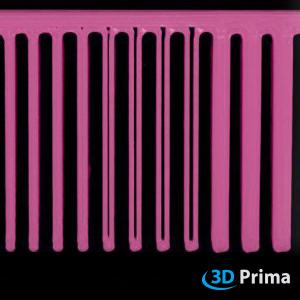
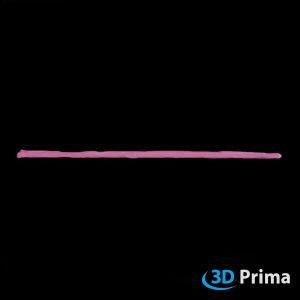
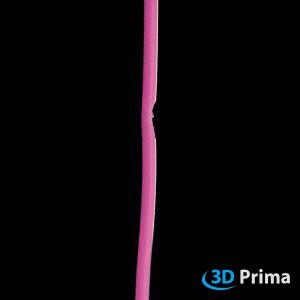 8. FILAMENT GRINDING 8. FILAMENT GRINDING
Filament grinding occurs when the filament can't move forward, the extruder is still spinning, and its sharp teeth grind enough plastic off the filament, so that there's nothing left for the gear teeth to grab onto. You will identify the piece of filament as you see in the image. Sometimes you can hear clicking noises from the extruder.
SLIDING EXTRUDER GEAR
All FDM 3D printers use a small drive gear that grabs the filament and presses it against a bearing or other drive gear. This drive gear has sharp teeth that allow it to grip the filament. If the filament is unable to move, the drive gear continues to spin and can grind away enough plastic from the filament so that there is nothing left for the gear teeth to grab onto.
If this happens on your printer, you will usually see a lot of small plastic shavings coming from the filament that have been shredded. You may also notice that the extruder motor is spinning, but the filament isn't being pushed into the hot end.
To fix this problem, you can try:
- increase the nozzle temperature by 5-10 degrees so that the plastic flows more easily.
- change the print speed, if the extruder tries to push the filament through the nozzle faster than the hot end can melt it. Reduce it by 30% to see if the problem is solved.
If the extruder slips, make sure the extruder drive gear is clean, because plastic fragments can fill the teeth of the drive gear. If this happens, the drive gear is more likely to slip again.
ADJUST THE NOZZLE TEMPERATURE
If you find that the extruder sometimes has difficulty pushing the filament through the hotend, perhaps it's because your nozzle is too cold, try increasing the temperature by 5-10 degrees so that the plastic flows more easily.
ADJUST THE PRINT SPEED
If you print too fast, the filament may fray. By reducing the print speed, the extruder motor will not need to spin as fast, as the filament is heated for a longer period. The slower rotation of the extruder motor can help avoid grinding problems. The same thing happens with the different axes, if the print speed is too high the motors have to accelerate and decelerate much faster, this can cause vibrations and ugly looking details. If you were printing at 3600 mm/min or 60 mm/s (the most common print speed), try reducing that value by 50% to 1800 mm/min or 30 mm/s to see if filament abrasion disappears or print quality increases. If not, the problem is most likely different. If this works, try increasing the print speed in small steps until you find the best balance between good quality and print speed.
ADJUST THE RETRACTMENT
Too powerful retraction settings can cause grinding of the filament. Try reducing the retraction speed by 50% and monitor if this affects filament grinding. If so, we have some tips:
Retraction speed
Retract speed is an important setting that affects printing. If you retract the filament too quickly, this may cause grinding of the filament or the filament may separate from the melted part. Otherwise, if it retracts too slowly, the nozzle may leak before it starts printing in the new position. For most printers, the retraction speed should be between 20-100 mm/s or 1200-6000 mm/min.
Test it by printing two cubes 40 mm apart from each other and increase the retraction speed in steps of 20 mm/s or 1200 mm/min and monitor the best performance.
Retraction distance
The distance defines how far the filament is pulled back from the nozzle. It depends on the printer what the best distance will be. Test it by printing two cubes 40 mm apart from each other and increase the retraction distance by 0.5 mm and monitor the best performance. For most printers, the retraction distance should be between 1 and 5 mm.
Retraction is the retreating of the filament during the printing process. When your 3D printer hotend moves to a new location (the extruder moves without extruding) strings may form as molten filament comes out of the nozzle. This can be improved by pulling the filament back the moment the hotend stops extruding.
Retraction settings are important for good results, so we recommend optimizing your retraction settings!
CHECK IF THE NOZZLE IS CLOGGED
There are two common methods to solve this problem:
COLD PULL
A cold draw works best with slippery, soft materials, such as nylon filament.
Once again, heat the hotend to the working temperature of the nylon or polyamide filament, push it through the hotend as far as possible, ideally, until the previous material is cleaned off, which will obviously be a little harsh if the nozzle is completely clogged. Then let the hotend cool down.
What we recommend is to set the hotend to 110, 120°C and keep pulling the filament while the hotend heats up until the filament comes out in one piece. Then cut off the unclean end of the filament, heat the hotend completely again, and repeat the process until the pulled end of the filament comes out clean and you've restored good flow through the nozzle. Two or three coats should usually be enough.
NEEDLE OR THREAD METHOD
For this method you will need an acupuncture or hypodermic needle, so you can try to remove the blockage. You will obviously need a needle or thread small enough to fit into the nozzle hole, typically 0.4mm.
However, we do not recommend using a drill bit, as it breaks more easily than solid needles and, even worse, can permanently damage the nozzle if you are not careful.
Preheat the nozzle to the normal printing temperature for each material and start poking with the needle. Be careful not to burn yourself. The goal is to break up the clog so it slides through the nozzle. The next time you push the filament through the clog, the filament will slide through the nozzle along with the filament.
You may need to repeat the cycle a few times and manually push in some filament to see if you've managed to break the blockage enough. If this method doesn't work, try the cold extraction method.
|
 9. ADHESION OF THE FIRST LAYER 9. ADHESION OF THE FIRST LAYER
Print not sticking to the bed is one of the most common and discussed problems in 3D printing. The first layer is very important for the entire print. All other layers will be placed on this layer. Good adhesion to the print bed is required, otherwise the print will lift off the print bed and must be stopped. There are many different things you can do to deal with this first layer adhesion problem.
USE AN ADHESIVE OR HEATED PRINT PLATE
There are many types on the market such as PrimaFix, glue sticks, other wipe-on or spray adhesives or printing surfaces such as PEI, Buildtak or even unheated Bluetape. It is important to set the correct heated bed temperature for each material and adhesive.
For PrimaFix we recommend the following settings:
-
PLA: first layer 210°C without heated printing surface.
-
ABS: first layer 235-245°C with 5 mm edge and heated bed 100-105°C.
-
PET-G: first layer at 225°C and a heated bed at 70-80°C.
ADJUST THE FIRST LAYER
If the distance from the nozzle to the print bed is not set correctly, you can adjust the height of the first layer to counterbalance it. As usual, a good first layer height is 70-90%. Consider that a nozzle too close to the surface will not extrude material and other problems such as "elephant's foot" will arise. When the nozzle is too far away, the result will be deformation.
LEVEL THE BUILD PLATE
To level the print bed and set the nozzle height correctly, follow the instructions of your 3D printer.
To set the correct nozzle height or, more accurately, setting the correct zero position for the Z-axis helps reduce warping, eliminating elephant footing, but also helps extrude the right amount into the first layer. Most 3D printers cannot detect when the nozzle touches the print surface, they simply rely on a limit switch or separate sensor to probe the bed. In both cases, it is usually necessary to set the zero position manually. The exact procedure differs from printer to printer, but the general idea is usually the same:
make sure the nozzle is clean and, ideally, heated so that any boogers are blown off the paper.
Use a thin piece of paper for firmer beds (approximately 90g per m2 or 0.1mm thick) and a thicker paper for spring beds (approximately 300g per m2 or 0.25mm thick, for example a business card).
Adjust the sensor end stop or offset until you feel a slight resistance in the paper sliding when the printer is in the zero position for the Z axis. Most printers have a semi-automatic mode, in which the print head moves to several defined points on the printing surface and you need to manually set the nozzle height. If not, start in the center of the bed for a first rough adjustment, work around the bed and repeat for each adjustment point. Move the printhead as close to the adjusters as possible and adjust them until you get uniform resistance with the calibration cards on each.
USE A BRIM
A brim (brim) is a printed structure that is attached to the print and increases the surface area of the part to stabilize it or increase adhesion. The brims (brim) usually have 10-15 contours and can be 1-2 layers high.
|
 10. SPACES BETWEEN FILLING AND OUTLINE 10. SPACES BETWEEN FILLING AND OUTLINE
Each of your prints is made up of several layers which in turn consist of perimeters (the outlines of the print) and fill. If you notice small gaps between the perimeters (outline of the print) and the fill, there are two things you may want to check.
ADJUST THE PRINT SPEED
If you print too quickly, it may cause shifting levels or poor print quality. At high printing speeds, it may happen that the belts slip on the sprocket/drive pulleys and the tool head/hotend loses the correct position.
You can adjust the printing speed as below.
If you were printing at 3600 mm/min or 60 mm/s (the most common print speed), try reducing that value by 50% to 1800 mm/min or 30 mm/s to see if filament abrasion disappears or print quality increases. If not, the problem is most likely different. If this works, try increasing the print speed in small steps until you find the best balance between good quality and print speed.
FILL/CONTOUR OVERLAP
To prevent printing of failed overhangs or to reduce the support structure, you can also reduce the layer height in the slicing software.
|
 11. GAPS IN THIN WALLS 11. GAPS IN THIN WALLS
When printing an object with a nozzle, which is only a few times smaller than the thickest wall, it may happen that the slicer leaves a gap in the center. For example: the wall is 1.5mm and you will print with an extrusion width of 0.6mm, you need to increase some slicing settings for a solid print without gaps. For this reason, adjust the thin wall behavior and/or extrusion width in your slicer.
REGULATES THE BEHAVIOR OF THE THIN WALL
Gaps may occur in the slicing process if the wall diameter cannot be divided exactly across the nozzle diameter. To avoid gaps in thin walls, choose thin wall settings. If your slicer doesn't have this option, vary the width of the extrusion and the diameter of the inside and outside perimeters.
MODIFY THE EXTRUSION WIDTH
Gaps may occur in the slicing process if the wall diameter cannot be divided by the nozzle diameter. The one row that no longer fits will be lost. Set the extrusion width so that it can be divided precisely.
|
 12. GHOSTING 12. GHOSTING
Can you see the fill of your print on the outside on the perimeters? In this case the fill and perimeters overlap and you can see it on the outside of the shell. The wall thickness may be too low for the nozzle size.
INCREASE THE PERIMETER
Ghosting occurs when the shell of our print, the perimeters, are too thin and the fill, which has too much overlap with the perimeters, becomes visible. To avoid this problem, allow the slicer to create additional perimeters.
DECREASE THE OVERLAPS OF THE CONTOURS
Do you want a good bond between the fill and the perimeters, but have you gone too far and the fill is visible on the outside? Simply reduce the outline overlap to 15-25% and see if you can "keep the ghost in".
|
 13. INCOHERENT EXTRUSION 13. INCOHERENT EXTRUSION
Good results in 3D printing are combined with a very substantial amount of extruded plastic. This problem is mostly visible on the thin lines of the print and will affect the final print quality. Looking closely at the printer as it prints is the best way to detect an irregular extrusion, which varies in size. Inconsistent extrusion can be affected by many causes, including a clogged nozzle, very low layer height, incorrect extrusion width, poor filament quality, blocked or tangled filament, and mechanical problems with the extruder.
ADJUST THE HEIGHT OF THE LEVEL
If your printer cannot run a very low layer height, this could be a source of error. If so, set the layer height higher and check if the problem is resolved now. As a general rule, consider 75% of the nozzle diameter as the maximum layer height.
MODIFY THE EXTRUSION WIDTH
One possibility of inconsistent extrusion is incorrect extrusion width. Try fixing the problem by changing the extrusion width. As a general rule, the extrusion width should be between 100 and 150% of the nozzle diameter. If the extrusion width is smaller than the nozzle diameter, a coherent flow of filament would not be possible.
COLD EXTRACTION METHOD
A cold draw works best with slippery, soft materials, such as nylon filament.
Once again, heat the hotend to the working temperature of the nylon or polyamide filament, push it through the hotend as far as possible, ideally, until the previous material is cleaned off, which will obviously be a little harsh if the nozzle is completely clogged. Then let the hotend cool down.
What we recommend is to set the hotend to 110, 120°C and keep pulling the filament while the hotend heats up until the filament comes out in one piece. Then cut off the unclean end of the filament, heat the hotend completely again, and repeat the process until the pulled end of the filament comes out clean and you've restored good flow through the nozzle. Two or three coats should usually be enough.
NEEDLE OR THREAD METHOD
For this method you will need an acupuncture or hypodermic needle, so you can try to remove the blockage. You will obviously need a needle or thread small enough to fit into the nozzle hole, typically 0.4mm.
However, we do not recommend using a drill bit, as it breaks more easily than solid needles and, even worse, can permanently damage the nozzle if you are not careful.
Preheat the nozzle to the normal printing temperature for each material and start poking with the needle. Be careful not to burn yourself. The goal is to break up the clog so it slides through the nozzle. The next time you push the filament through the clog, the filament will slide through the nozzle along with the filament.
You may need to repeat the cycle a few times and manually push in some filament to see if you've managed to break the blockage enough. If this method doesn't work, try the cold extraction method.
SLIDING EXTRUDER GEAR
All FDM 3D printers use a small drive gear that grabs the filament and presses it against a bearing or other drive gear. This drive gear has sharp teeth that allow it to grip the filament. If the filament is unable to move, the drive gear continues to spin and can grind away enough plastic from the filament so that there is nothing left for the gear teeth to grab onto.
If this happens on your printer, you will usually see a lot of small plastic shavings coming from the filament that have been shredded. You may also notice that the extruder motor is spinning, but the filament isn't being pushed into the hot end.
To fix this problem, you can try:
- increase the nozzle temperature by 5-10 degrees so that the plastic flows more easily.
- to change the print speed, if the extruder tries to push the filament through the nozzle faster than the hot end can melt it. Reduce it by 30% to see if the problem is solved.
If the extruder slips, make sure the extruder drive gear is clean, because plastic fragments can fill the teeth of the drive gear. If this happens, the drive gear is more likely to slip again.
|
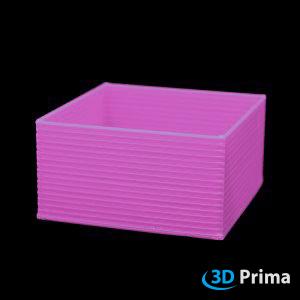
 14. SEPARATION OF LAYERS 14. SEPARATION OF LAYERS
If the layers do not bond/fuse together and the individual layers deform within the part, this is called layer separation.
ADJUST THE NOZZLE TEMPERATURE
The adhesion between layers can be increased with a higher printing temperature. However, if you find that the extruder sometimes has difficulty pushing the filament through the hotend, perhaps it's because the nozzle is too cold. Try increasing the temperature 5-10 degrees so the plastic flows more easily.
ADJUST THE HEIGHT OF THE LEVEL
If you're having trouble separating layers, one of the first settings you need to check is the layer height. The height of the layer depends on the size of the nozzle you are using. Most printers have a nozzle diameter between 0.3 and 0.5 millimeters. As a general formula for maximum layer height, you can take 75% of your nozzle diameter – for example: for a 0.4mm nozzle, set the layer height to 0.3mm.
PARTIAL COOLING FAN
Sometimes disabling or slowing down the parts cooling fan might be a solution for separated layers. But it depends on the material you are using. For PC, SEMIFLEX and ABS we recommend disabling the parts cooling fan, for PLA, PET-G and other materials try other solutions.
DRY THE FILAMENT (PA12)
PA12 / Nylon is a hydrophilic material, for this reason it is necessary to dry it before printing. ABS is not as hydrophilic as PA12, so storing it in an airtight container or bag after printing should be sufficient. As a general rule, 100 g of PA12 should be dried in an air-circulating oven at 70-90°C for approximately 3-4 hours.
|
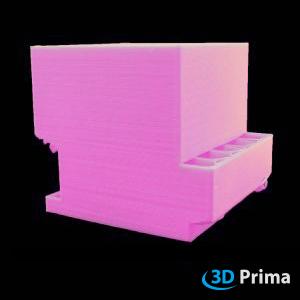 15. LEVEL SHIFT OR LEVEL MISALIGNMENT 15. LEVEL SHIFT OR LEVEL MISALIGNMENT
If you identify a “stepped” effect in your print, this is called layer shift or layer misalignment. The most common 3D printers do not have a feedback system on the actual position of the tool head/hotend. If an impact occurs during printing or a motor loses steps, the printer cannot detect it and will continue printing with an incorrect position. The following solutions are a good way to fix this problem, but it can also be caused by the warping of the top layers.
ADJUST THE PRINT SPEED
If you print too quickly, it may cause shifting levels or poor print quality. At high printing speeds, it may happen that the belts slip on the sprocket/drive pulleys and the tool head/hotend loses the correct position.
You can adjust the printing speed as in the following pictures.
If you were printing at 3600 mm/min or 60 mm/s (the most common print speed), try reducing that value by 50% to 1800 mm/min or 30 mm/s to see if filament abrasion disappears or print quality increases. If not, the problem is most likely different. If this works, try increasing the print speed in small steps until you find the best balance between good quality and print speed.
ADJUST THE BELT TENSION
Many printers use belts to transmit the force of the motors. These rubber straps lose strength over time.
If the tension is too low, the belts will slip on the sprocket/drive pulleys and the tool head will lose the correct position.
• Check if all straps have the same tension by pinching them together.
• Adjust the belt resistance as described in the printer manual. Some printers like the Prusa i3 come with screws to reinforce the straps. Be careful about over-reinforcing the belts, this could cause other problems, such as a motor that won't move.
If you are unsure about the strength of your printer's belt, read your printer's manual or contact the manufacturer.
• If your printer belts are too old and worn, keep in mind that you may want to change them as a last option.
CHECK THE AUCTIONS
Turn off the printer and try moving the printer tool head along the entire length of the X and Y axes. If you feel increased resistance in some places, clean the rods and lubricate them as described in the printer manual.
Do not use oil or grease to smear each bearing! It depends on the bearing materials (e.g. metal/metal, metal/plastic, different plastics) which lubricant is best.
If lubricating the rods doesn't help and you still feel resistance in some places, the rods may be bent. Check if your rods are aligned. If they are in place and you still feel resistance, you can remove the rods and roll them on a flat surface. If they wobble, your rods are bent and would be best to replace them.
CHECK YOUR BUILD PLATE
There are many different printing beds available on the market with different mounting systems. We can't cover all the different systems, just make sure your print bed doesn't move while printing. Perhaps the clips or even screws have become loose over time and you need to repair or replace them.
STABILIZE THE 3D PRINTER
Make sure the printer has a stable, flat surface to stand on and check for any sources of impact nearby. Even small external influences such as knocks can have an effect on your print. If you have multiple printers, put them on different tables, sometimes they might affect each other.
|
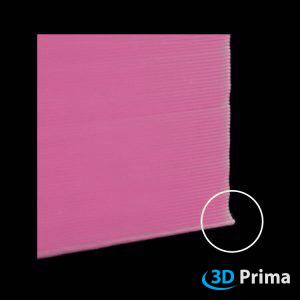
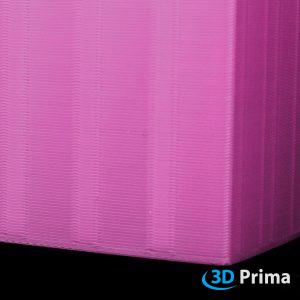
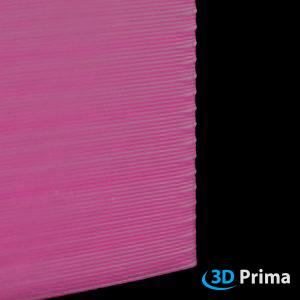
 16. LINES ON THE SIDES OF THE PRINT 16. LINES ON THE SIDES OF THE PRINT
The goal of every print is for the surface to be smooth layer after layer. If one of the layers goes wrong, it is clearly visible on the outside of the object. For example: one layer in ten is wider than the others.
The constant diameter of the filament plays an important role and an exact positioning of the axis could lead to the formation of lines on the surface (e.g.: z-wobbeling). A poorly adjusted PID controller could be another reason why these lines appear. In this case the nozzle heating is inconsistent.
ADJUST THE BELT TENSION
Many printers use belts to transmit the force of the motors. These rubber straps lose strength over time. If the tension is too low, the belts will slip on the sprocket/drive pulleys and the tool head will lose the correct position.
- Check if all straps have the same tension by pinching them together.
-
Adjust the belt resistance as described in your printer manual. Some printers like the Prusa i3 come with screws to reinforce the straps. Be careful about over-reinforcing the belts, this could cause other problems, such as a motor that won't move.
If you are unsure about the strength of your printer's belt, read your printer's manual or contact the manufacturer.
- If your printer belts are quiet, too worn and old, keep in mind that perhaps you should change them as a last option.
CHECK THE AUCTIONS
Turn off the printer and try moving the printer tool head along the entire length of the X and Y axes. If you feel increased resistance in some places, clean the rods and lubricate them as described in your printer manual.
Do not use oil or grease to smear each bearing! It depends on the bearing materials (e.g. metal/metal, metal/plastic, different plastics) which lubricant is best.
If lubricating the rods doesn't help and you still feel resistance in some places, the rods may be bent. Check if your rods are aligned. If they are in place and you still feel resistance, you can remove the rods and roll them on a flat surface. If they wobble, it means your rods are bent and would be best to replace them.
CHECK THE Z AXIS
Check if the rods and chuck are aligned and in the correct position. Are the bearings and joints ok? Do they have any smudges ? If so, try repairing or replacing them. We recommend doing a visual inspection first, then lubricating the rods and spindle as described in your printer manual.
Do not use oil or grease to smear each bearing! It depends on the bearing materials (e.g. metal/metal, metal/plastic, different plastics) which lubricant is best.
The next step will be to remove the Z-axis parts and roll them on a clean, flat surface to see if they wobble. If they wobble, they are bent and would be best to replace them.
OPTIMIZE THE PID CONTROLLER
As is often the case, getting the best results in terms of overhangs requires a combination of print speed and nozzle temperature settings. We can't give you a general solution, because different materials, printers and cooling fans of the parts greatly influence the overhang result.
We recommend printing overhang tests to optimize your settings and to find out what overhang angles are possible.
|
 17. DISORDERED BRIDGES 17. DISORDERED BRIDGES
Plastic is extruded through a gap from one point to another. When the bridges are messy, the plastic strings sag. The plastic should be cooled very quickly on a blank for a solid intermediate connection. For optimal performance, good calibration is required in the connection and cooling settings. If the road is too far for bridges, use supports.
ADJUST THE BRIDGE SETTING
Bridges are difficult for the 3D printer to make. Most slicing programs have settings for bridging. Plastic shrinks as it cools. This is an advantage in the bridge, because the strings rise and form a flat surface. Try a lower extrusion multiplier and lower speed multiplier for better bridging behavior. More plastic would induce a sagged string. The next layer would hang from a bad bridge.
ADD SUPPORT STRUCTURE
An easy way to achieve better results is support structures. We can't recommend what the best settings are, because they change when you change the layer height or material. We recommend starting with the standard settings in your slicer program, if you need to change them, try the "you learn from mistakes" method. Keep in mind that support material requires additional printing time, and sometimes optimizing model placement is another solution.
COOLING FAN
For rapid cooling, set the fan to a high percentage, so that the plastic hardens before sagging. Special overdrive settings are available for bridging, where the fan can be turned up.
|
 18. MISSING LAYERS 18. MISSING LAYERS
A typical clue to this problem is the gaps between the layers. This can be caused by partial underextrusion or partial or completely skipped layers.
ADJUST THE NOZZLE TEMPERATURE
If you find that the extruder sometimes has difficulty pushing the filament through the hotend, perhaps it's because the nozzle is too cold, try increasing the temperature by 5-10 degrees so that the plastic flows more easily.
SLIDING EXTRUDER GEAR
All FDM 3D printers use a small drive gear that grabs the filament and presses it against a bearing or other drive gear. This drive gear has sharp teeth that allow it to grip the filament. If the filament is unable to move, the drive gear continues to spin and can grind away enough plastic from the filament so that there is nothing left for the gear teeth to grab onto.
If this happens on your printer, you will usually see a lot of small plastic shavings coming from the filament that have been shredded. You may also notice that the extruder motor is spinning, but the filament isn't being pushed into the hot end.
To fix this problem, you can try:
- increase the nozzle temperature by 5-10 degrees so that the plastic flows more easily.
- to change the print speed, if the extruder tries to push the filament through the nozzle faster than the hot end can melt it. Reduce it by 30% to see if the problem is solved.
If the extruder slips, make sure the extruder drive gear is clean, because plastic fragments can fill the teeth of the drive gear. If this happens, the drive gear is more likely to slip again.
FILAMENT DIAMETER SETTINGS
The most common filament diameters are 1.75 mm and 2.85 mm, but many others exist. T hese measurements have different tolerances which can vary from 0.01 mm to 0.1 mm.
So, make sure to measure your filament with a caliper on 4-5 points in the first few meters and calculate the average diameter, before using it. (The sum of the measurements divided by my number of measurements)
Use the calculated result to set the filament diameter or extrusion multiplier to the correct value.
The most common method is to set the filament diameter to the standard size (1.75mm, 2.85mm etc.) and change the amount of material extruded on the extrusion multiplier.
(Attention: the extrusion multiplier is the percentage of extrusion for the specific diameter.)
REPAIR THE PRINT FILE
You may need to repair your print file if you find missing layers in your object. They can be caused by a damaged or incomplete file. There are a few options in your slicing program that you can choose to repair these problems.
|
 19. DOES NOT EXTRUDE AT THE START OF PRINTING 19. DOES NOT EXTRUDE AT THE START OF PRINTING
This problem is probably the most common for every 3D printing beginner, but it's also very easy to fix! If the nozzle does not extrude the plastic at the first layer, this can have a few possible causes.
ADJUST THE NOZZLE TEMPERATURE
As is often the case, getting the best results in terms of overhangs requires a combination of print speed and nozzle temperature settings. We can't give you a general solution, because different materials, printers and cooling fans of the parts greatly influence the overhang result.
We recommend printing overhang tests to optimize your settings and to find out what overhang angles are possible.
COLD PULL
Cold pulling works best with soft, slippery materials, such as nylon filament.
Once again, heat the hotend to the working temperature of the nylon or polyamide filament, push it through the hotend as far as possible, ideally, until the previous material is cleaned off, which will obviously be a little harsh if the nozzle is completely clogged. Then let the hotend cool down.
What we recommend is to set the hotend to 110, 120°C and keep pulling the filament while the hotend heats up until the filament comes out in one piece. Then cut off the unclean end of the filament, heat the hotend completely again, and repeat the process until the pulled end of the filament comes out clean and you've restored good flow through the nozzle. Two or three coats should usually be enough.
FIRST EXTRUDER
Many hotends have the problem of leaking plastic when idle at high temperatures, which creates a gap inside the nozzle where the plastic has leaked. This leakage occurs most of the time at the beginning of a print when you are preheating the hotend. If your hotend has lost some plastic due to liquid leakage, the next time you try to extrude, it will likely take a few seconds before plastic starts to leak out of the nozzle again. If you are starting a print after the nozzle has started to pop out, you may notice the same delay in extrusion.
To fix this, make sure to charge the hotend right before you start printing so that the nozzle is filled with plastic and ready to extrude.
The most common way to solve this problem is to use a skirt, which is two or more lines of filament that are usually a few millimeters away from the print to ensure a constant flow of material.
NEEDLE METHOD
For this method you will need an acupuncture or hypodermic needle, so you can try to remove the blockage. You will obviously need a needle or thread small enough to fit into the nozzle hole, typically 0.4mm.
However, we do not recommend using a drill bit, as it breaks more easily than solid needles and, even worse, can permanently damage the nozzle if you are not careful.
Preheat the nozzle to the normal printing temperature for each material and start poking with the needle. Be careful not to burn yourself. The goal is to break up the clog so it slides through the nozzle. The next time you push the filament through the clog, the filament will slide through the nozzle along with the filament.
You may need to repeat the cycle a few times and manually push in some filament to see if you've managed to break the blockage enough. If this method doesn't work, try the cold extraction method.
LEVEL BUILD PLATE
To level the print bed and set the nozzle height correctly, follow the instructions of your 3D printer.
To set the correct nozzle height or, more accurately, setting the correct zero position for the Z-axis helps reduce warping, eliminating elephant footing, but also helps extrude the right amount into the first layer. Most 3D printers cannot detect when the nozzle touches the print surface, they simply rely on a limit switch or separate sensor to probe the bed. In both cases, it is usually necessary to set the zero position manually. The exact procedure differs from printer to printer, but the general idea is usually the same:
make sure the nozzle is clean and, ideally, heated so that any boogers are blown off the paper.
Use a thin piece of paper for firmer beds (approximately 90g per m2 or 0.1mm thick) and a thicker paper for spring beds (approximately 300g per m2 or 0.25mm thick, for example a business card).
Adjust the sensor end stop or offset until you feel a slight resistance in the paper sliding when the printer is in the zero position for the Z axis. Most printers have a semi-automatic mode, in which the print head moves to several defined points on the printing surface and you need to manually set the nozzle height. If not, start in the center of the bed for a first rough adjustment, work around the bed and repeat for each adjustment point. Move the printhead as close to the adjusters as possible and adjust them until you get uniform resistance with the calibration cards on each.
|
 20. OVEREXTRUSION 20. OVEREXTRUSION
Is your 3D printer extruding more filament than necessary? Are you seeing overhanging layers on the surface of your print? This is called extrusion.
It happens when the software and printer are not configured: the software does not provide the right input for the right amount of extrusion of your FDM printer.
FILAMENT DIAMETER/EXTRUSION MULTIPLIER
If you detect overextrusion during your print, you can manage this problem by decreasing the extrusion multiplier (also sometimes called “flow rate”). Each printer and each extruder has its own specific and perfect settings.
Try decreasing the extrusion multiplier in your software in 5% increments. If the multiplier is set to 1, try 0.95 then 0.9, …
|
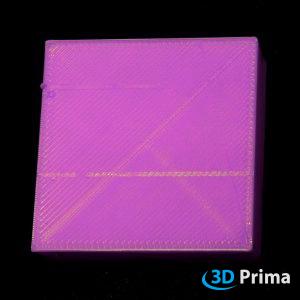
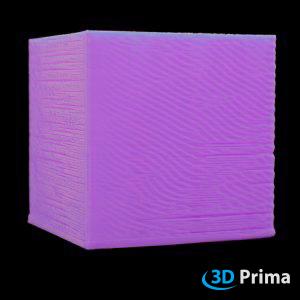
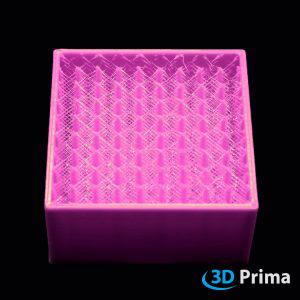
 21. PADDING / TOP LAYER INCOMPLETE 21. PADDING / TOP LAYER INCOMPLETE
If you notice a defective top layer with warping or holes and gaps, this is called cushion. The main problem is that the top layer does not overlap the outline or fill. In most cases it is caused by underfill, high print speed, or inadequate cooling.
FILL/CONTOUR OVERLAP
Most Slicer programs allow you to adjust the overlap between the perimeter (outlines) and the fill. Overlap is usually measured as a percentage of how much the fill overlaps the outline perimeters. One of the most common overlap percentages is 15%. If it's too low, try increasing it to 20% or 30%.
COOLING FAN
If you are printing low viscosity materials or printing at high temperatures, protrusions between the infill could also cause a problem. To minimize this problem, the material must cool quickly enough after printing. If your printer has a partial cooling fan, you should turn it on or increase the fan speed. Also check if the fan and ventilation slot are in the correct position (check that the air is cooling your part and not going anywhere). Some materials have extremely low viscosity at printing temperatures and that is why you need to print them with high print speeds and part cooling fan.
INCREASE THE FILLING DENSITY
In most cases of padding or incomplete top layer, the filling density is too low. 10-25% are typical fill density values. As always, it depends on your material and print settings, so experiment with the Test Cube for best results.
INCREASE THE NUMBER OF TOP LAYERS
Typically, you set 3-6 layers higher, depending on your fill density and print settings. If you have padding issues, try increasing the number of top layers.
|
 22. SCARS ON THE SURFACE 22. SCARS ON THE SURFACE
An object is printed layer by layer. To start a new layer or move to a new location, the nozzle must move over the top of a previous printed layer. This leaves visible marks on the top solid layers of the print. To resolve this issue, check the following steps
EXTRUSION MULTIPLIER
If too much plastic is extruded, each layer becomes thicker than it should be. Changing the nozzle position will cause scarring on the last printed layer. To avoid scarring on the top layer of the print, set the extrusion multiplier.
VERTICAL LIFTING (Z-HOP)
One way to avoid scarring on the top layers of the print is to lift the nozzle when changing positions. This option allows you to travel with the nozzle in an elevated state from one point of the object to another without scratching the previous printed layer.
|
 23. SMALL ELEMENTS DO NOT PRINT 23. SMALL ELEMENTS DO NOT PRINT
When printing small items, it is helpful to print with a small nozzle to ensure fine detail. A wall smaller than the nozzle diameter may not appear in the slicing program and therefore not print. To print in great detail, adjust your hardware and software.
ALLOW SINGLE EXTRUSION WALL
This option is for very thin parts with a diameter smaller than that of the nozzle. By avoiding this option you cannot print small parts because the nozzle has a wider extrusion width. This feature is only available in Simlify3D and can be found in "Edit Process Settings" by changing the "External Thin Wall Type". The print will not become more detailed but it ensures that every small piece of an object will be detected by the slicer and printed.
INSTALL A THINNER NOZZLE
If parts of the print are thinner than the nozzle, they may not be printed in the right size or not very precisely. Installing a thinner nozzle can solve this problem.
|
 24. STOPS EXTRUSION IN THE MIDDLE OF A PRINT 24. STOPS EXTRUSION IN THE MIDDLE OF A PRINT
Does your printer no longer extrude when printing? Is it necessary to stop printing? This problem can be caused by several separate causes.
CHECK IF THE NOZZLE IS CLOGGED
There are two common methods to solve this problem:
COLD PULL
A cold draw works best with slippery, soft materials, such as nylon filament.
Once again, heat the hotend to the working temperature of the nylon or polyamide filament, push it through the hotend as far as possible, ideally, until the previous material is cleaned off, which will obviously be a little harsh if the nozzle is completely clogged. Then let the hotend cool down.
What we recommend is to set the hotend to 110, 120°C and keep pulling the filament while the hotend heats up until the filament comes out in one piece. Then cut off the unclean end of the filament, heat the hotend completely again, and repeat the process until the pulled end of the filament comes out clean and you've restored good flow through the nozzle. Two or three coats should usually be enough.
NEEDLE OR THREAD METHOD
For this method you will need an acupuncture or hypodermic needle, so you can try to remove the blockage. You will obviously need a needle or thread small enough to fit into the nozzle hole, typically 0.4mm.
However, we do not recommend using a drill bit, as it breaks more easily than solid needles and, even worse, can permanently damage the nozzle if you are not careful.
Preheat the nozzle to the normal printing temperature for each material and start poking with the needle. Be careful not to burn yourself. The goal is to break up the clog so it slides through the nozzle. The next time you push the filament through the clog, the filament will slide through the nozzle along with the filament.
You may need to repeat the cycle a few times and manually push in some filament to see if you've managed to break the blockage enough. If this method doesn't work, try the cold extraction method.
FILAMENT OUT
Before you start printing, you should always check if you still have enough filament on the spool.
EXTRUDER GEAR SLIDING
All FDM 3D printers use a small drive gear that grabs the filament and presses it against a bearing or other drive gear. This drive gear has sharp teeth that allow it to grip the filament. If the filament is unable to move, the drive gear continues to spin and can grind away enough plastic from the filament so that there is nothing left for the gear teeth to grab onto.
If this happens on your printer, you will usually see a lot of small plastic shavings coming from the filament that have been shredded. You may also notice that the extruder motor is spinning, but the filament isn't being pushed into the hot end.
To fix this problem, you can try:
- increase the nozzle temperature by 5-10 degrees so that the plastic flows more easily.
- to change the print speed, if the extruder tries to push the filament through the nozzle faster than the hot end can melt it. Reduce it by 30% to see if the problem is solved.
If the extruder slips, make sure the extruder drive gear is clean, because plastic fragments can fill the teeth of the drive gear. If this happens, the drive gear is more likely to slip again.
|
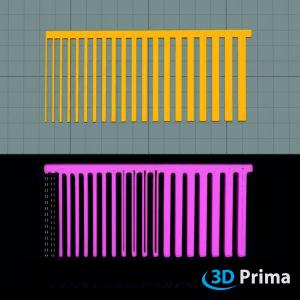
 25. STRINGING AND OOZING 25. STRINGING AND OOZING
Hairy print? If there are hairy plastic strands on the print, which typically occurs between two parts, it is called stringing. Other terms for this problem are oozing, furry footprints, or whiskers. When the nozzle moves to another position, it may happen that the fluid filament comes out of the nozzle and produces the strings. In this case, check if retraction is enabled, because in many cases you can solve this problem by optimizing the retraction settings. You can use a good performance model of positive characteristics, such as the one from "make" magazine. Download link: http://www.thingiverse.com/thing:533472/#files
ADJUST THE NOZZLE TEMPERATURE
As is often the case, a combination of retraction and nozzle temperature settings is needed to achieve the best results and reduce stringing. If the nozzle temperature is too high, the molten filament is so liquid (has a low viscosity) that the nozzle will leak while moving to the next position. If the nozzle temperature is too low, you may have problems with filament extrusion. For best results, try to minimize the temperature by 5-10 degrees so that the plastic no longer bleeds.
ADJUST THE RETRACTION
Retraction is the retreating of the filament during the printing process. When your 3D printer hotend moves to a new location (the extruder moves without extruding) strings may form as molten filament comes out of the nozzle. This can be improved by pulling the filament back the moment the hotend stops extruding.
First, make sure you have retraction enabled. The second step will be to optimize the retraction settings, such as retraction: distance and speed.
RETRACTION DISTANCE
The distance defines how far the filament is pulled back from the nozzle. It depends on the printer what the best distance will be. Test it by printing two cubes 40 mm apart from each other and increase the retraction distance by 0.5 mm and monitor the best performance. For most printers, the retraction distance should be between 1 and 5 mm.
RETRACTMENT SPEED
Retraction speed is also an important setting that affects printing. If you retract the filament too quickly, the filament may separate from the melted part. Otherwise, if it retracts too slowly, the nozzle may leak before it starts printing in the new position. For most printers, the retraction speed should be between 20-100 mm/s or 1200-6000 mm/min.
Test it by printing two cubes 40 mm apart from each other and increase the retraction speed in steps of 20 mm/s or 1200 mm/min and monitor the best performance.
AVOID CROSSING THE PARAMETERS
There are some slicers on the market, which have special functions to prevent your hotend from crossing gaps when you move from one place to another.
|
 26. UNDER EXTRUSION 26. UNDER EXTRUSION
Underextrusion can have different causes. A clogged nozzle, a slipping extruder gear, incorrect filament diameter/extrusion multiplier settings in the slicer program.
COLD PULL
A cold draw works best with slippery, soft materials, such as nylon filament.
Once again, heat the hotend to the working temperature of the nylon or polyamide filament, push it through the hotend as far as possible, ideally, until the previous material is cleaned off, which will obviously be a little harsh if the nozzle is completely clogged. Then let the hotend cool down.
What we recommend is to set the hotend to 110, 120°C and keep pulling the filament while the hotend heats up until the filament comes out in one piece. Then cut off the unclean end of the filament, heat the hotend completely again, and repeat the process until the pulled end of the filament comes out clean and you've restored good flow through the nozzle. Two or three coats should usually be enough.
FILAMENT DIAMETER
The most common filament diameters are 1.75 mm and 2.85 mm but there are many others. But these measurements have different tolerances which can vary from 0.01mm to 0.1mm.
So, make sure to measure your filament with a caliper on 4-5 points in the first few meters and calculate the average diameter, before using it. (The sum of the measurements divided my number of measurements)
Use the calculated result to set the filament diameter or extrusion multiplier to the correct value.
The most common method is to set the filament diameter to the standard size (1.75mm, 2.85mm etc.) and change the amount of material extruded on the extrusion multiplier.
(Attention: the extrusion multiplier is the percentage of extrusion for the specific diameter.)
NEEDLE METHOD
For this method you will need an acupuncture or hypodermic needle, so you can try to remove the blockage. You will obviously need a needle or thread small enough to fit into the nozzle hole, typically 0.4mm.
However, we do not recommend using a drill bit, as it breaks more easily than solid needles and, even worse, can permanently damage the nozzle if you are not careful.
Preheat the nozzle to the normal printing temperature for each material and start poking with the needle. Be careful not to burn yourself. The goal is to break up the clog so it slides through the nozzle. The next time you push the filament through the clog, the filament will slide through the nozzle along with the filament.
You may need to repeat the cycle a few times and manually push in some filament to see if you've managed to break the blockage enough. If this method doesn't work, try the cold extraction method.
EXTRUDER GEAR SLIDING
All FDM 3D printers use a small drive gear that grabs the filament and presses it against a bearing or other drive gear. This drive gear has sharp teeth that allow it to grip the filament. If the filament is unable to move, the drive gear continues to spin and can grind away enough plastic from the filament so that there is nothing left for the gear teeth to grab onto.
If this happens on your printer, you will usually see a lot of small plastic shavings coming from the filament that have been shredded. You may also notice that the extruder motor is spinning, but the filament isn't being pushed into the hot end.
To fix this problem, you can try:
- increase the nozzle temperature by 5-10 degrees so that the plastic flows more easily.
- to change the print speed, if the extruder tries to push the filament through the nozzle faster than the hot end can melt it. Reduce it by 30% to see if the problem is solved.
If the extruder slips, make sure the extruder drive gear is clean, because plastic fragments can fill the teeth of the drive gear. If this happens, the drive gear is more likely to slip again.
|
 27. DEFORMATION 27. DEFORMATION
3D prints shrink due to its thermal properties when cooling. This subjects the print to considerable stress and, in the event of incorrect adhesion to the print bed, it can partially or completely detach from it. There are many things you can do about warping.
USE A SELF-ADHESIVE ADHESIVE AND/OR BUILD PLATE
There are many types on the market such as PrimaFix, glue sticks, other wipe-on or spray adhesives or printing surfaces such as PEI, Buildtak or even unheated Bluetape.
It is important to set the correct heated bed temperature for each material and adhesive.
For PrimaFix we recommend the following settings:
- PLA: first layer 210°C without heated printing surface
- ABS: first layer 235-245°C with 5 mm edge and heated bed 100-105°C.
- PET-G: first layer at 225°C (437° Fahrenheit) and a heated bed at 70-80°C.
ADJUST THE FIRST LAYER
You can also use the slicer settings to increase the width and height of the extrusion for the first layer only - this results in pumping out proportionately more material, which not only spreads the plastic against the bed more extensively, but makes also the first layer is more resistant to atmospheric agents. small adjustment errors – so it is not necessary to have the bed perfectly flat and without irregularities up to the last 10 µm. Usually take 120-140% of the layer height for the first layer.
USE A BRIM
A border is a printed structure that is attached to the print and increases the surface area of the part to stabilize it or increase adhesion. Flaps usually have 10-15 contours and can be 1-2 layers high.
LEVEL THE PRINT PLATE
To level the print bed and set the nozzle height correctly, follow the instructions of your 3D printer.
To set the correct nozzle height or, more accurately, setting the correct zero position for the Z-axis helps reduce warping, eliminating elephant footing, but also helps extrude the right amount into the first layer. Most 3D printers cannot detect when the nozzle touches the print surface, they simply rely on a limit switch or separate sensor to probe the bed. In both cases, it is usually necessary to set the zero position manually. The exact procedure differs from printer to printer, but the general idea is usually the same:
make sure the nozzle is clean and, ideally, heated so that any boogers are blown off the paper.
Use a thin piece of paper for firmer beds (approximately 90g per m2 or 0.1mm thick) and a thicker paper for spring beds (approximately 300g per m2 or 0.25mm thick, for example a business card).
Adjust the sensor end stop or offset until you feel a slight resistance in the paper sliding when the printer is in the zero position for the Z axis. Most printers have a semi-automatic mode, in which the print head moves to several defined points on the printing surface and you need to manually set the nozzle height. If not, start in the center of the bed for a first rough adjustment, work around the bed and repeat for each adjustment point. Move the printhead as close to the adjusters as possible and adjust them until you get uniform resistance with the calibration cards on each.
USE AN ENCLOSURE
Although the heated bed keeps the lower layers of the part at temperature, it may have difficulty keeping the upper layers of the part from shrinking once you start printing taller parts. In this situation, you may find it helpful to place the printer inside an enclosure that can help regulate the temperature of the entire build volume. Some machines may already include an external enclosure specifically for this reason.
|
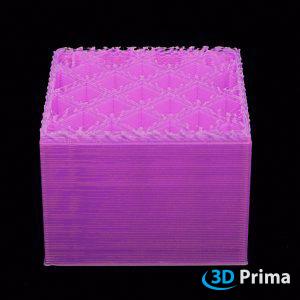
 28. WEAK FILLING 28. WEAK FILLING
This problem occurs when the fill has strings that are too weak and is not strong enough to support the outer shells. In this case the entire press loses resistance. To eliminate this problem you can use another fill pattern, a larger fill, and a slower fill print speed. A clogged nozzle can also be the problem.
REDUCE THE FILL PRINT SPEED
When poor or weak filling is detected, the material may not be able to dissolve as quickly. Try decreasing the print speed to get a solid infill with enough plastic to support the outer shells and see if that fixes the problem.
LARGER FILLING EXTRUSION WIDTH
If the infill of the printed part is weak, the entire print becomes weak. Set a higher fill extrusion width when you detect a weak fill. This can be done by observing the part during printing.
ALTERNATIVE FILLING MODEL
If the infill of the print is weak, the perforated parts will become weak and may break during use. There are a few different fill patterns with different fill angles in the settings, which you can choose from. It also depends on the printed part which model fits best and supports it as needed.
COLD PULL
A cold draw works best with slippery, soft materials, such as nylon filament.
Once again, heat the hotend to the working temperature of the nylon or polyamide filament, push it through the hotend as far as possible, ideally, until the previous material is cleaned off, which will obviously be a little harsh if the nozzle is completely clogged. Then let the hotend cool down.
What we recommend is to set the hotend to 110, 120°C and keep pulling the filament while the hotend heats up until the filament comes out in one piece. Then cut off the unclean end of the filament, heat the hotend completely again, and repeat the process until the pulled end of the filament comes out clean and you've restored good flow through the nozzle. Two or three coats should usually be enough.
NEEDLE METHOD
For this method you will need an acupuncture or hypodermic needle, so you can try to remove the blockage. You will obviously need a needle or thread small enough to fit into the nozzle hole, typically 0.4mm.
However, we do not recommend using a drill bit, as it breaks more easily than solid needles and, even worse, can permanently damage the nozzle if you are not careful.
Preheat the nozzle to the normal printing temperature for each material and start poking with the needle. Be careful not to burn yourself. The goal is to break up the clog so it slides through the nozzle. The next time you push the filament through the clog, the filament will slide through the nozzle along with the filament.
You may need to repeat the cycle a few times and manually push in some filament to see if you've managed to break the blockage enough. If this method doesn't work, try the cold extraction method.
|