

Installing the DJI Dock is a crucial step when it comes to integrating it into your workflows.
Regardless of whether it is a permanent location or a more mobile installation, it is essential to take into account some key aspects in order to ensure smooth and reliable operation.
Determining the optimal location plays a critical role, along with considerations such as power, Internet connectivity, selecting the appropriate base, and of course, the associated cost.
Installing DJI Dock: Overview
Before we look at installing the DJI Dock in detail, we'll take a quick look to provide a preview of the key requirements.
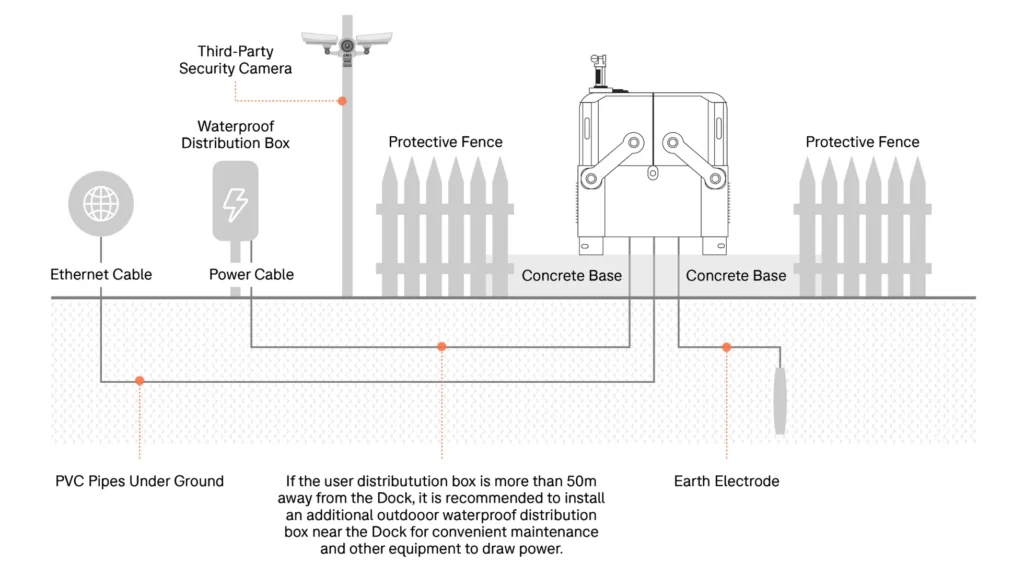
The graphic below provides a quick overview of the infrastructure required for a permanent Dock setup.
This table highlights some of the key aspects to consider during an installation workflow. Although primarily focused on permanent setups, it is important to note that elements such as power, network connectivity and image transmission also have crucial relevance for mobile installations.
| Workflow | Considerations |
| Phase 1: inspection | Power supply : stable mains power, 1500 watts, 100-240v. Network : Upload and downlink bandwidth greater than 10Mbps. Image transmission : Avoid obvious signal obstructions. |
| Phase 2: civil works | Base : Concrete base, metal base. Wiring : Standards for wire type, size, installation and spacing must be met. Grounding : Use an existing grounding system or install and connect. |
| Step 3: Installation | Assembly : Correctly mount the DJI Dock on the base: Complete connections with power, internet and grounding system. |
| Step 4: Configuration | Setup : Use the RC Plus remote controller to set up the Dock, drone, and backup landing spot (discussed later in this article). Flight Test : Complete the on-site flight test to verify successful installation. |
Location Requirements: Site Selection
Evaluating how the pier is used is a crucial first step that could influence the choice of the ideal location.
The Dock can be used in mobile mode or as a more stable installation, which can be located at ground level or on a roof. Considerations for installing on a roof vary slightly from those for installing on the ground, and we'll go into more detail later in the blog.
The location can depend on several factors, including access to power and network, but we will address these points in more detail later.
Regardless of your choice of location, it is essential to note that the Dock must be installed on a flat surface.
To assist you in selecting the optimal site, we offer site inspections and consultation services, which incur an additional cost.
Below, we present an example of digital resources that can be useful in flight planning.
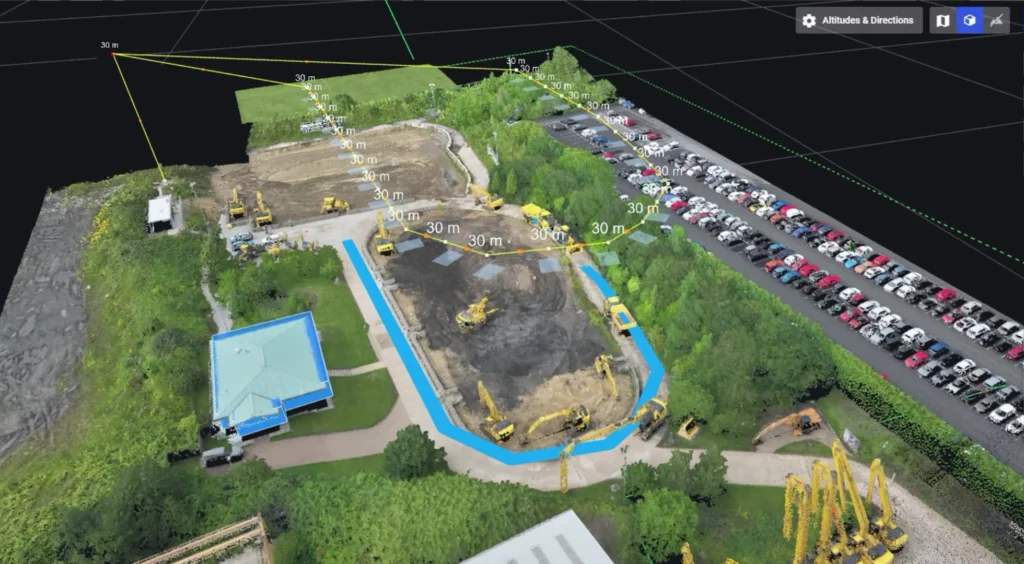
Following the inspections carried out, we opted for this position.
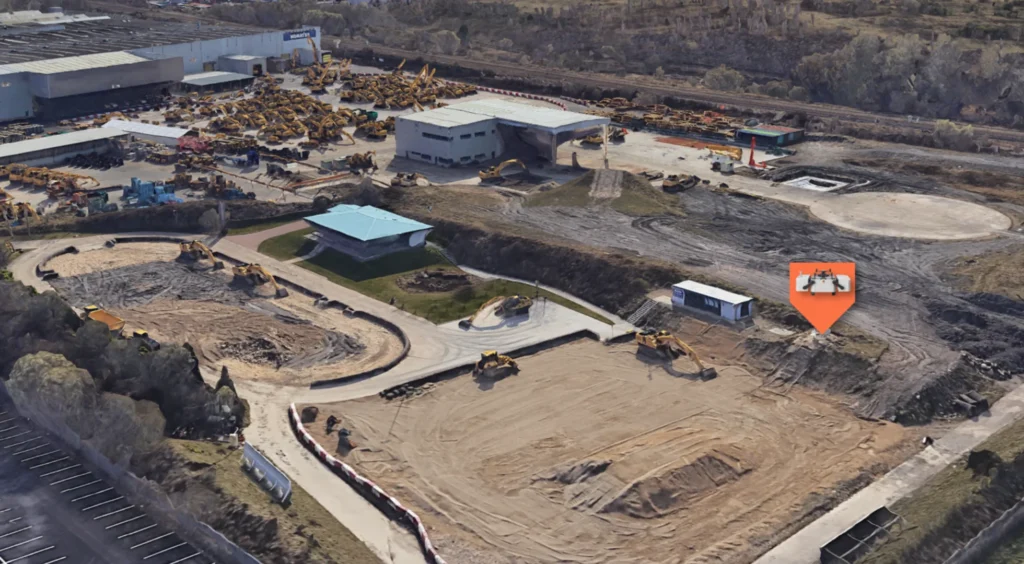
…and this close-up view.
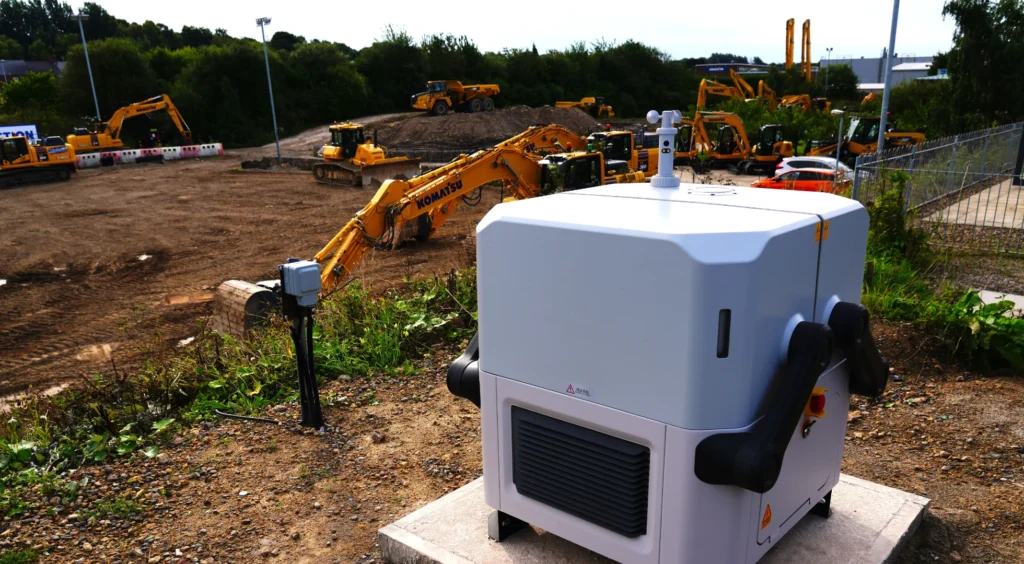
The main reasons for this choice were DJI's official recommendations.
Space
The dimensions of the DJI Dock are:
Dock lid open : 1675 x 885 x 735 mm (W x D x H)
Dock lid closed : 800 x 885 x 1065 mm (L x W x H)
In light of this, the site selected for the Dock offered sufficient area: it was perfectly flat, exceeding the recommended dimensions of 2.6 meters x 3 meters for the placement of the Dock, and allowed for an additional meter on both sides to facilitate opening the Dock cover and dissipating heat.
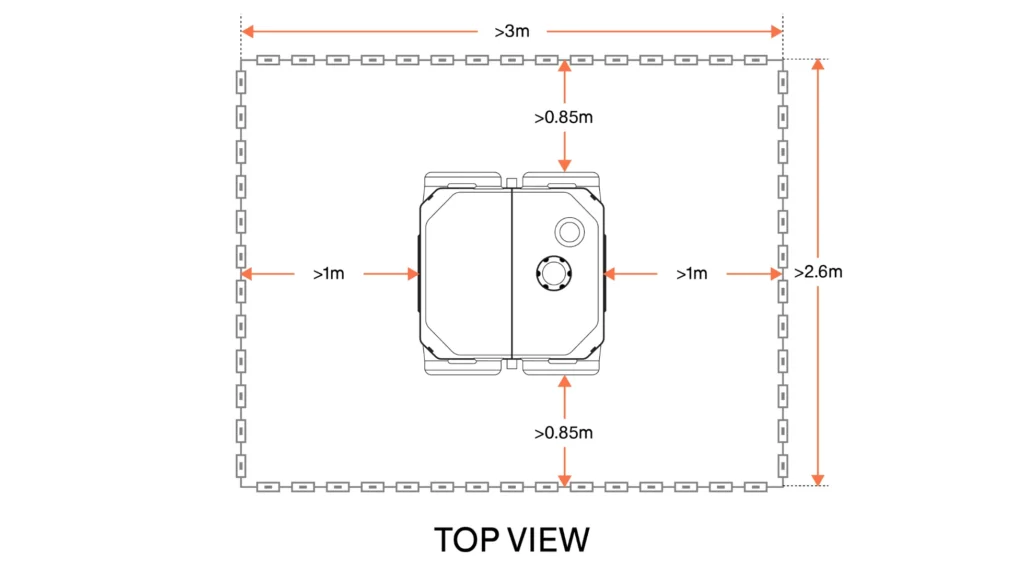
The space also allowed us to reserve at least 0.85 m at the front and rear of the basin to allow for installation and maintenance.
It was also a quiet place, away from pedestrian traffic.
Environmental requirements
The site also met environmental requirements, such as:
- The altitude of the installation did not exceed 4,000 meters.
- The annual temperature of the installation site was within the -35°C to 50°C basin operating temperature range.
- The site was above the excavator training area, therefore protected from dust and sand and not subject to strong gusts of wind. The maximum wind resistance of the DJI M30 Series Dock version drone is 12 m/s
- This was a static site, as the Dock should not be used by moving objects, such as cars and boats.
Drone capabilities
The site must be within the capabilities of the DJI M30 Series drone (Dock version).
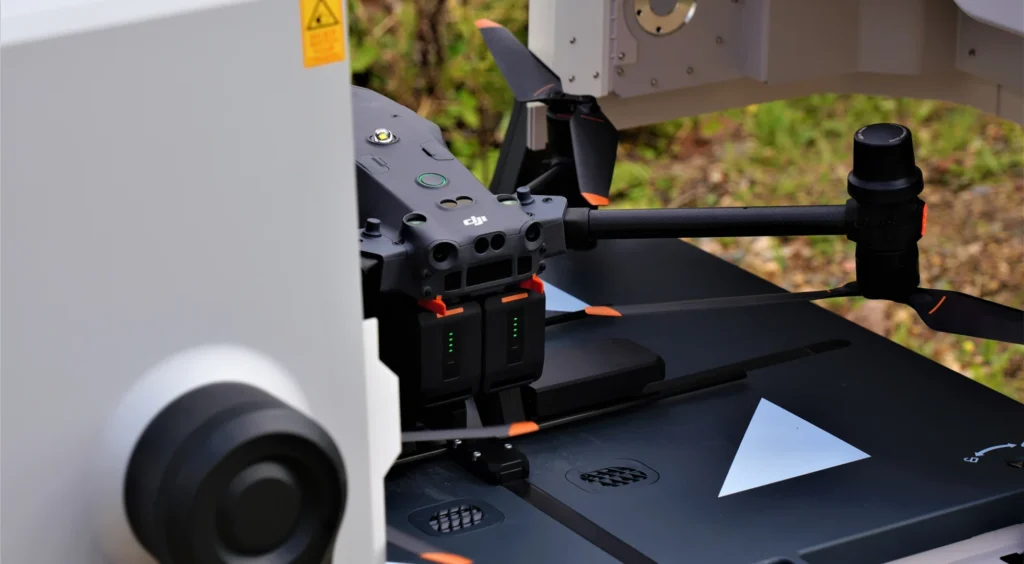
For example, the drone has a flight time of 40 minutes and can recharge from 10% to 90% in just 25 minutes. The drone's battery is usually charged up to 90% to extend its useful life and reach the expected 400 charge cycles; however, during scheduled missions, you may be required to use 100% battery.
The Dock system automatically evaluates whether reentry is necessary during a mission, considering factors such as wind and the drone's position, thus ensuring that the drone has at least 15% charge when it lands in the Dock.
In the case of Komatsu, the Dock was positioned near the excavator training area, where data collection is more frequent, to maximize the use of the battery during the collection phase, thus avoiding discharging it during flights to data collection points.
Signal quality requirements
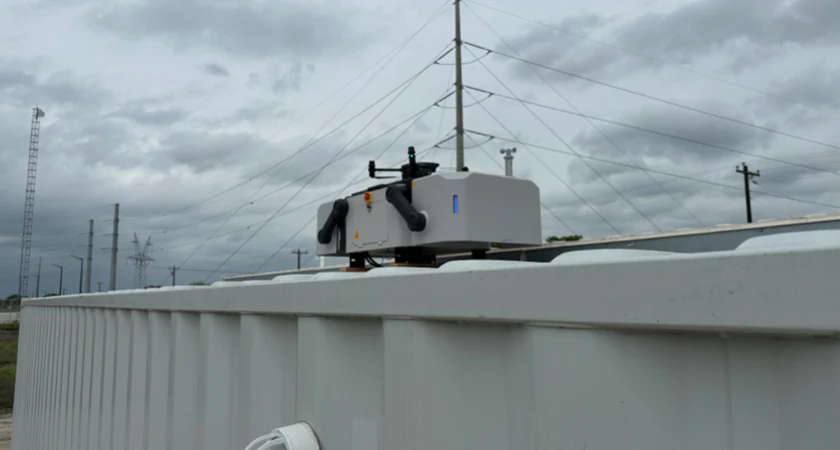
The Dock must be placed in a position without obvious obstacles to guarantee the quality and stability of the signal coming from the RTK module integrated into the Dock.
Furthermore, it is important to avoid the presence of obvious reflectors, such as tin roofs or billboards, both in the surrounding sky and in the vicinity of the Dock, in order to preserve the integrity of the aircraft video transmission system and the GNSS system.
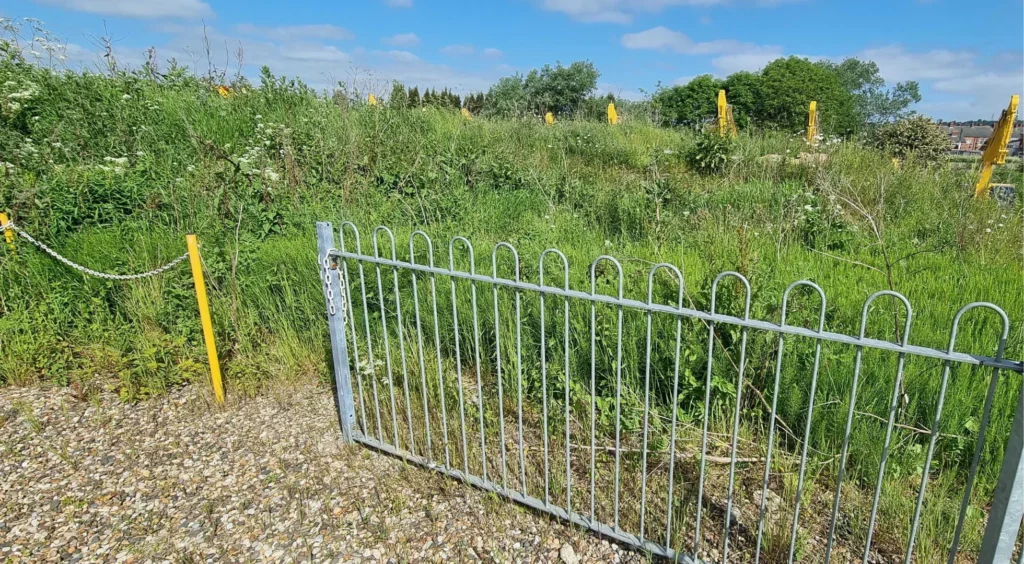
As you can see from the images below, our installation site was free of any obvious obstacles and had no signal quality issues.
Placing the dock on a roof
As already mentioned, the Dock can be placed on a roof.
However, there are some things to consider.
- The roof must be structurally sound to support the Dock, which weighs 105kg.
- Do not install the Dock in the corner of a roof to prevent the aircraft from accidentally crashing.
- Make sure RTK and video transmission signals are not obstructed by surrounding walls, structures, or other obstacles.
- When installing the Dock on top of a building, ensure that the roof floor can be drilled. Otherwise, we recommend using a steel frame properly secured with heavy objects, such as sandbags.
- An alternate landing site is required as part of the DJI Dock installation. If the alternate landing spot is on the roof of the building, make sure it is not in the corner of the roof.
Installation
Once you've chosen your site, it's time to install the Dock.
If permanently positioned, the Dock can be placed on a:
- Concrete base
- Base with steel structure
- On hardened concrete ground
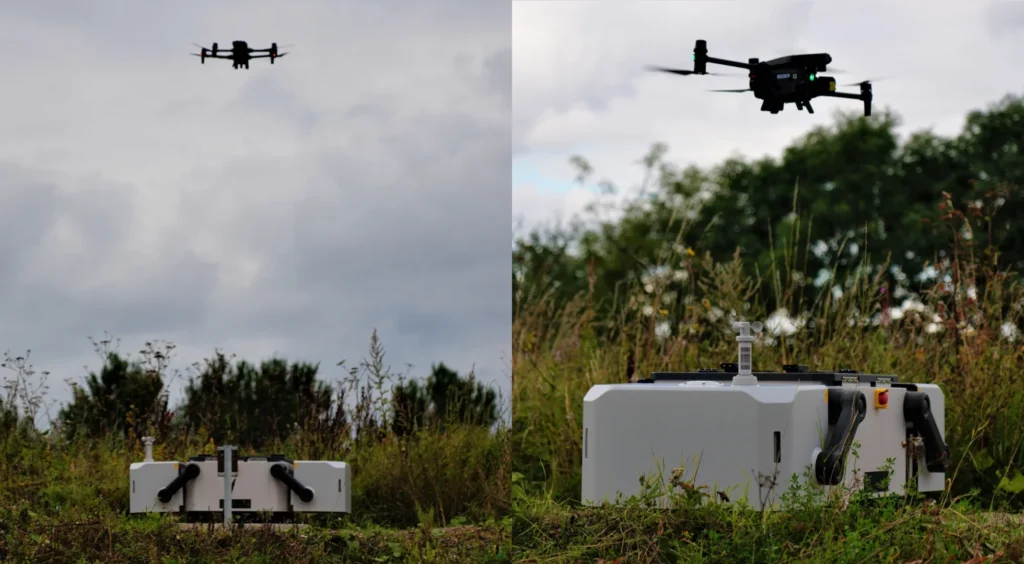
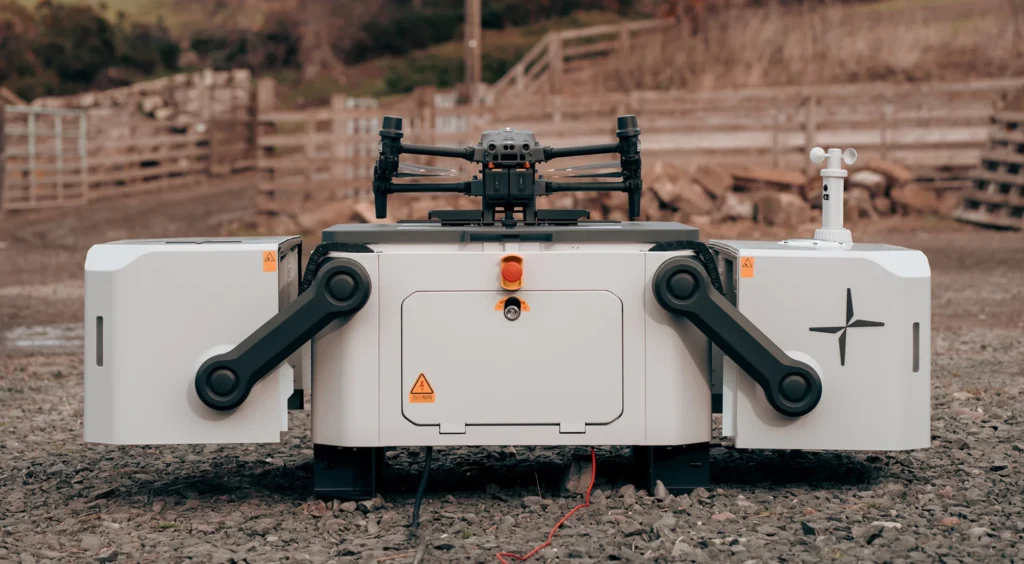
For mobile use, the Dock can be placed directly on the ground without the need to secure it to the floor, as illustrated in this image from our first tests conducted on an agricultural site. However, we do not recommend it for permanent installations due to the potential risk of damage or theft.
If the drone is used on the move, you can attach the Dock to a cart and roll it into place when needed.
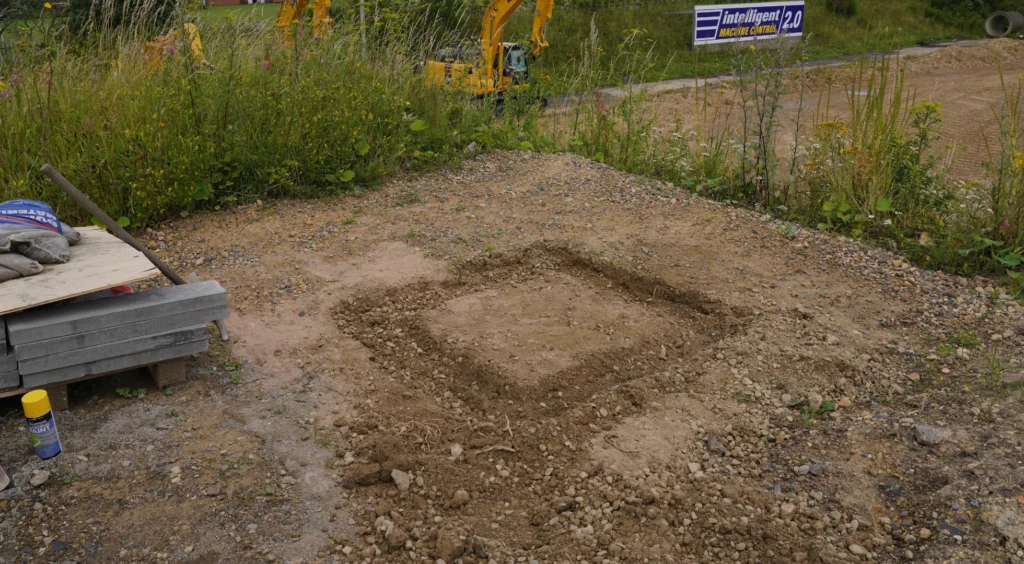
Concrete base :
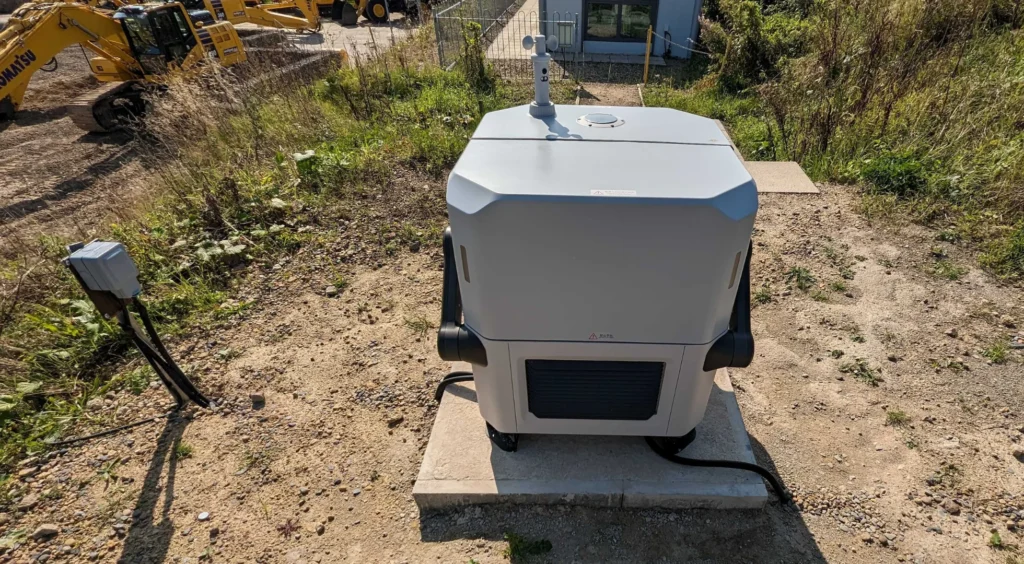
At the site, we attached the Dock to a concrete base. These images show how the site was prepared:
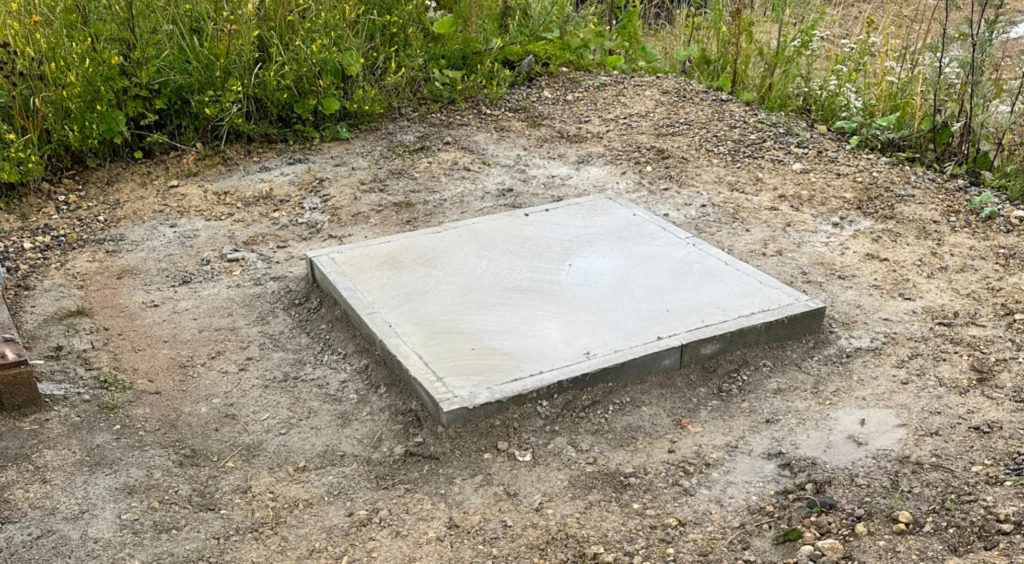
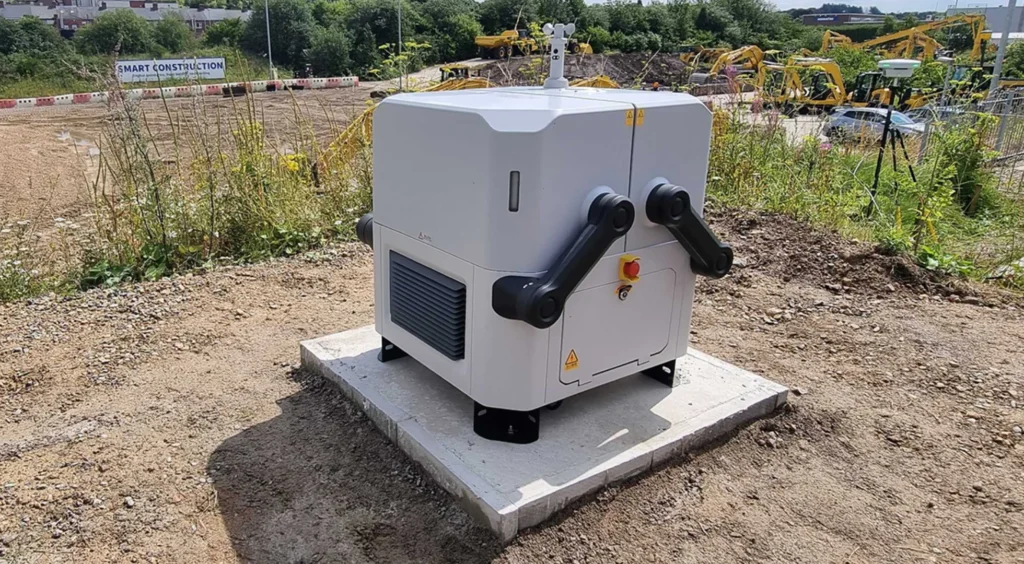
Installing the docking station on a concrete base has several advantages:
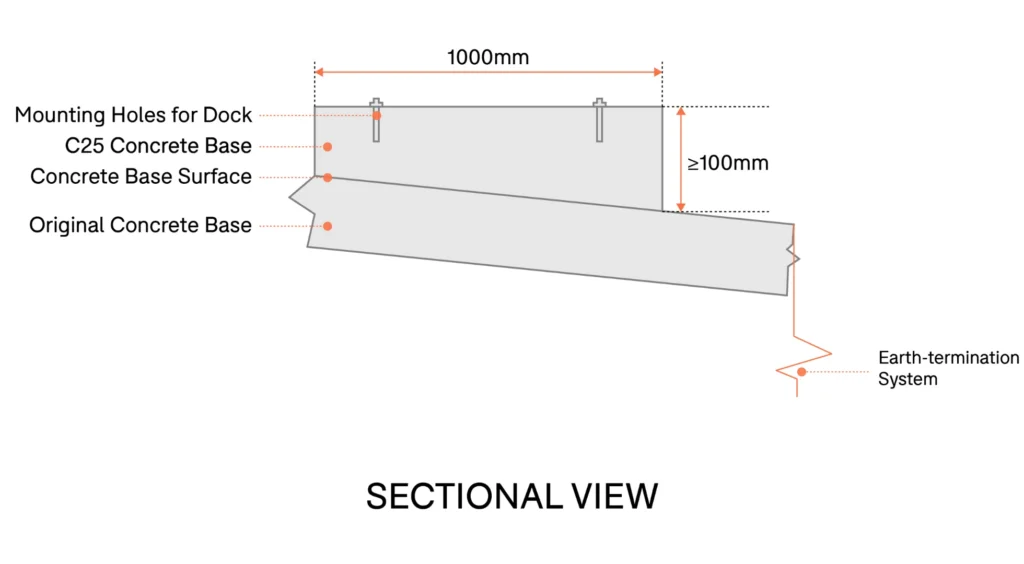
1. The concrete base raised the platform, helping to prevent problems related to ground subsidence or the risk of flooding. The recommended dimensions for the concrete base are 1000mm x 1000mm x 100mm.
2. Minimizes the risk of theft. The mounting brackets attached to the bottom of the docking station were anchored to the concrete to ensure a solid fit of the Dock to the base.
While it is essential that the base of the Dock is level, it is possible to place the Dock on previously concreted ground with slopes or unevenness, as long as the slope remains less than 5 degrees, as highlighted in this sectional view diagram.
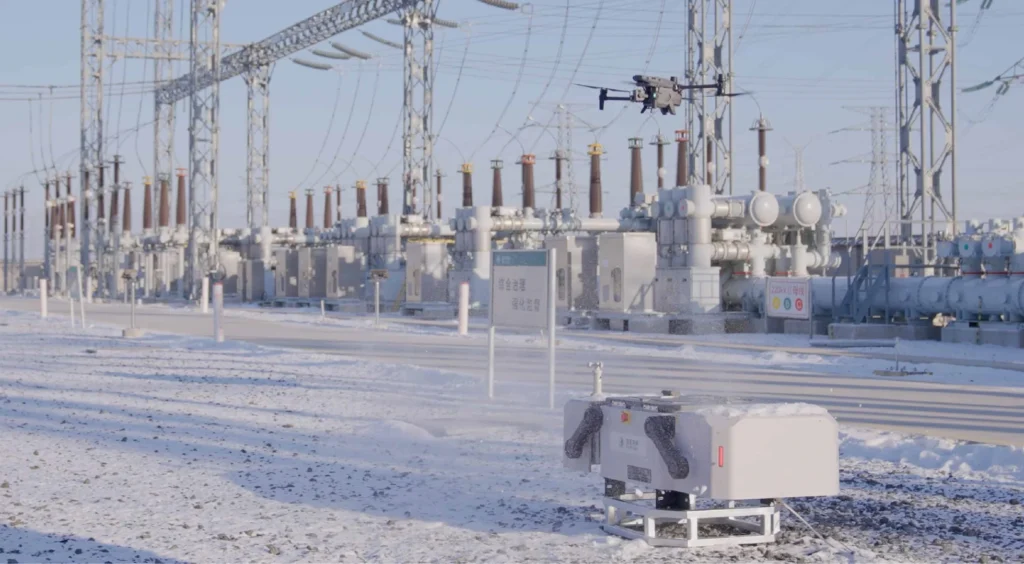
Base with steel frame
The DJI Dock can be solidly attached to a steel frame base.
Initially, it is necessary to firmly anchor the base of the steel structure to the ground using expansion bolts or through the placement of heavy objects such as sandbags. Next, the Dock can be screwed to the base of the steel structure.
This method is clearly illustrated in the example below from China, where the Dock facilitates personnel in acquiring data from substation sites 60 km away, eliminating the need for manual inspections in extreme weather conditions of -20 °C.
To the ground
If the installation site has reinforced concrete ground and does not present risks related to flooding, it is possible to fix the Dock to the ground using expansion bolts.
Alternatively, it is also possible to simply place it on the ground, but this practice is only advisable when an operator is present on site to ensure mobility. We have opted for this approach for demonstration and testing purposes only.
However, it is important to note that using a footplate that offers stability, while possible for testing purposes, is not recommended for long-term use.
Cart
For mobile installations, the Dock can be mounted on a dedicated cart.
The trolley is a customized transport and leveling system, designed to facilitate the placement of the Dock on suitable surfaces and its loading and unloading into the vehicle using a winch. This system eliminates the need for manual handling.
Inside the vehicle, a foldable manual loading ramp is available to simplify the load mounting operation.
The trolley can be purchased as an integral part of the vehicle or as a separate component. We will share images of the truck as soon as the vehicle is available in the market.
Alternate landing site requirements
In addition to establishing a primary landing area, it is also critical to establish an alternative landing location in the immediate vicinity for emergency situations.
If the drone cannot land at the dock due to adverse weather conditions or equipment failure, the drone will remain in flight until the battery power runs out. Thereafter, it will head to the previously designated alternate landing site to complete the landing safely.
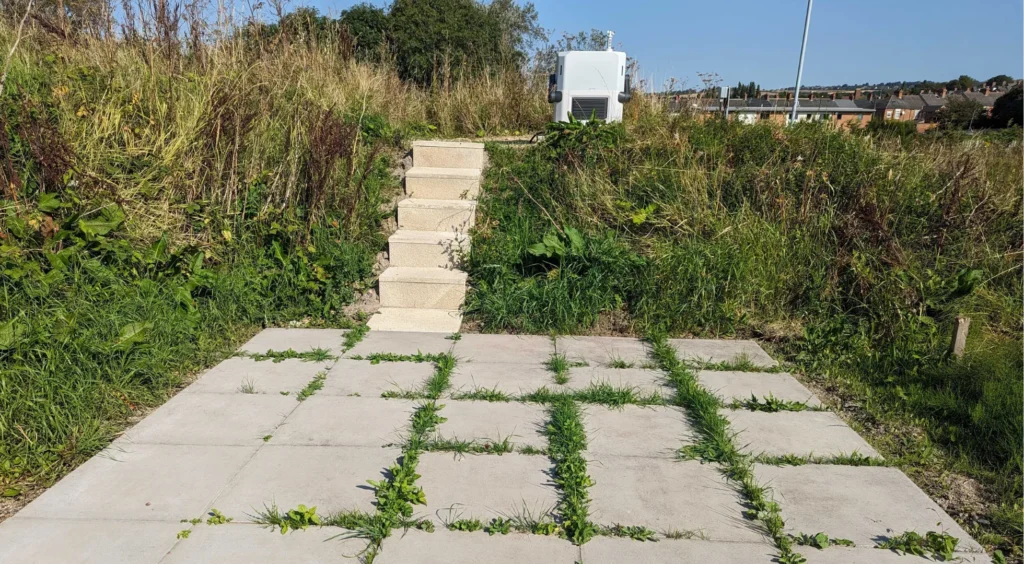
The site provides:
- Adequate space for the aircraft landing process, without obstacles within one meter of the alternative landing zone.
- It was located in an open area near the pier, within a straight line distance of 5 to 50 meters from the pier.
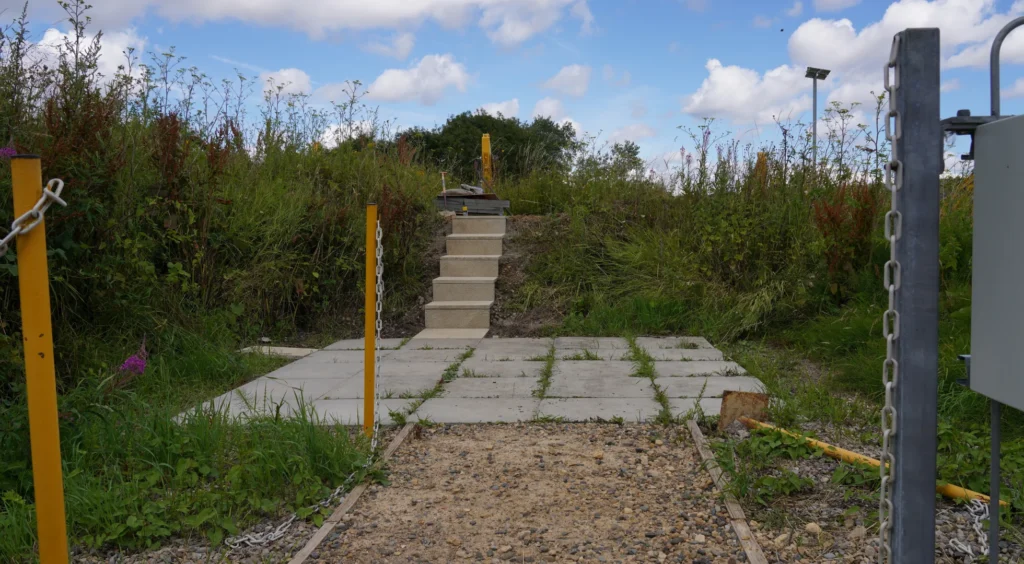
We prepared the alternative landing site in advance, converting this waste space…
…in a dedicated concrete landing area.
Network connection
The DJI Dock requires an Internet connection for proper operation.
You can achieve this connection through an Ethernet cable, using the port on the back of the Dock, and connecting to an existing network or router.
We recommend using a Gigabit network with an upstream and downstream bandwidth of at least 10 Mbps for a satisfactory user experience. However, for optimal performance, a bandwidth greater than 40 Mbps is recommended.
In our partner, we have successfully implemented Starlink, which also proves to be an excellent solution for mobile operations.
Additionally, we considered implementing a multi-cluster service with network failover to enable load balancing across clusters and ensure greater reliability.
If the connection distance exceeds 100 meters using an Ethernet cable, it is preferable to opt for a fiber optic based solution and install a fiber optic transceiver.
Before establishing a network connection, it is critical to obtain approval from your IT department and conduct a risk assessment to ensure the security of your network data.
Diet
When the Dock is in use, you need to connect an external AC power supply.
The power requirements are as follows:
| Parameters | Specifications |
| Diet | Single-Phase AC |
| Nominal input voltage | 100-240 VAC |
| Max. Input Voltage | 264 VAC |
| Frequency | 50/60 Hz |
| Power | Max. 1500W |
Power can come from the mains or, if the Dock is used in a temporary location, from a generator.
If you are installing the Dock in a more permanent location, there are several factors to consider:
1: Requirements for laying protective pipelines
Make sure external cables are laid with PVC pipes, waterproofed and installed underground.
2: Power cord requirements
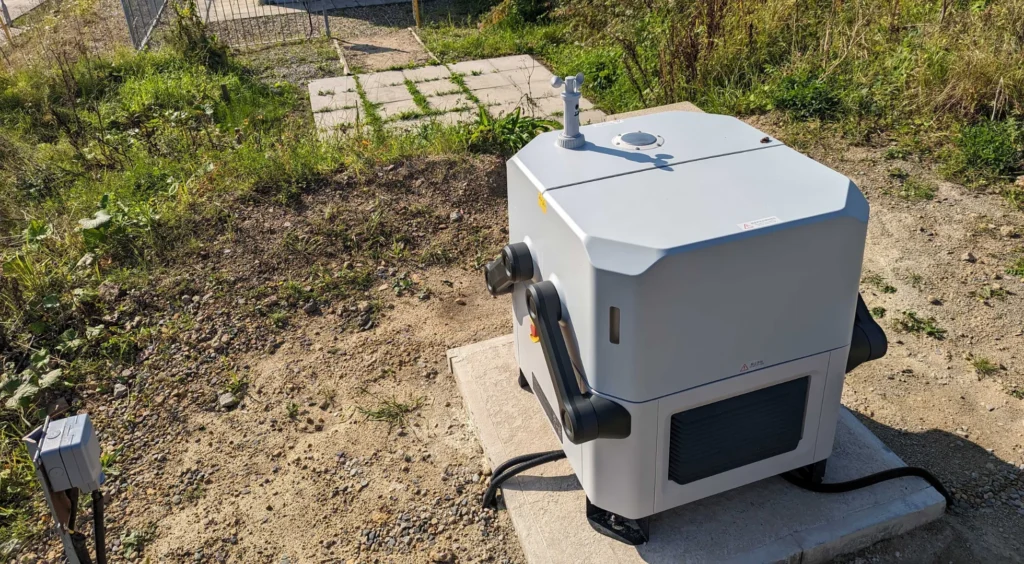
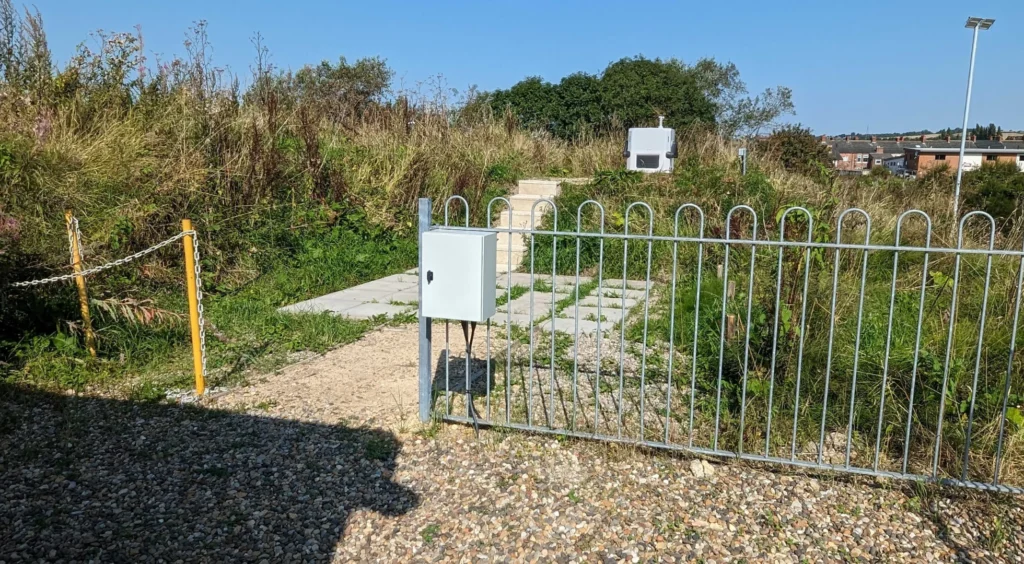
At the site, we have installed a waterproof distribution box, which safely houses various electrical components.

We have followed several key requirements, as shown in the image above, such as:
- The box was securely fixed and at least 500 mm above the ground to avoid flooding;
- More than 1 meter away from the Dock to avoid influencing the take-off/landing of the drone;
- Protect the box input/output cables using PVC pipes installed underground.
- If the user distribution box is located more than 50 meters away from the Dock, it is recommended to install an additional external waterproof distribution box near the Dock to facilitate maintenance and powering other equipment.
Grounding
Before using the Dock, it is essential to verify that it is correctly earthed, avoiding its operation without an adequate earth connection.
The Dock is equipped with surge protection up to 40 kA. This protection system is mainly composed of a suitable earthing system, a down conductor and an air termination system, such as a lightning rod, a lightning protection belt or a lightning protection grid.
When the air termination system is directly struck by lightning, the electrical current is rapidly dissipated to the ground through the down conductor and the grounding system.
To minimize the risk of surges, it is vital to ensure that earthing installation is carried out properly. If necessary, we are available to provide assistance at this stage.
Keep the dock safe: Protective fences and security cameras
Organizations are advised to install a protective fence to ensure pedestrian safety and prevent possible theft.
On our site, we have selected a secluded area with a fence in the immediate vicinity. This choice created an adequate protective perimeter around the pier and the alternative landing area, as highlighted in the image below.
It is also prudent to equip the site with independent CCTV for theft prevention and general monitoring.
The Dock comes with a built-in ultra-wide camera, but it's designed to monitor the Dock's environment in real time. This can be viewed from live streams within Dock software, such as DJI FlightHub 2, FlytBase, and Drone Harmony.
Configuration
Once the Dock is in place, you need to prepare the aircraft and configure the Dock.
This includes configuring the Dock network, connecting the Dock to the aircraft, configuring the cloud service, such as DJI FlightHub 2, and calibrating the location of the Dock and the alternate landing site.
Configurations can be made with the DJI RC Plus remote controller.
Recalibration is required if the Dock is moved.
troubleshooting
It is essential to always carry out test flights after positioning the Dock. When completing an installation, it is critical to ensure that everything is working properly before proceeding.
However, in the table below, there is a troubleshooting guide that tells you when to contact us, the authorized service provider for DJI Dock, and DJI in case of any problems.
| Problem | Possible reasons | Troubleshooting instructions |
| The Dock is unresponsive after turning on (the light on the Dock cover is off and there is no startup sound). | 1: The main power of the Dock is abnormal or the power cable is damaged. 2: The Dock's AC power switch is damaged or the Dock has an error. |
1: Check that the voltage of the N and L terminals of the Dock's AC power input is normal.2: Contact for repair. |
| The user's distribution box circuit breaker turns off unexpectedly | 1: The power cord connected to the Dock has errors in the connection sequence of the PE (ground wire), N (neutral wire) and L (live wire) wires. 2: A short circuit occurred due to damage to the power cord. | 1: Connect the PE, N and L cables correctly. Be sure to disconnect the main power before reconnecting the Dock. 2: First unplug the power cable from the Dock and turn on the circuit breaker. |
| The dock cannot connect to the remote controller | 1: The firmware version of the remote controller is not supported. 2: The USB-C cable is damaged. 3: The remote control's USB-C port is damaged. 4: Dock electrical cabinet connector module has an error. |
1: Update the remote control, Dock and aircraft to the latest firmware version. 2: Check and replace the USB-C cable. 3: Try another remote control. 4: Contact us for repair. |
| RTK Dock calibration failed | 1: Custom Network RTK Service is not enabled.2: RTK satellite signal is poor, as the Dock may be blocked.3: There is an error in the account information used to calibrate Custom Network RTK Service. 4: The remote control is not connected to the network or is connected to an unstable network.5: The Dock has an error. | 1: Go to the DJI Pilot 2 homepage, tap Data & Privacy > Network Security Mode, and then enable Network RTK Service. 2: Make sure the area above the RTK antenna and around the Dock is free of any obstacles. 3: Make sure the account is valid and the information is correct. 4: Make sure the remote controller is connected to the network and the network is stable. 5: Contact us for repair. |
| Unable to set up an alternate landing site for the aircraft | 1: The Dock has no location information because the RTK Dock has not completed satellite positioning. 2: The aircraft is positioned too close or too far from the Dock. 3: The aircraft has no position information due to an obstacle. 4: The RTK positioning of the aircraft is not fixed. 5: Video transmission between the aircraft and the Dock is disconnected. |
1: Make sure the RTK Dock has completed satellite positioning by viewing it in the DJI Pilot 2. 2: Make sure the distance between the aircraft and the Dock is correct according to the prompt of the app, and the distance is 5-50m. 3: Make sure there are no obstacles around the aircraft when setting the alternate landing site. 4: Wait until the RTK position of the aircraft is fixed. 5: Make sure the video transmission between the aircraft and the Dock is connected. |
| The dock cannot connect to the DJI FlightHub 2 | 1: The DJI FlightHub 2 organization ID or link code is incorrect. 2: The Dock is disconnected from the network. 3: The Dock has an error. |
1: Make sure your organization ID and constraint code are filled in correctly (they are case sensitive). 2: Make sure the network connection to the Dock is working properly. Connect the network cable to the computer to check if it can access the Internet. 3: Contact us for repair. |
| The Live button on DJI FlightHub 2 is gray and cannot be clicked | 1: Wind speed indicator is not connected. | 1: Make sure the connection of the wind speed meter is reliable. |
| The dock cannot connect to the Ethernet network | 1: The network connection has an error. 2: The Dock network configuration has an error. 3: The Dock has an error. |
1: Make sure the network connection is normal and the wire sequence in the pass-through connector is correct. 2: Make sure your network configuration is correct. If you have set a static IP, set the DNS service to static at the same time. Otherwise, the network connection will be interrupted. 3: Contact us for repair. |
Summary
The installation represents a critical step in the DJI Dock integration process. It requires careful planning and can be a considerable commitment, especially when it is a permanent setup.