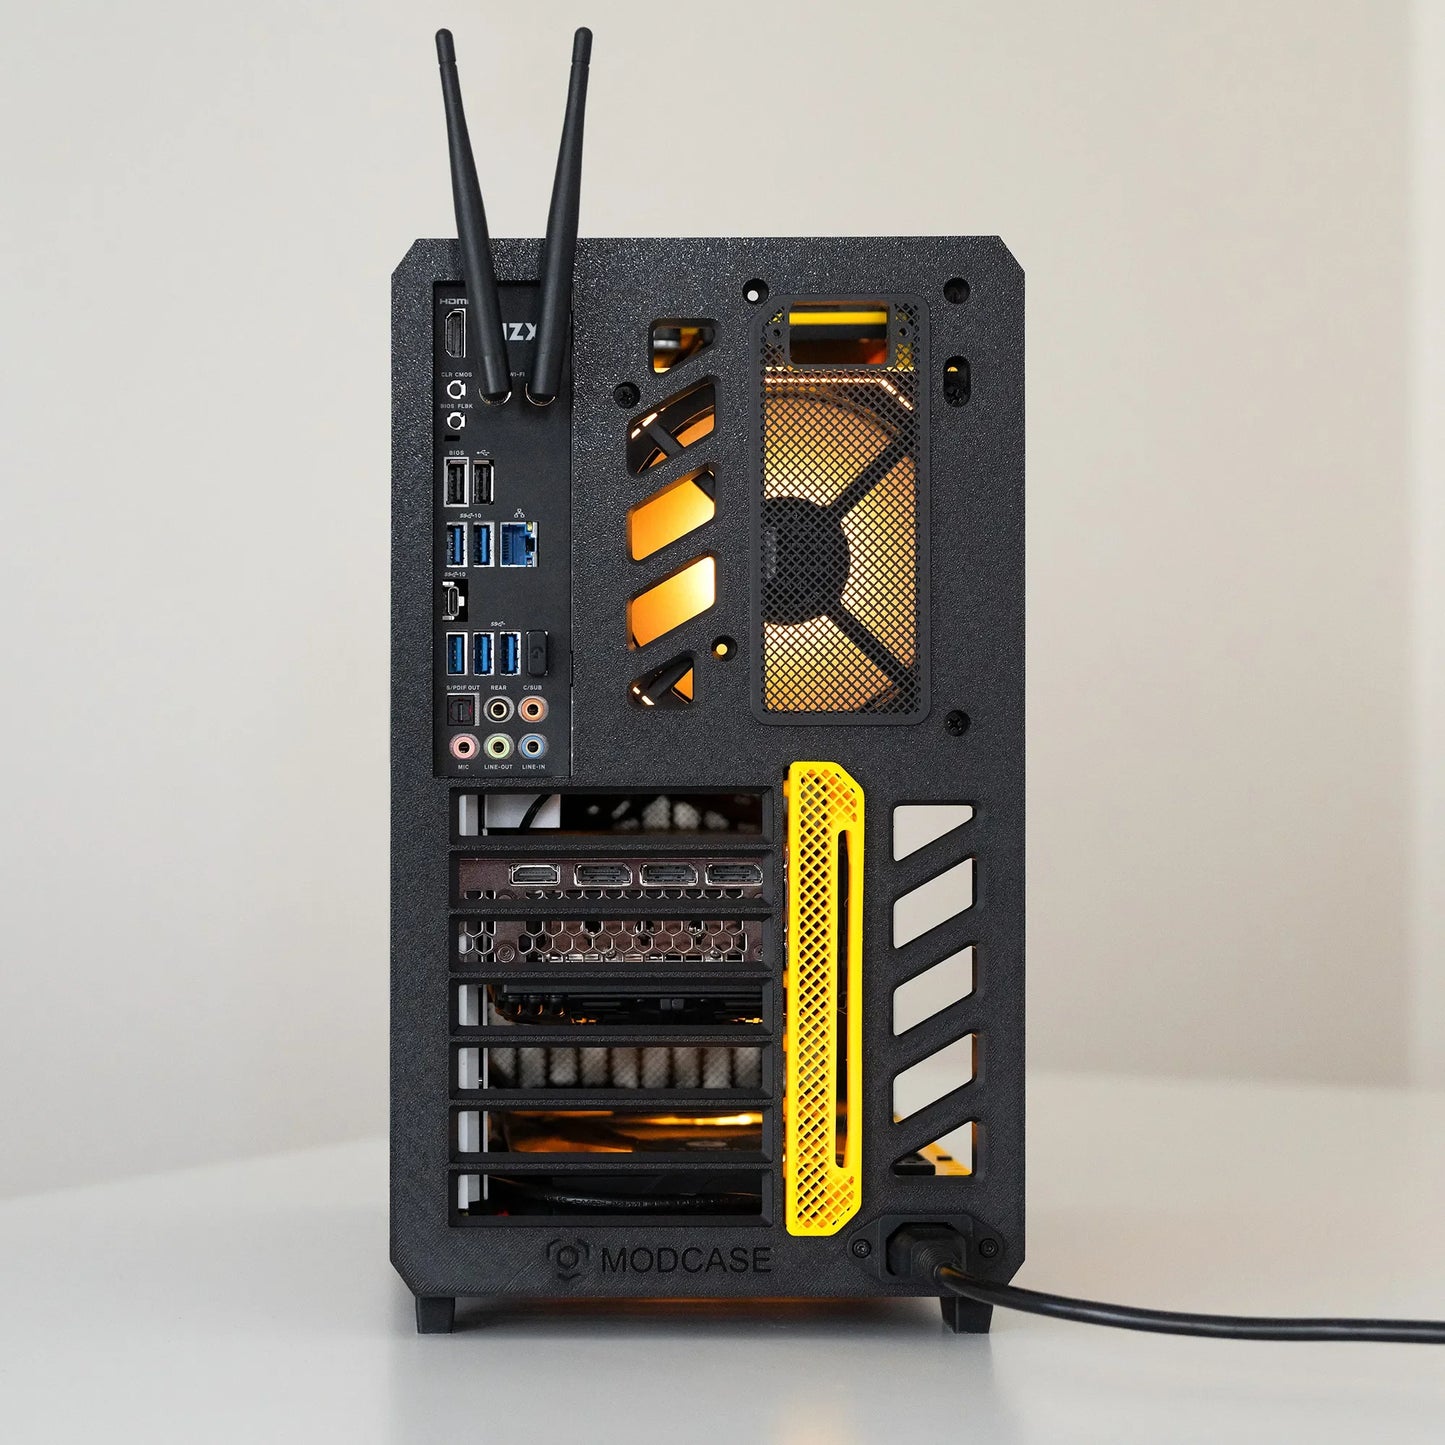
Boîtier Universel pour PC - Imprimé en 3D
Boîtier Universel pour PC - Imprimé en 3D
Impossible de charger la disponibilité du service de retrait


ARTICLE FABRIQUÉ SUR DEMANDE, EN RAISON DES NOMBREUSES OPTIONS DE PERSONNALISATION, VEUILLEZ NOUS CONTACTER POUR DISCUTER DE LA CONFIGURATION LA PLUS ADAPTÉE À VOTRE ÉQUIPEMENT OU À VOTRE UTILISATION
Étape 1 : Choisissez votre châssis

Note :
❶ Le châssis E-ATX a le port USB-C retiré pour s'adapter aux cartes mères E-ATX. Sinon, il a les mêmes dimensions que le châssis ATX.
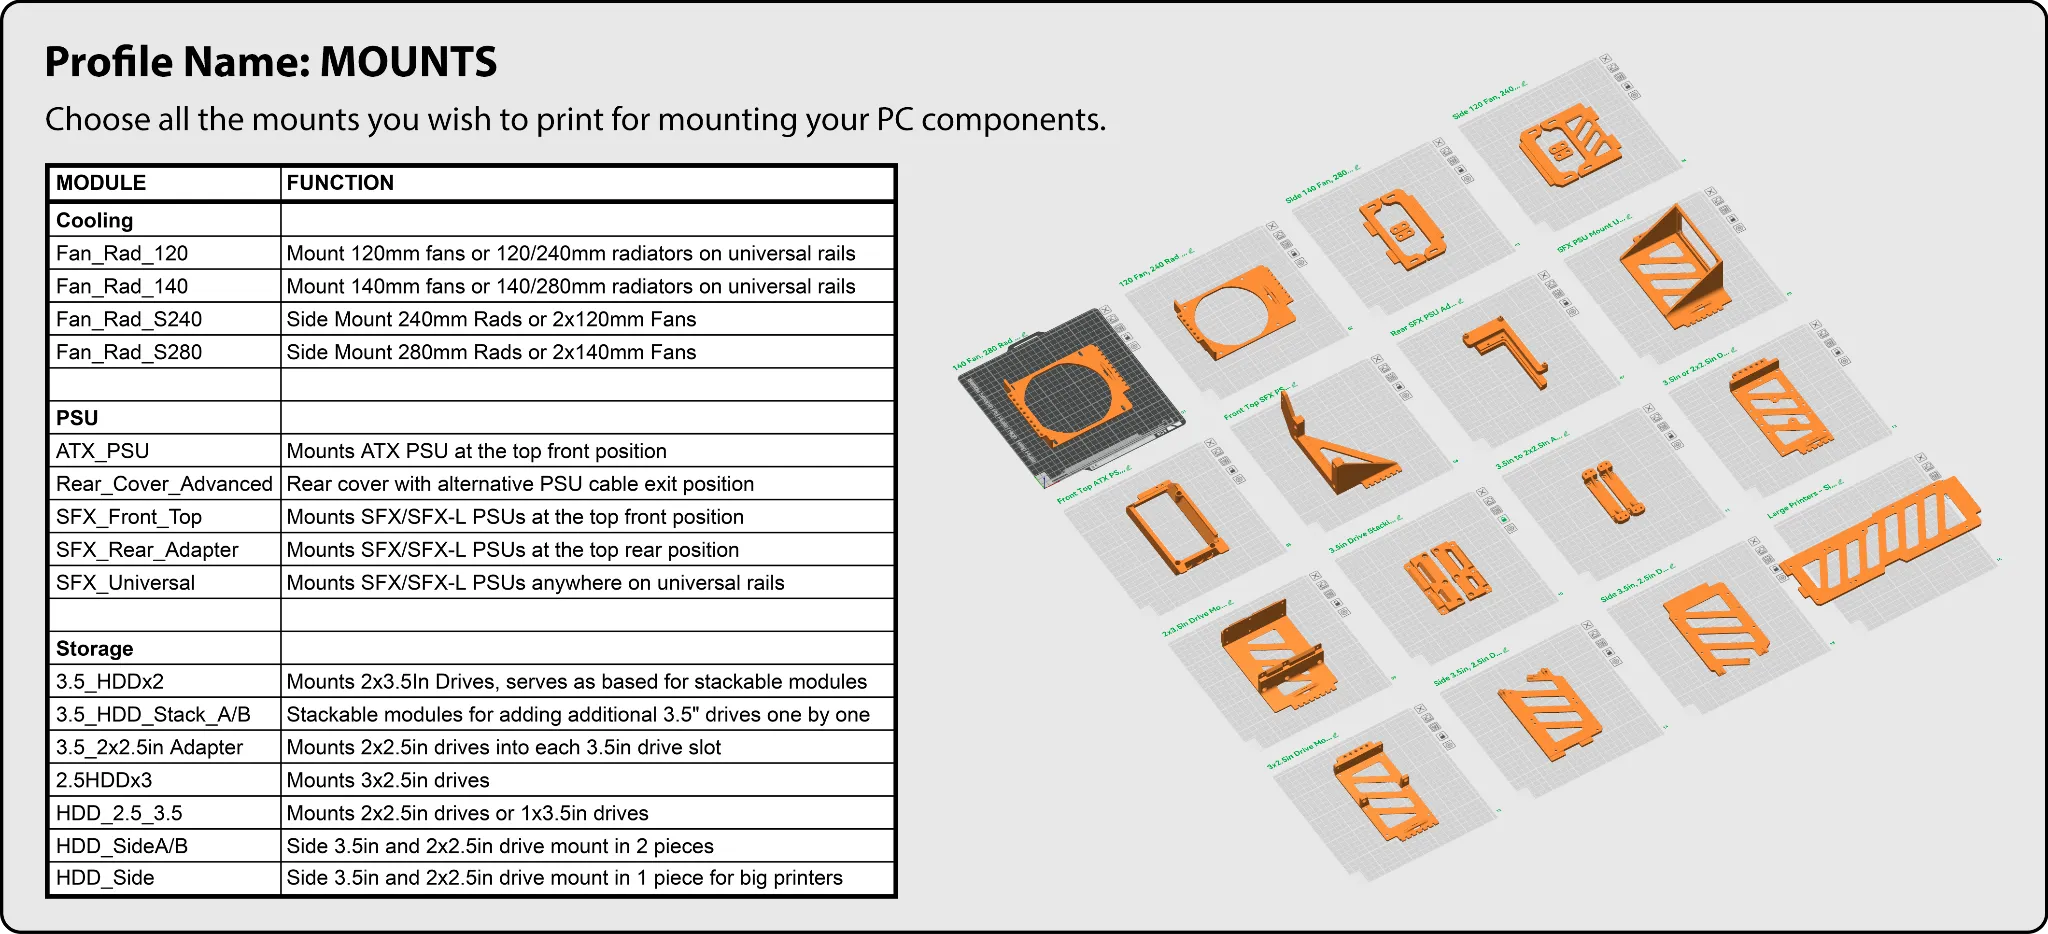
Étape 2 : Choisissez vos supports
OPTIONNEL : Choisissez votre extension
Celles-ci vous permettent d'augmenter la longueur de votre boîtier pour loger des radiateurs de 360 mm, des GPU de 450 mm de long, d'ajouter plus de support pour les disques, plus de ventilateurs et de monter plus de composants ensemble.
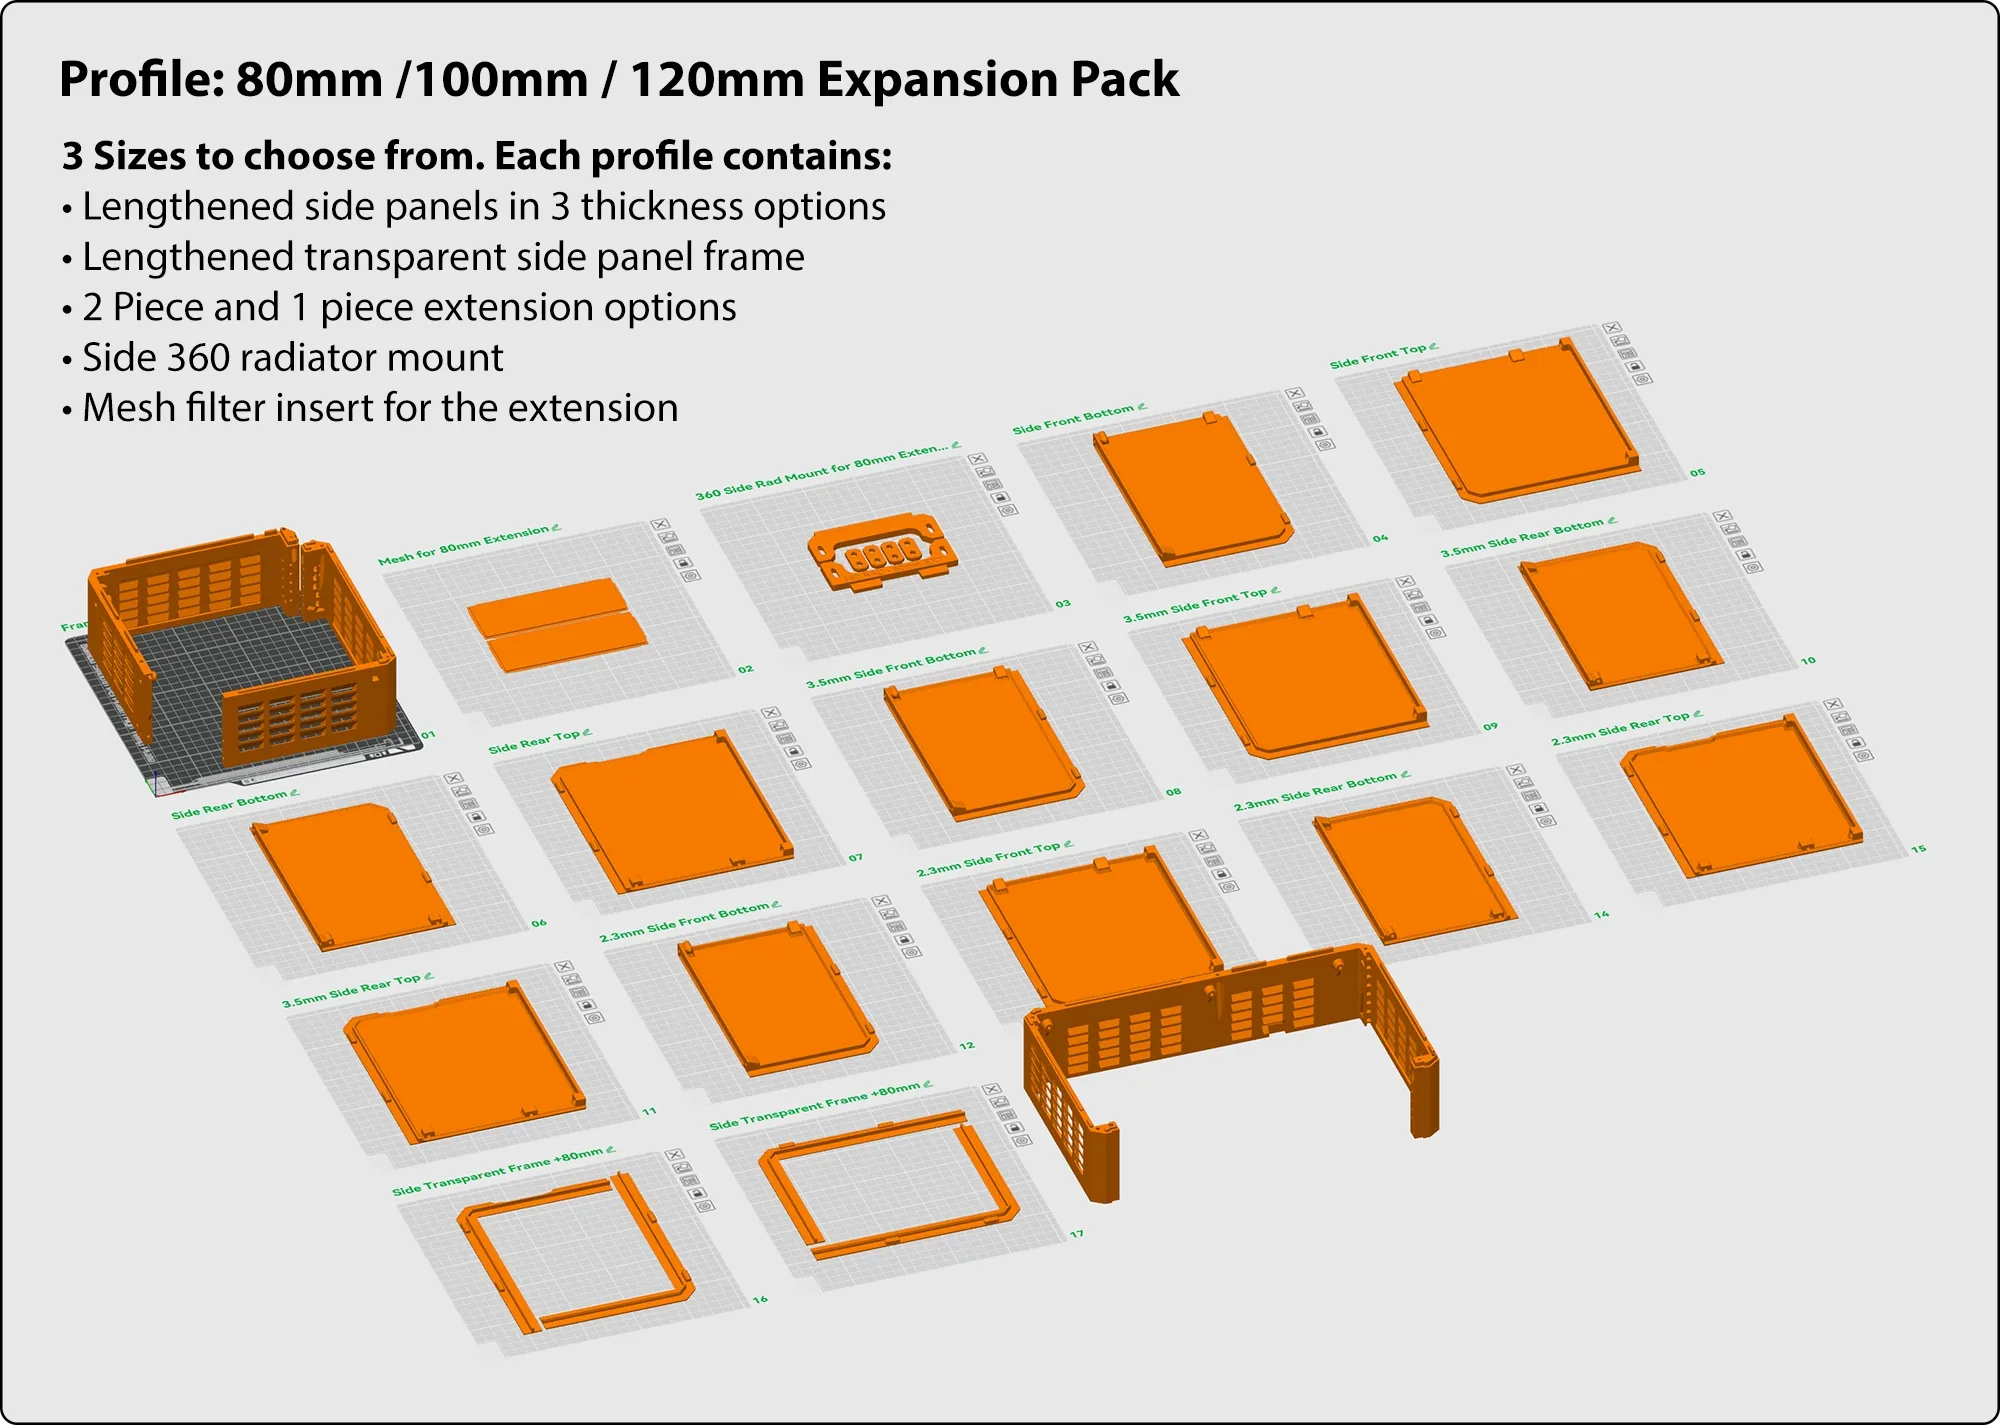
Note : Chaque pack d'extension inclut les panneaux latéraux allongés correspondants. Il n'est pas nécessaire d'imprimer les panneaux latéraux de longueur standard ci-dessous si vous utilisez les versions du pack d'extension.
Étape 3 : Choisissez votre panneau latéral

Les panneaux latéraux en maille plus fins ont un flux d'air supérieur et une meilleure visibilité. Cependant, ils nécessitent des matériaux plus résistants pour conserver la même rigidité. Le PAHT et le PPA-CF ont été les matériaux testés. Le PPA-CF est recommandé pour le panneau de 2,3 mm.
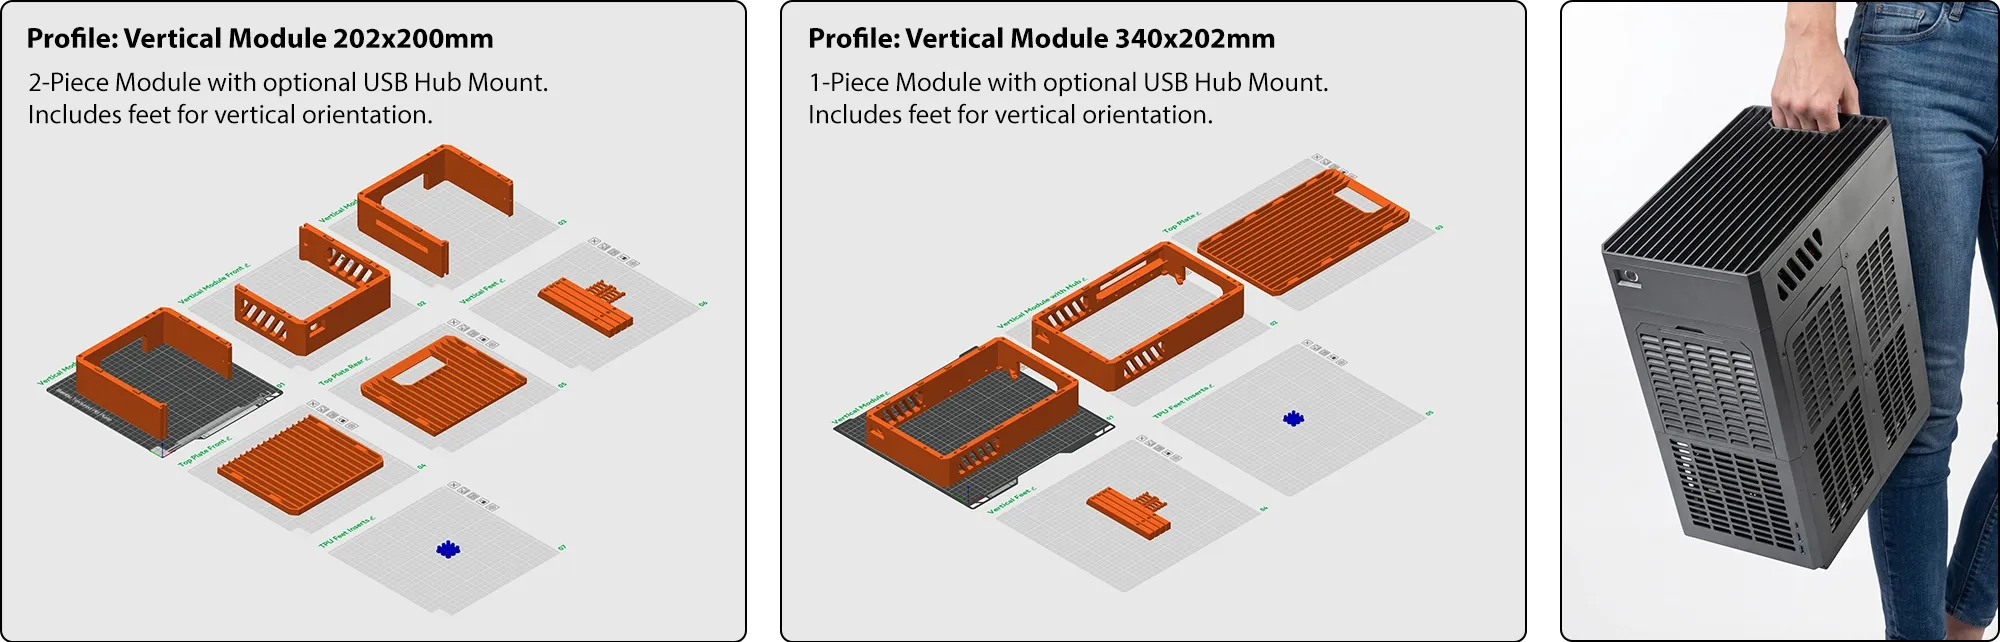
OPTIONNEL : Module Vertical
Ajoutez une poignée et utilisez votre boîtier à la verticale pour un encombrement minimal.
ASSEMBLAGE
Étape 1 :
Assembler les quarts avant et arrière avec des vis autotaraudeuses BT3x20
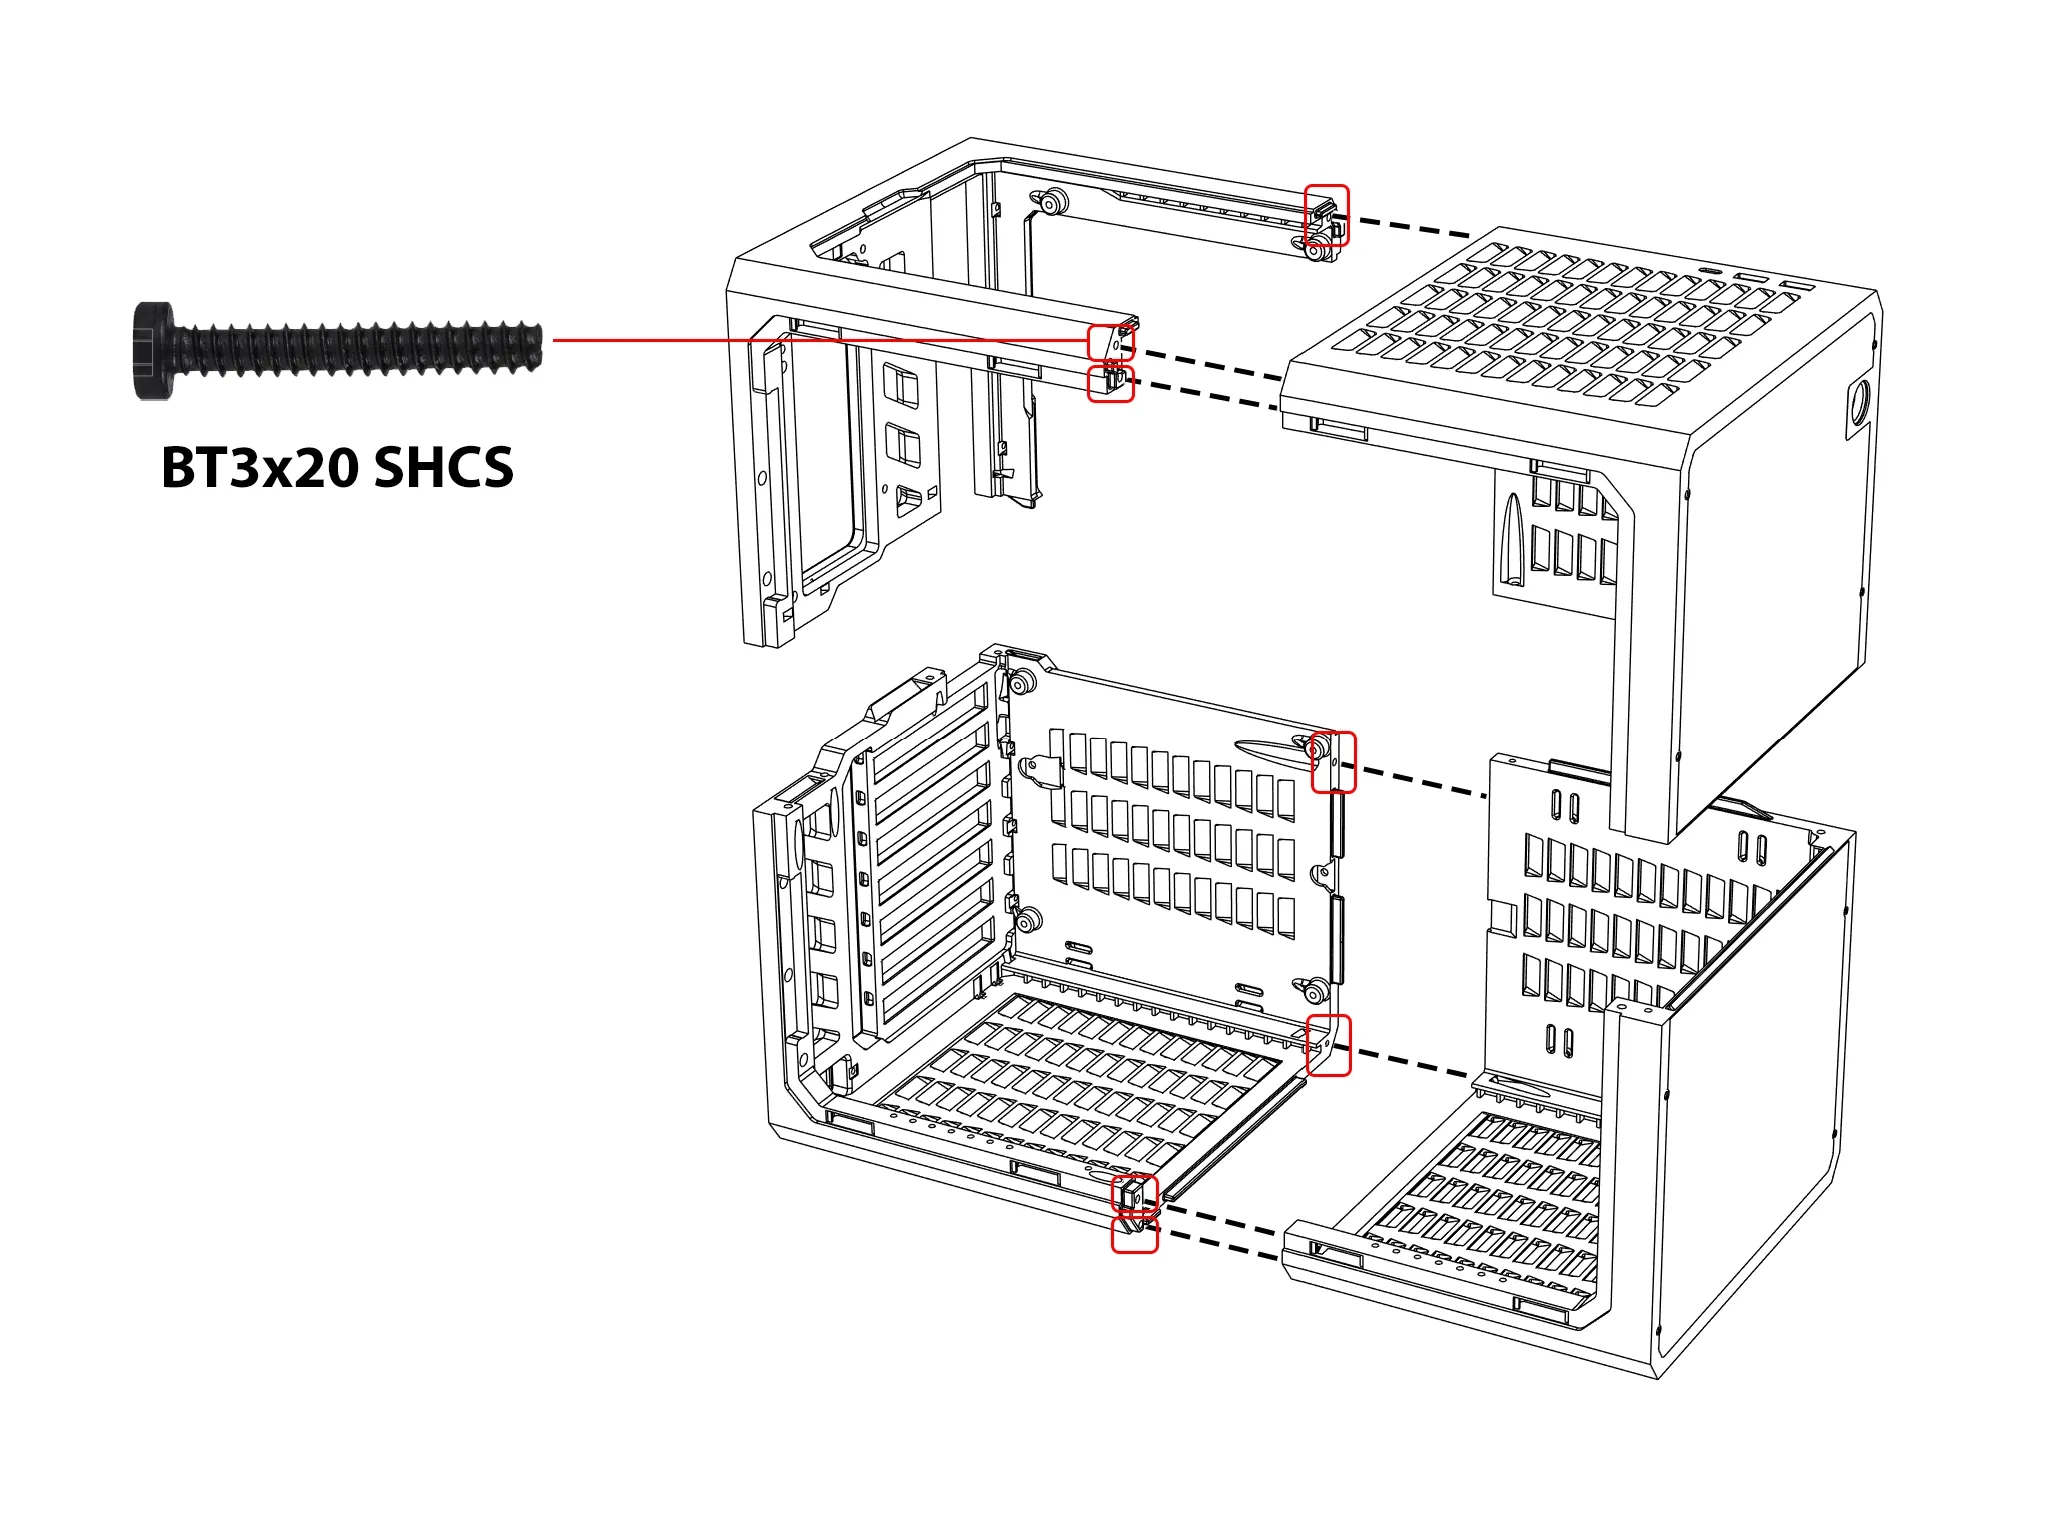
Les vis M3x20 et #4x3/4 sont également compatibles.
Étape 2 :
Joindre les deux moitiés
OPTIONNEL :
Installer les plaques frontales
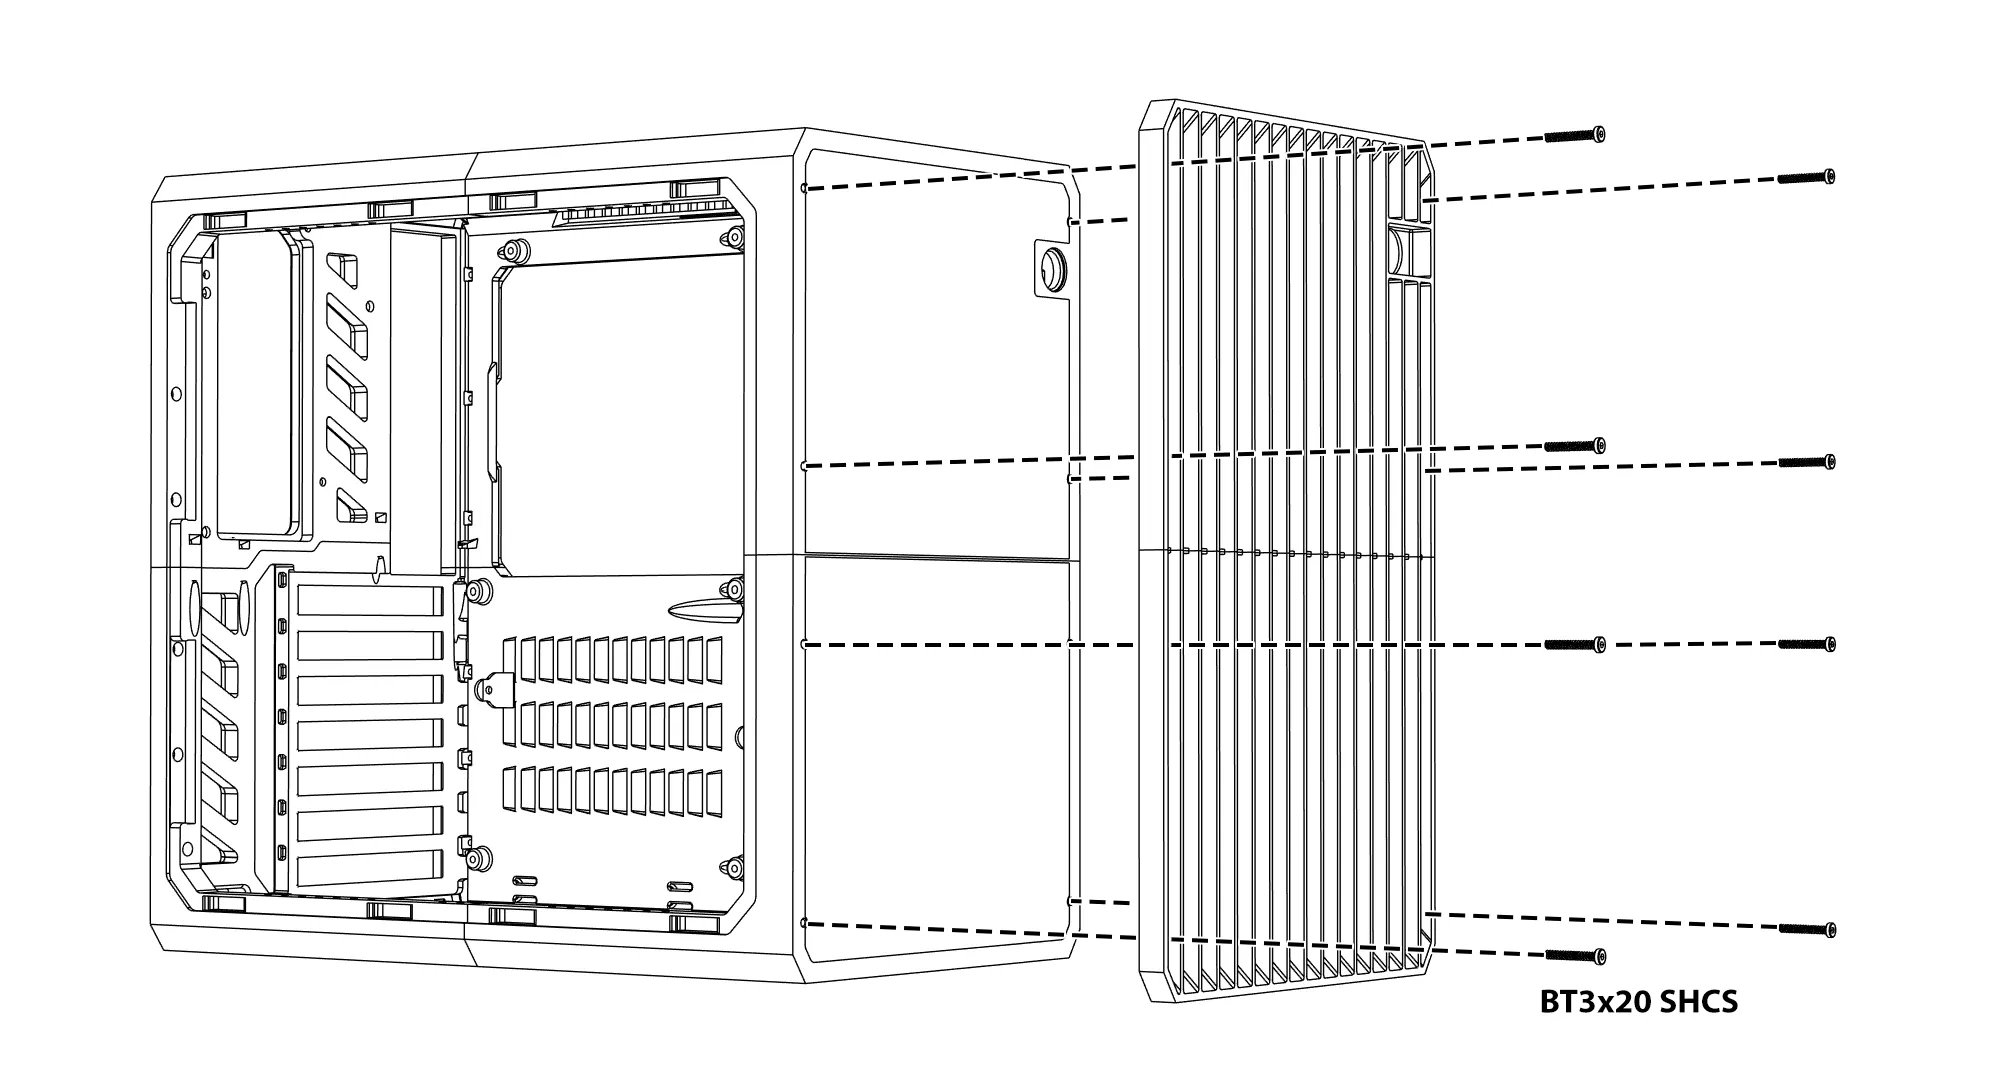
Installation du module d'extension
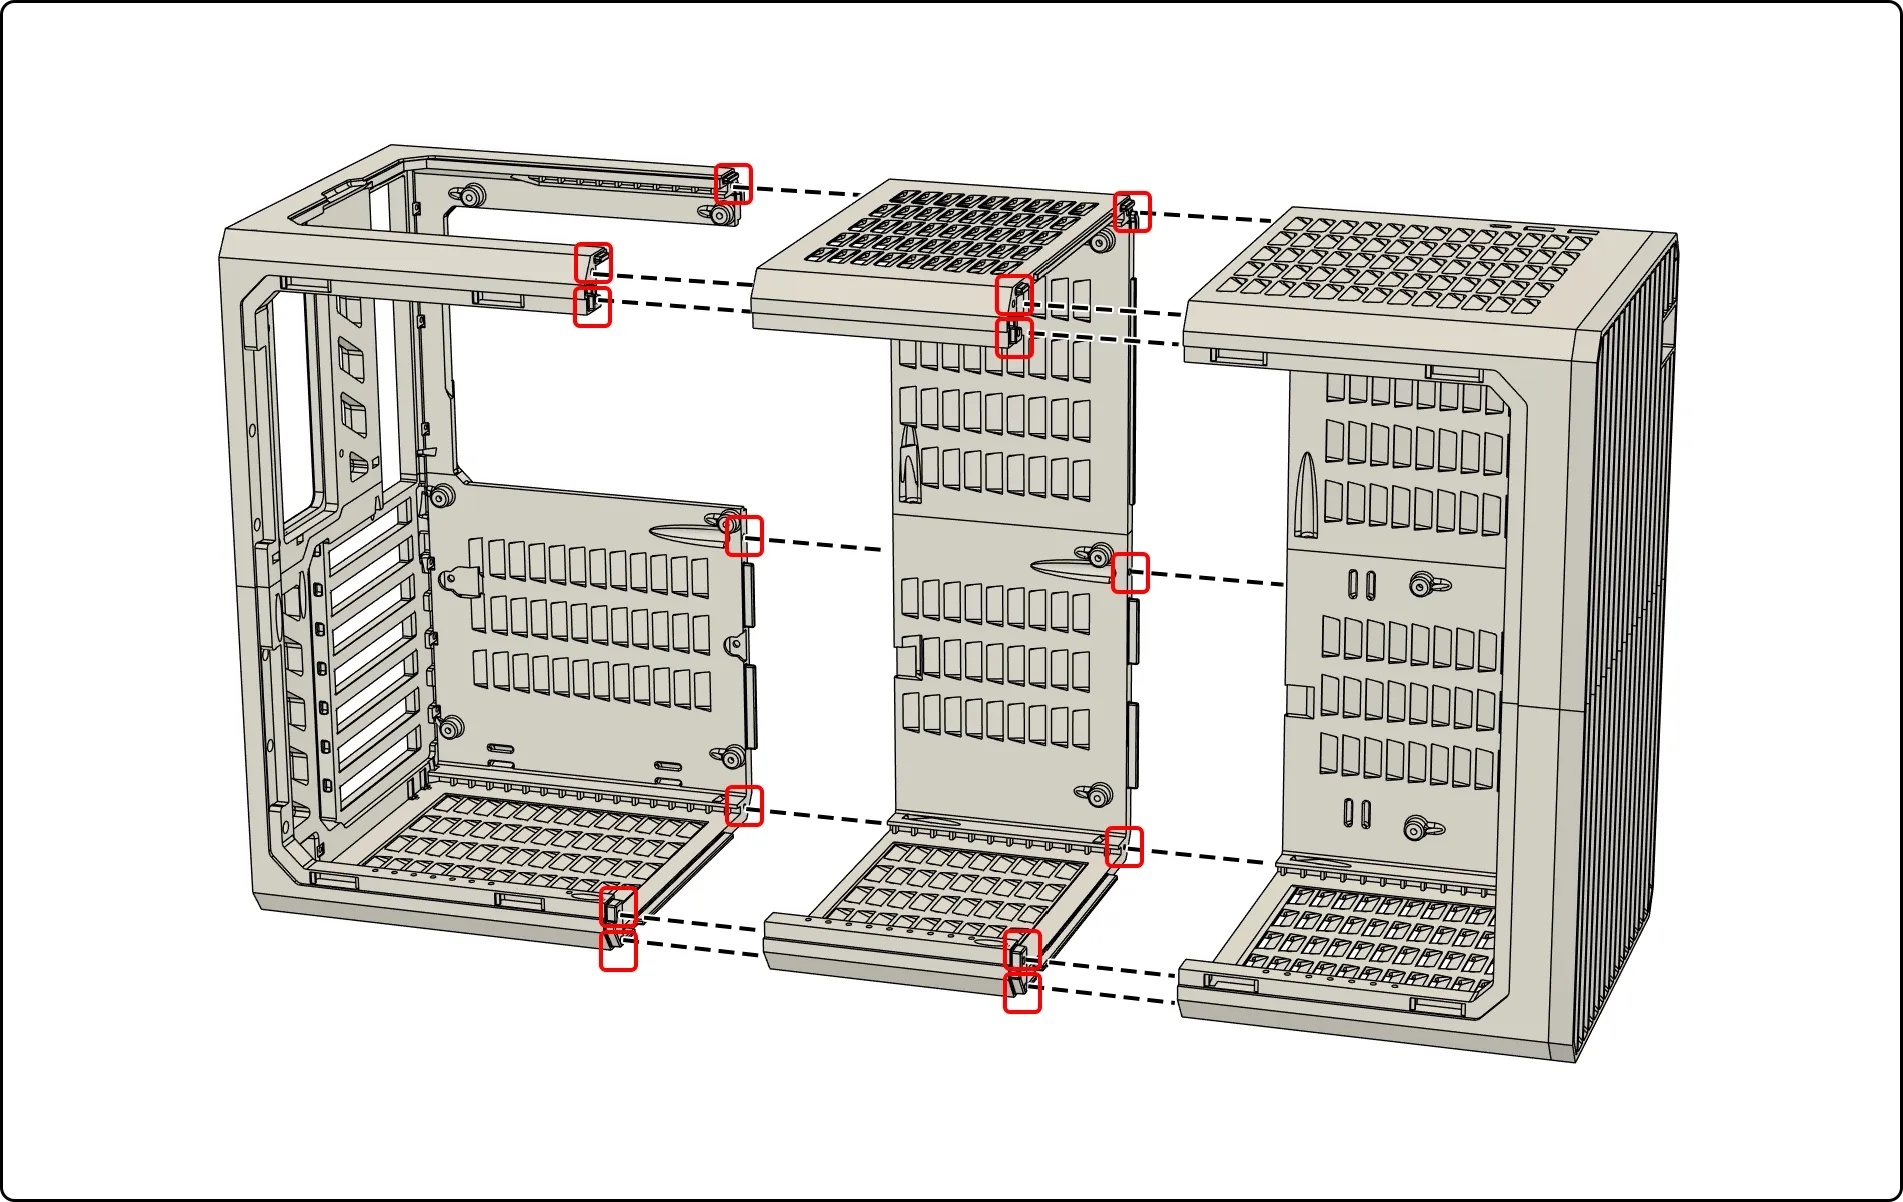
Note : La version HYPER v2.1 a ajouté 2 vis supplémentaires pour joindre la partie centrale sur le côté du panneau latéral pour une rigidité accrue. Il n'est pas nécessaire de réimprimer les châssis originaux ; une seule vis fonctionne bien avec le panneau latéral installé et a été vérifiée par les assembleurs au cours des 8 derniers mois sur la version originale.
Installation de la CARTE MÈRE
E-ATX, ATX, MATX, ITX - Monter directement à l'aide de vis standard pour boîtiers PC.
Insérer les entretoises incluses pour les cartes mères MATX .
Installation GPU / PCIE
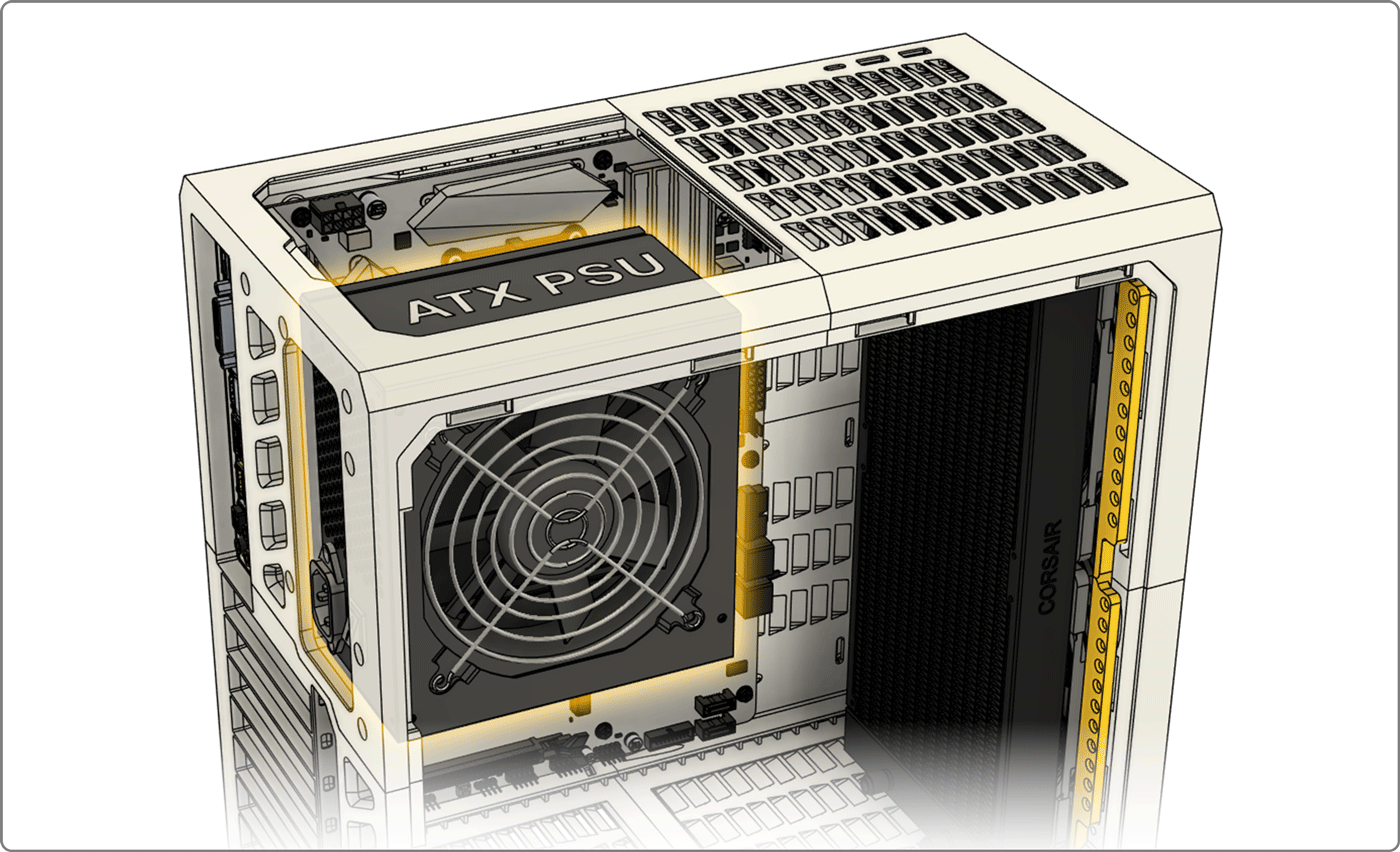
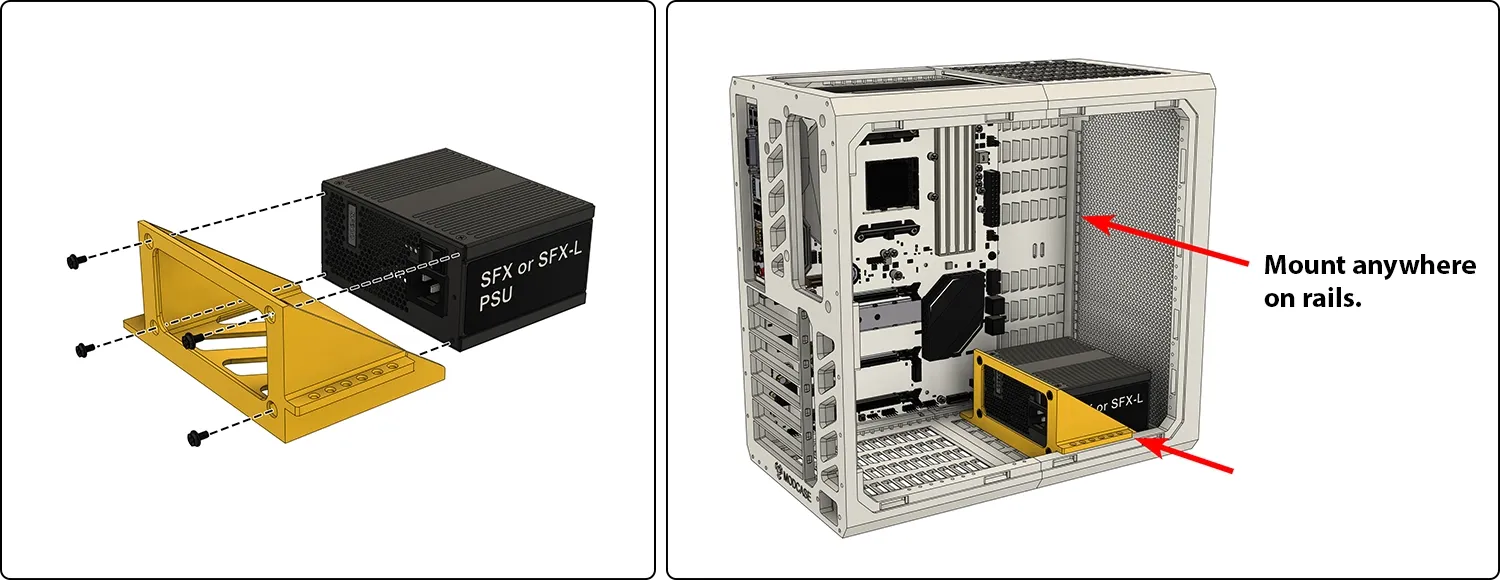
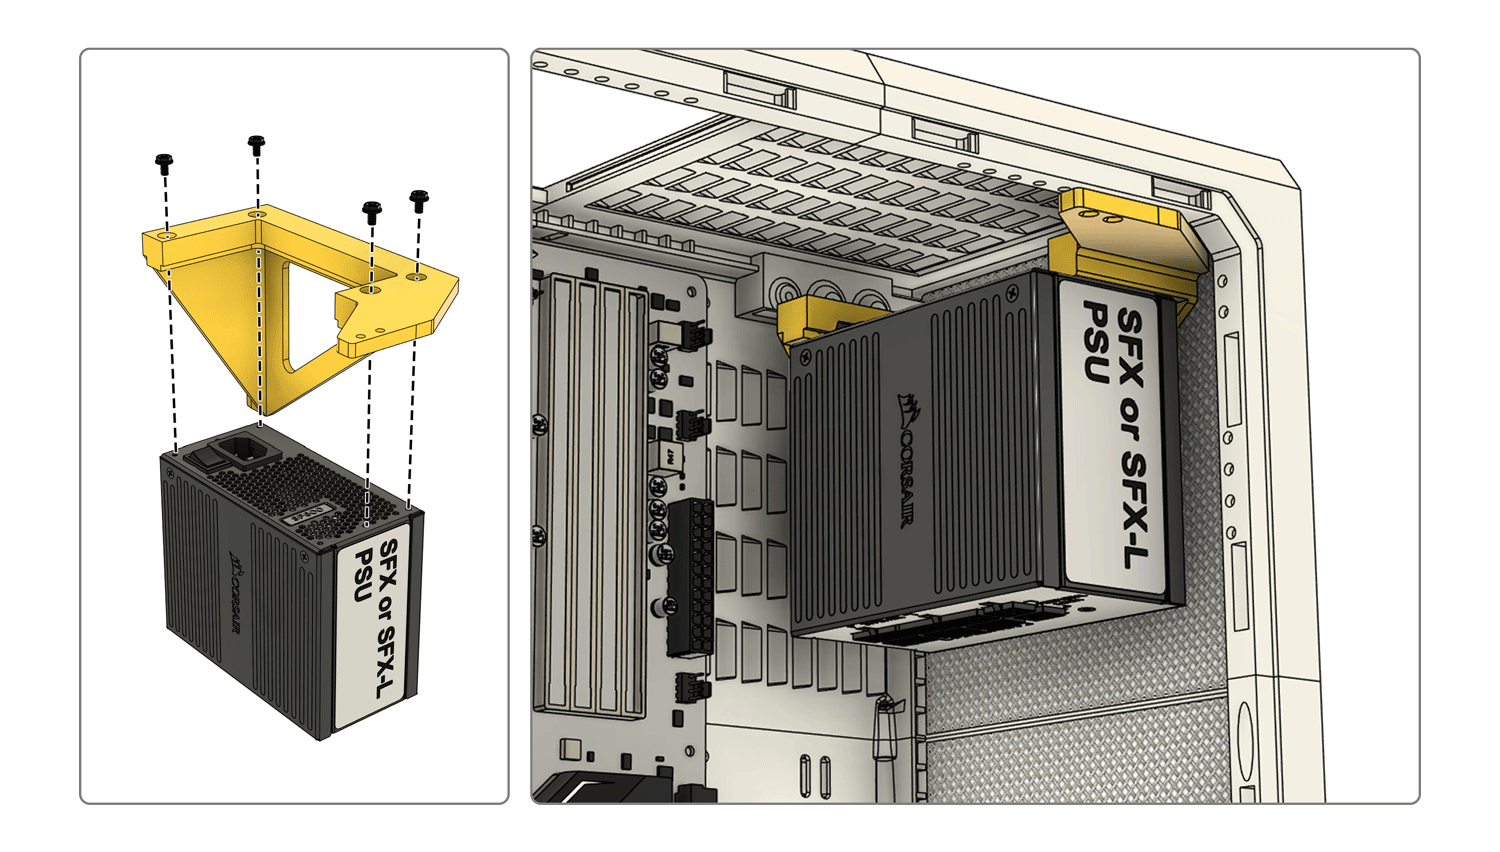
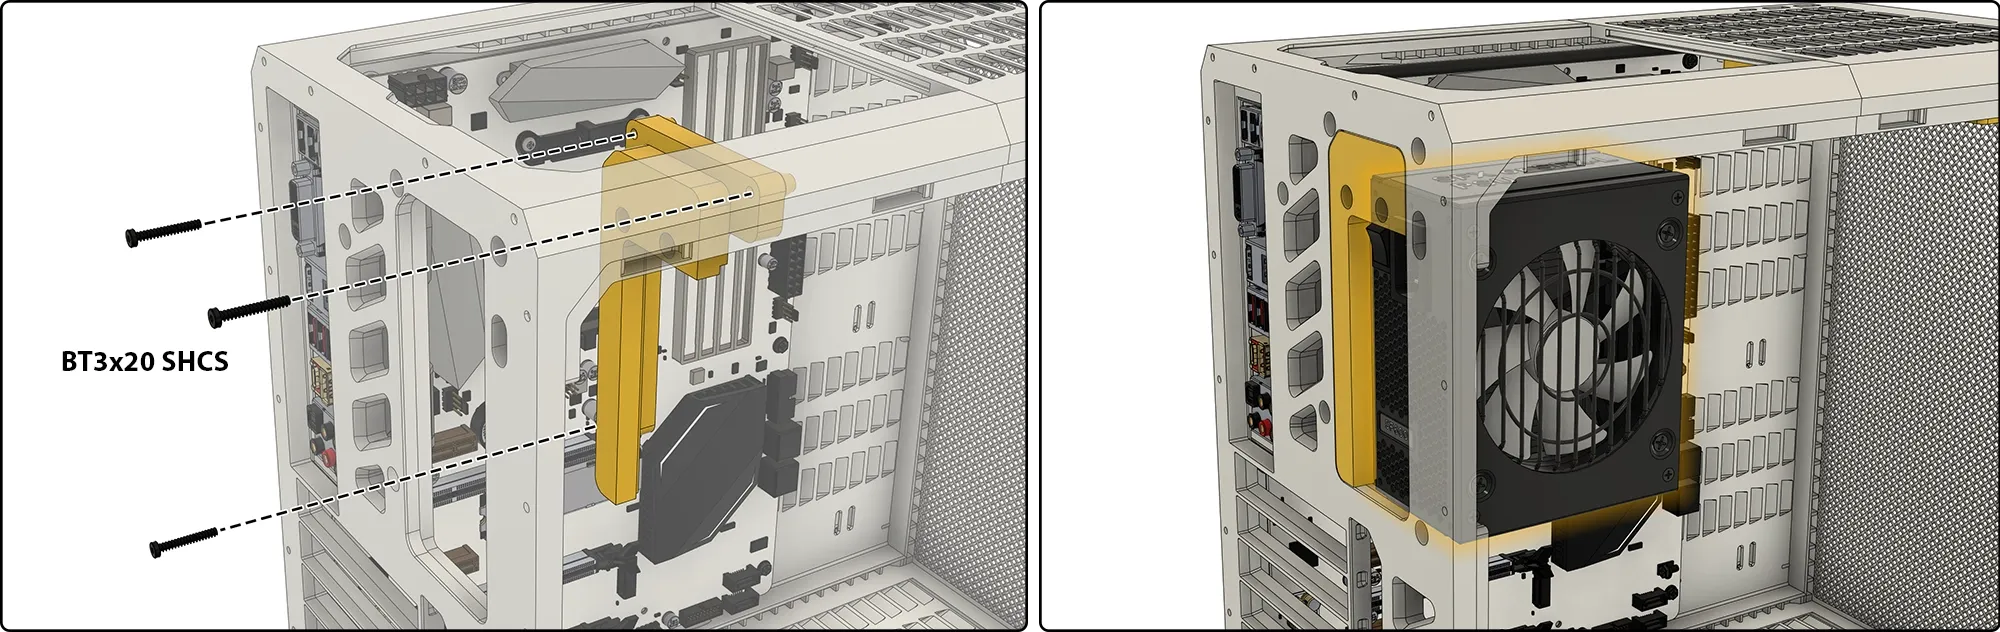
Installation PSU
Option PSU ATX avant
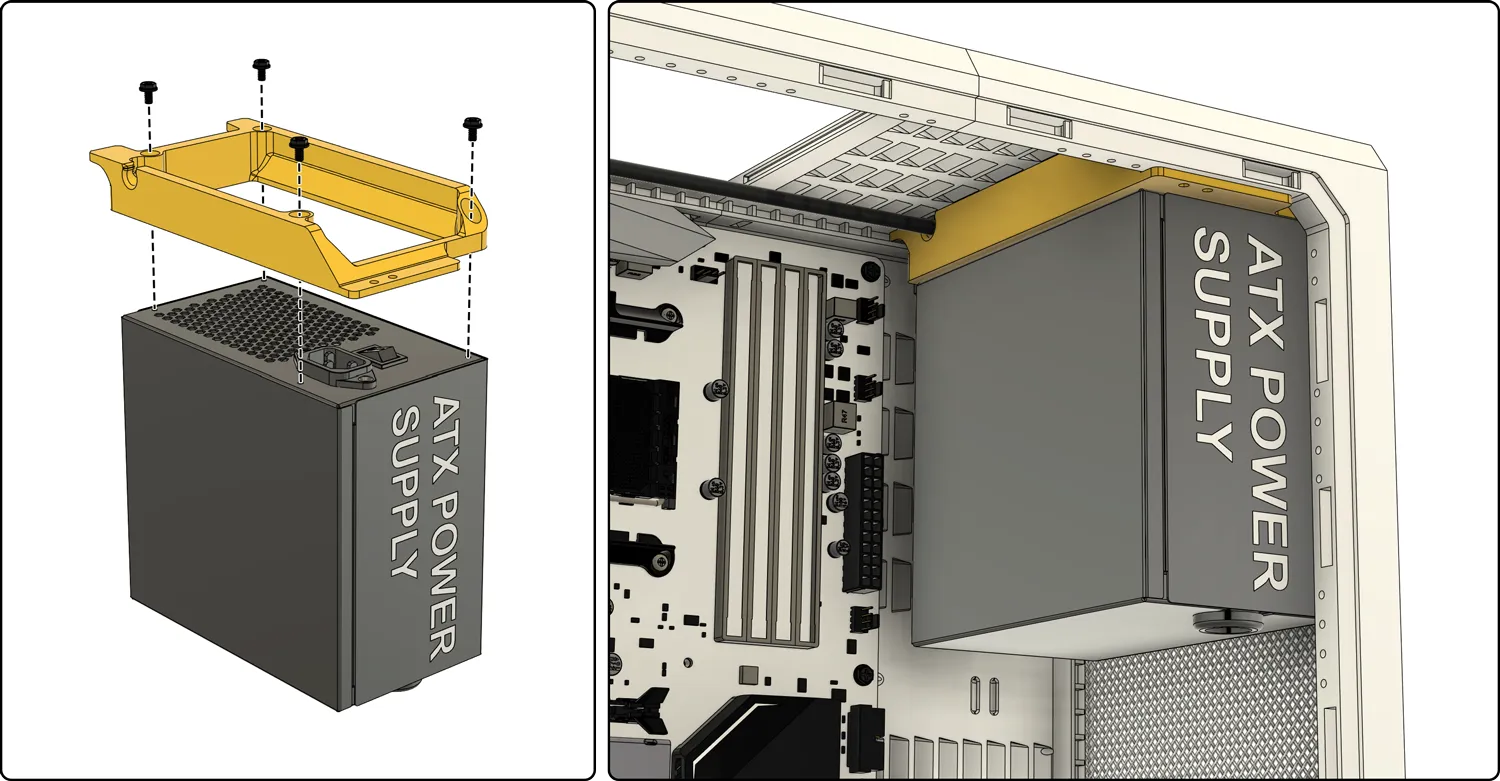
Option PSU ATX arrière
Option PSU SFX universelle
Option SFX avant
Option PSU SFX arrière
Inserts en Maille
👉Personnalisez la densité de votre maille et la forme des trous
Ventilateurs
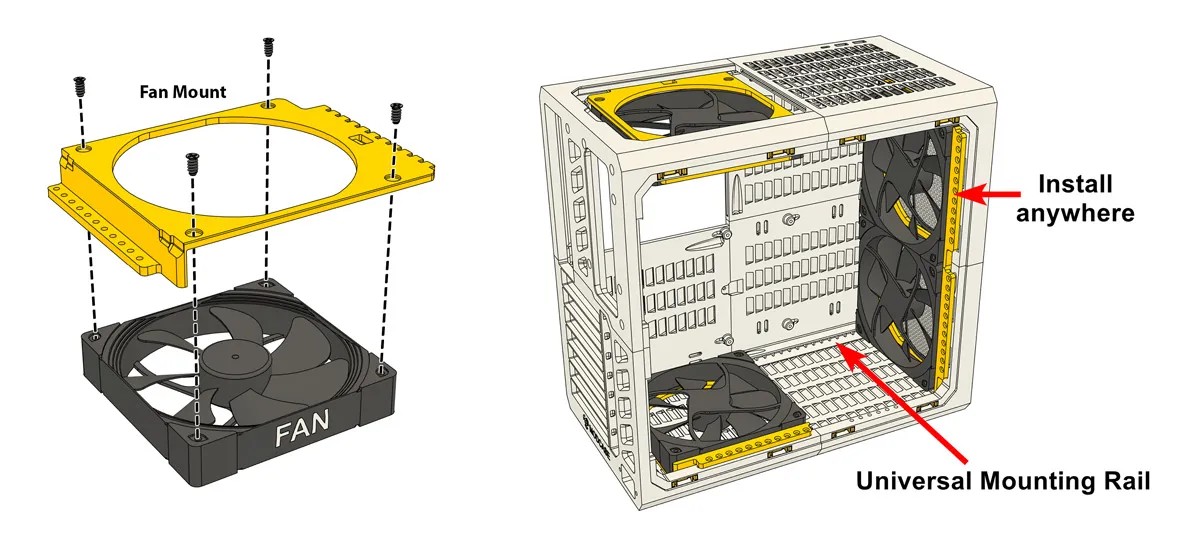
Les ventilateurs de 120 mm et 140 mm sont montés sur des supports universels qui peuvent être installés n'importe où le long du haut, de l'avant et du bas du boîtier.
Radiateurs
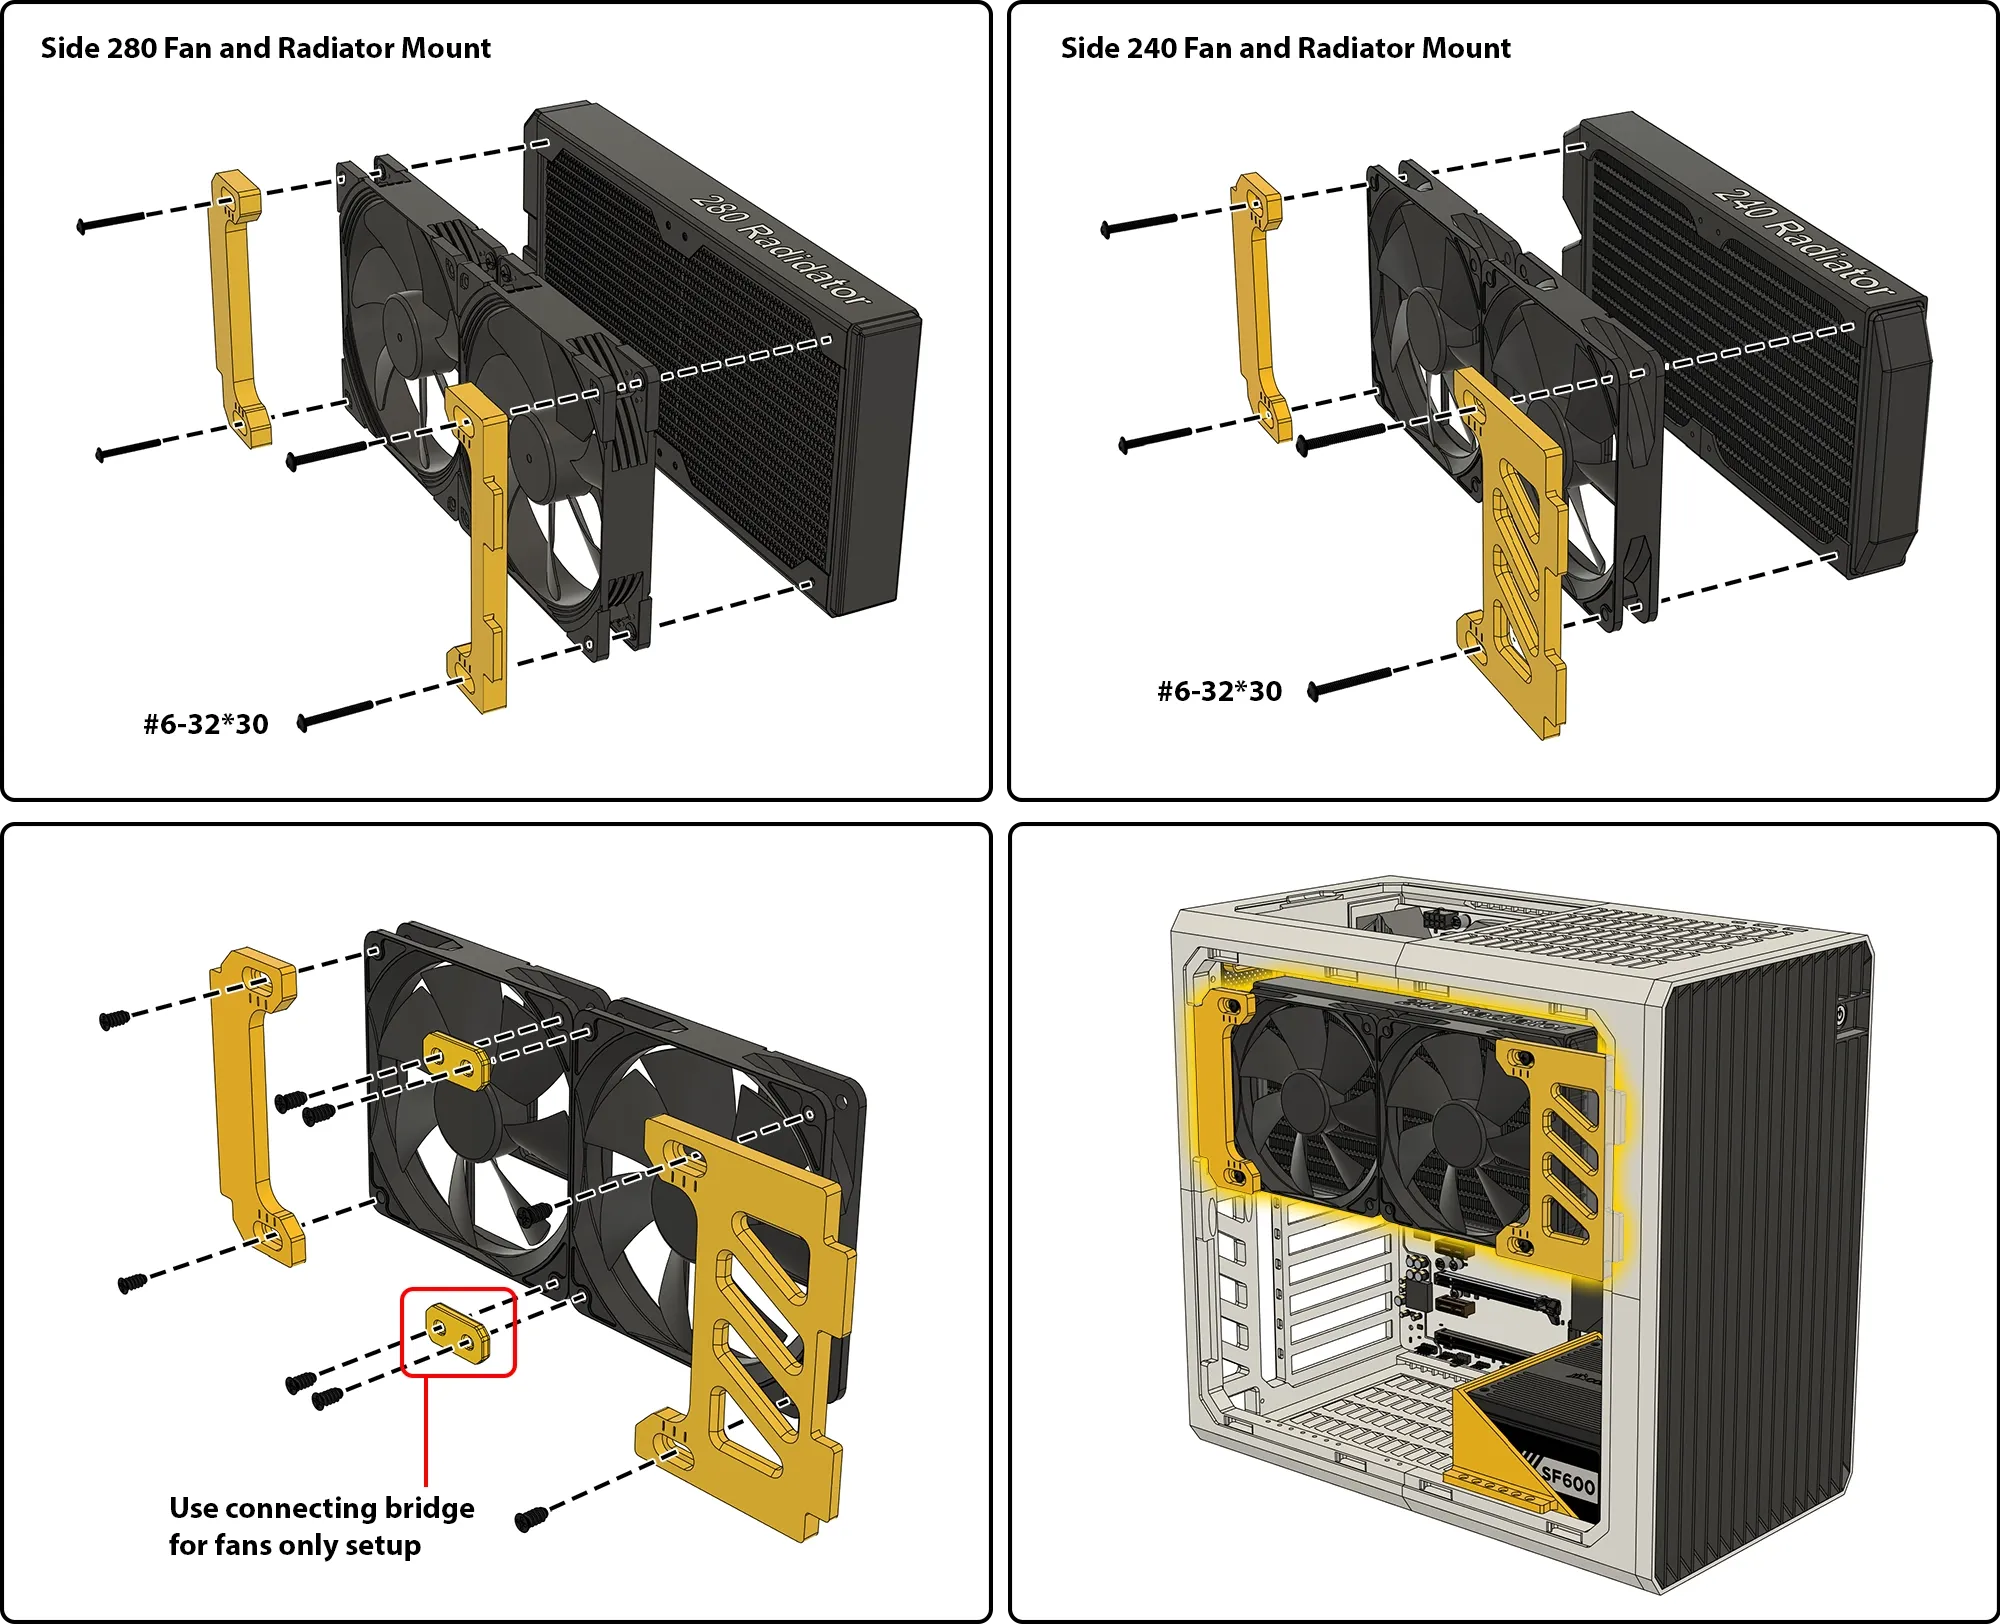
Utilisez le même support que pour les ventilateurs.
Ventilateurs et Radiateurs à Montage Latéral
Disques Durs
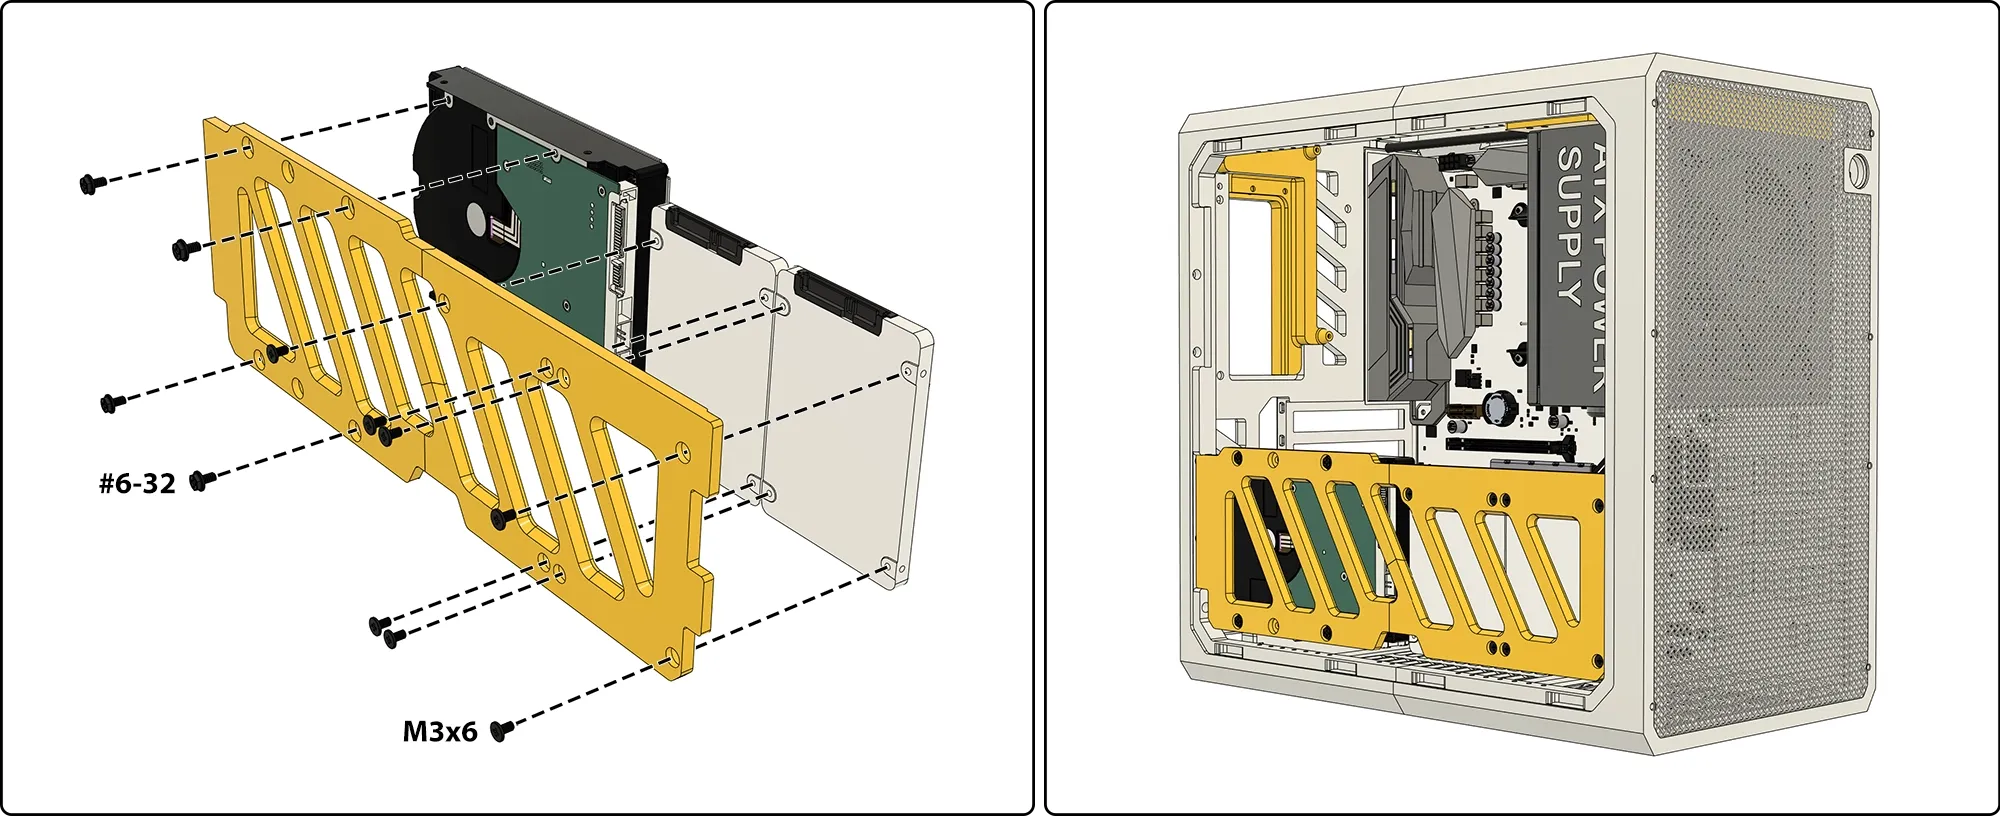
Les disques durs 3,5” ou 2,5” peuvent être montés sur les supports ci-dessous. Il est possible d'utiliser plusieurs plaques si vous disposez de l'espace. Placez-les n'importe où le long du haut, de l'avant et du bas de votre boîtier.
Module pour Disque Empilable
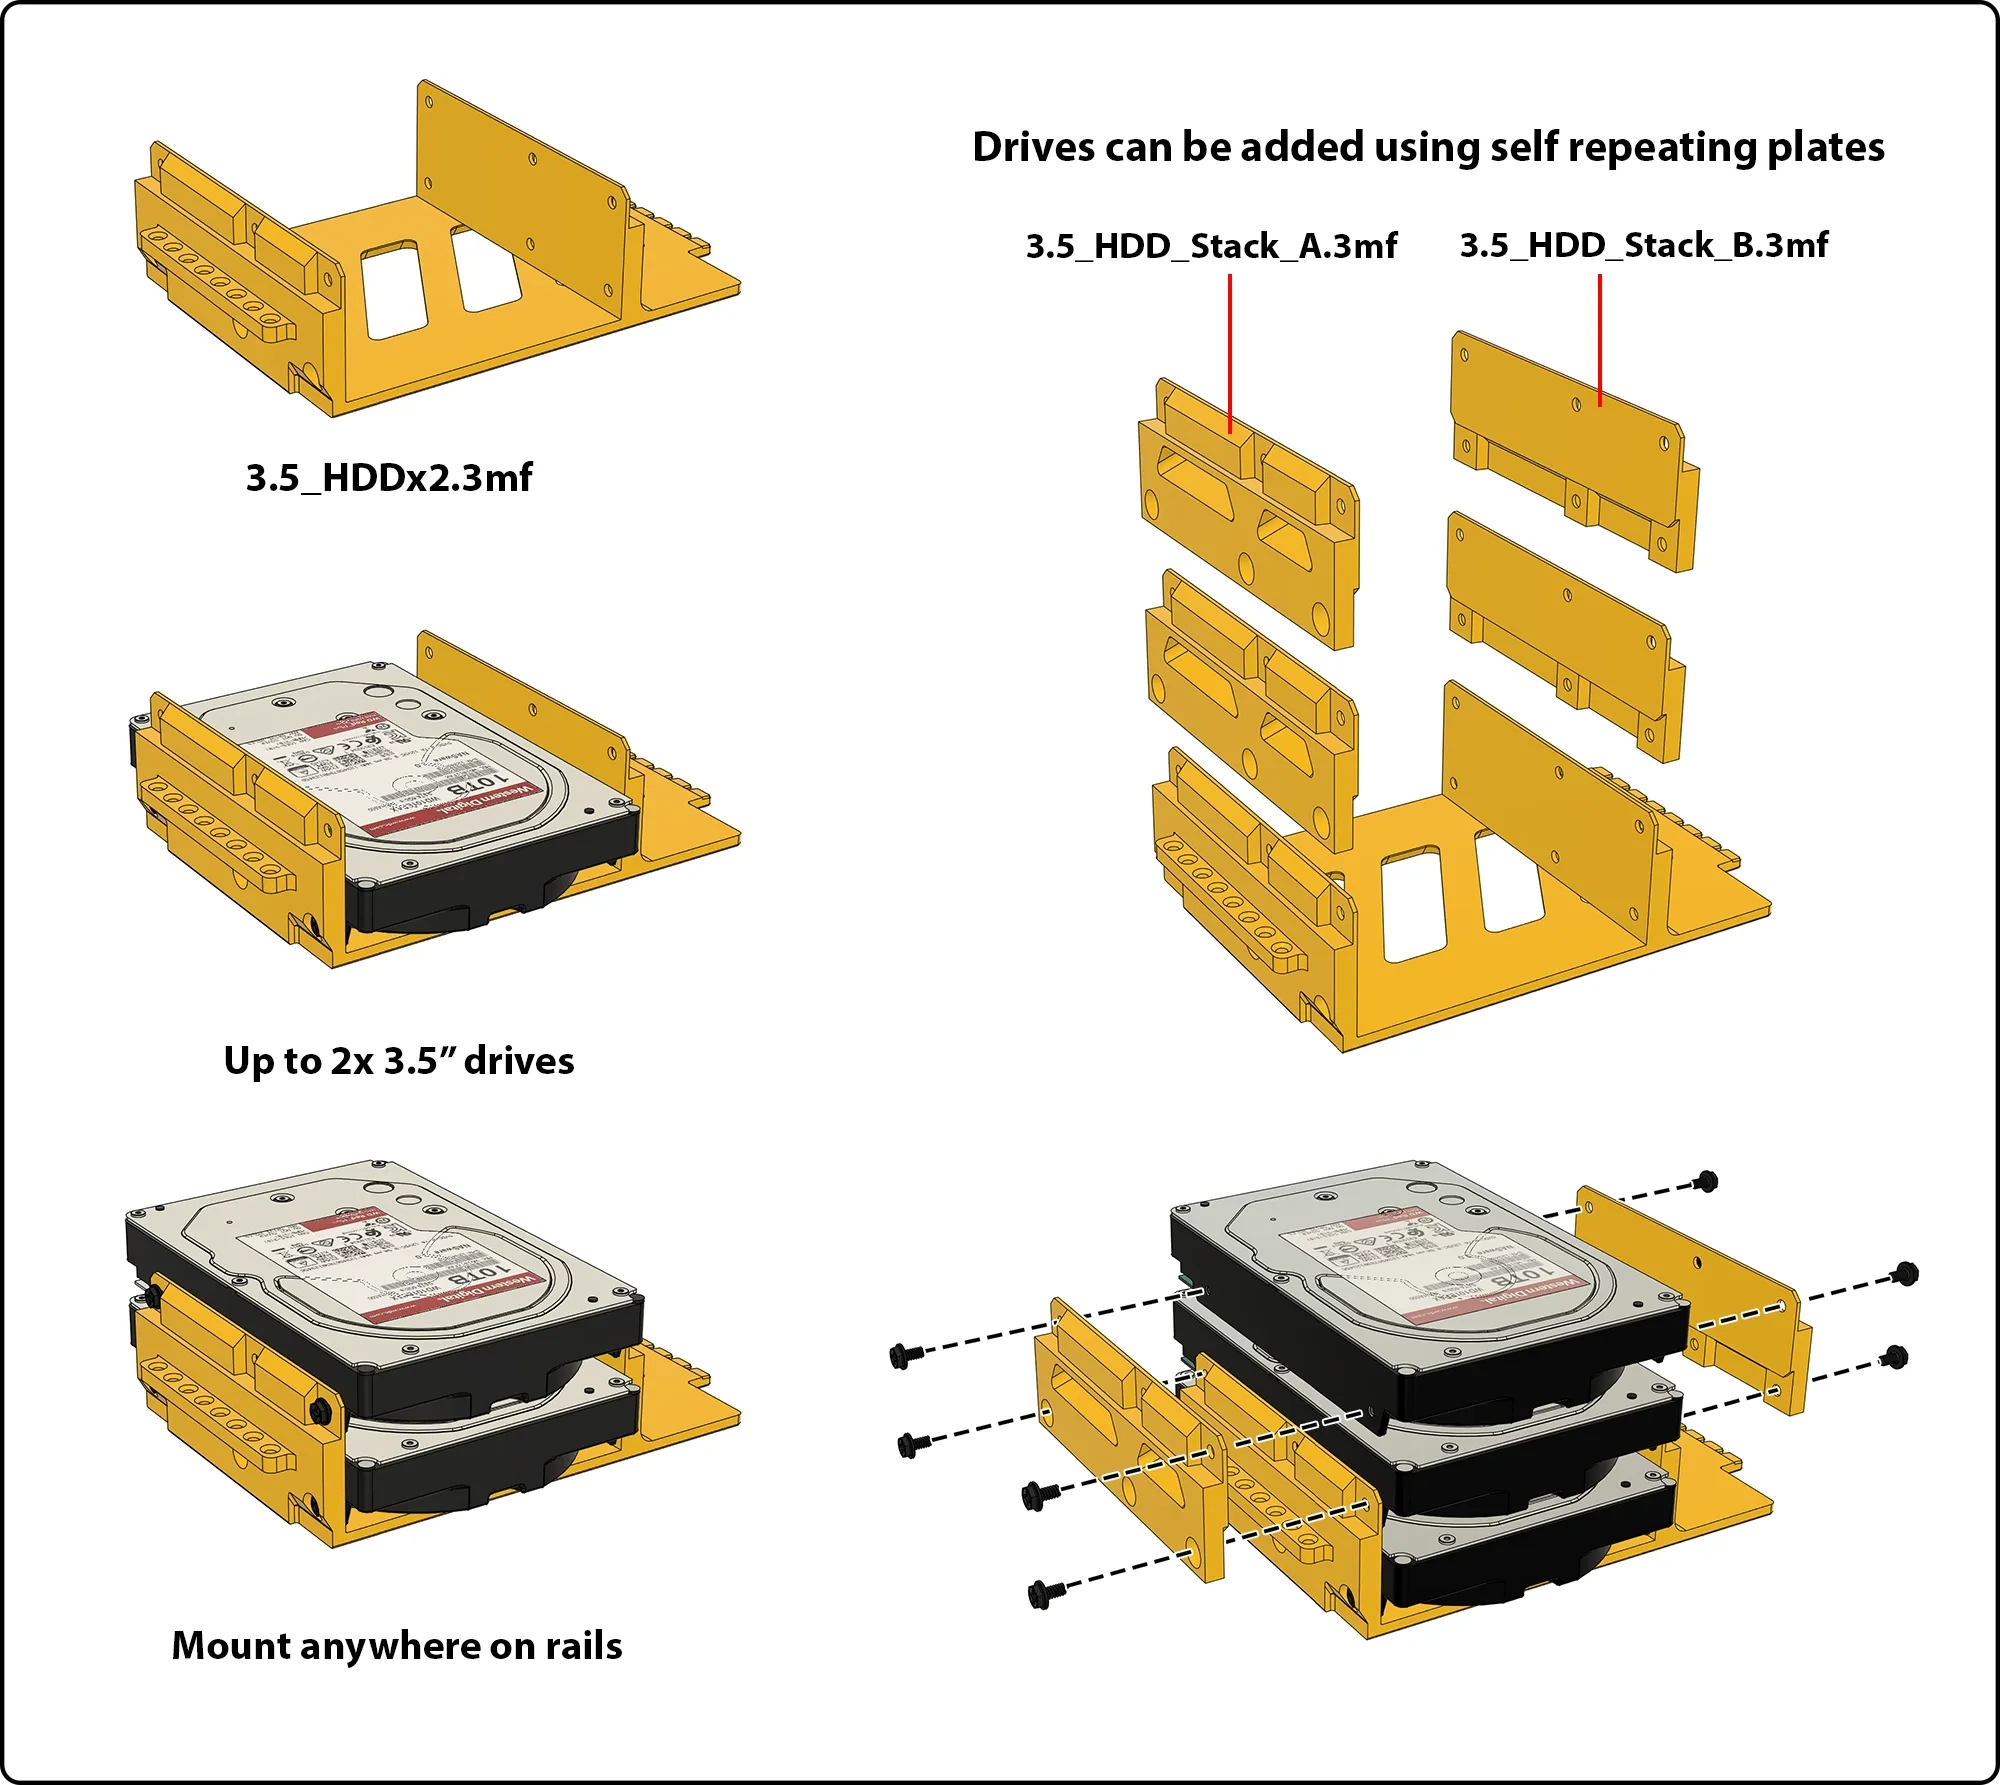
Se monte sur des rails universels.
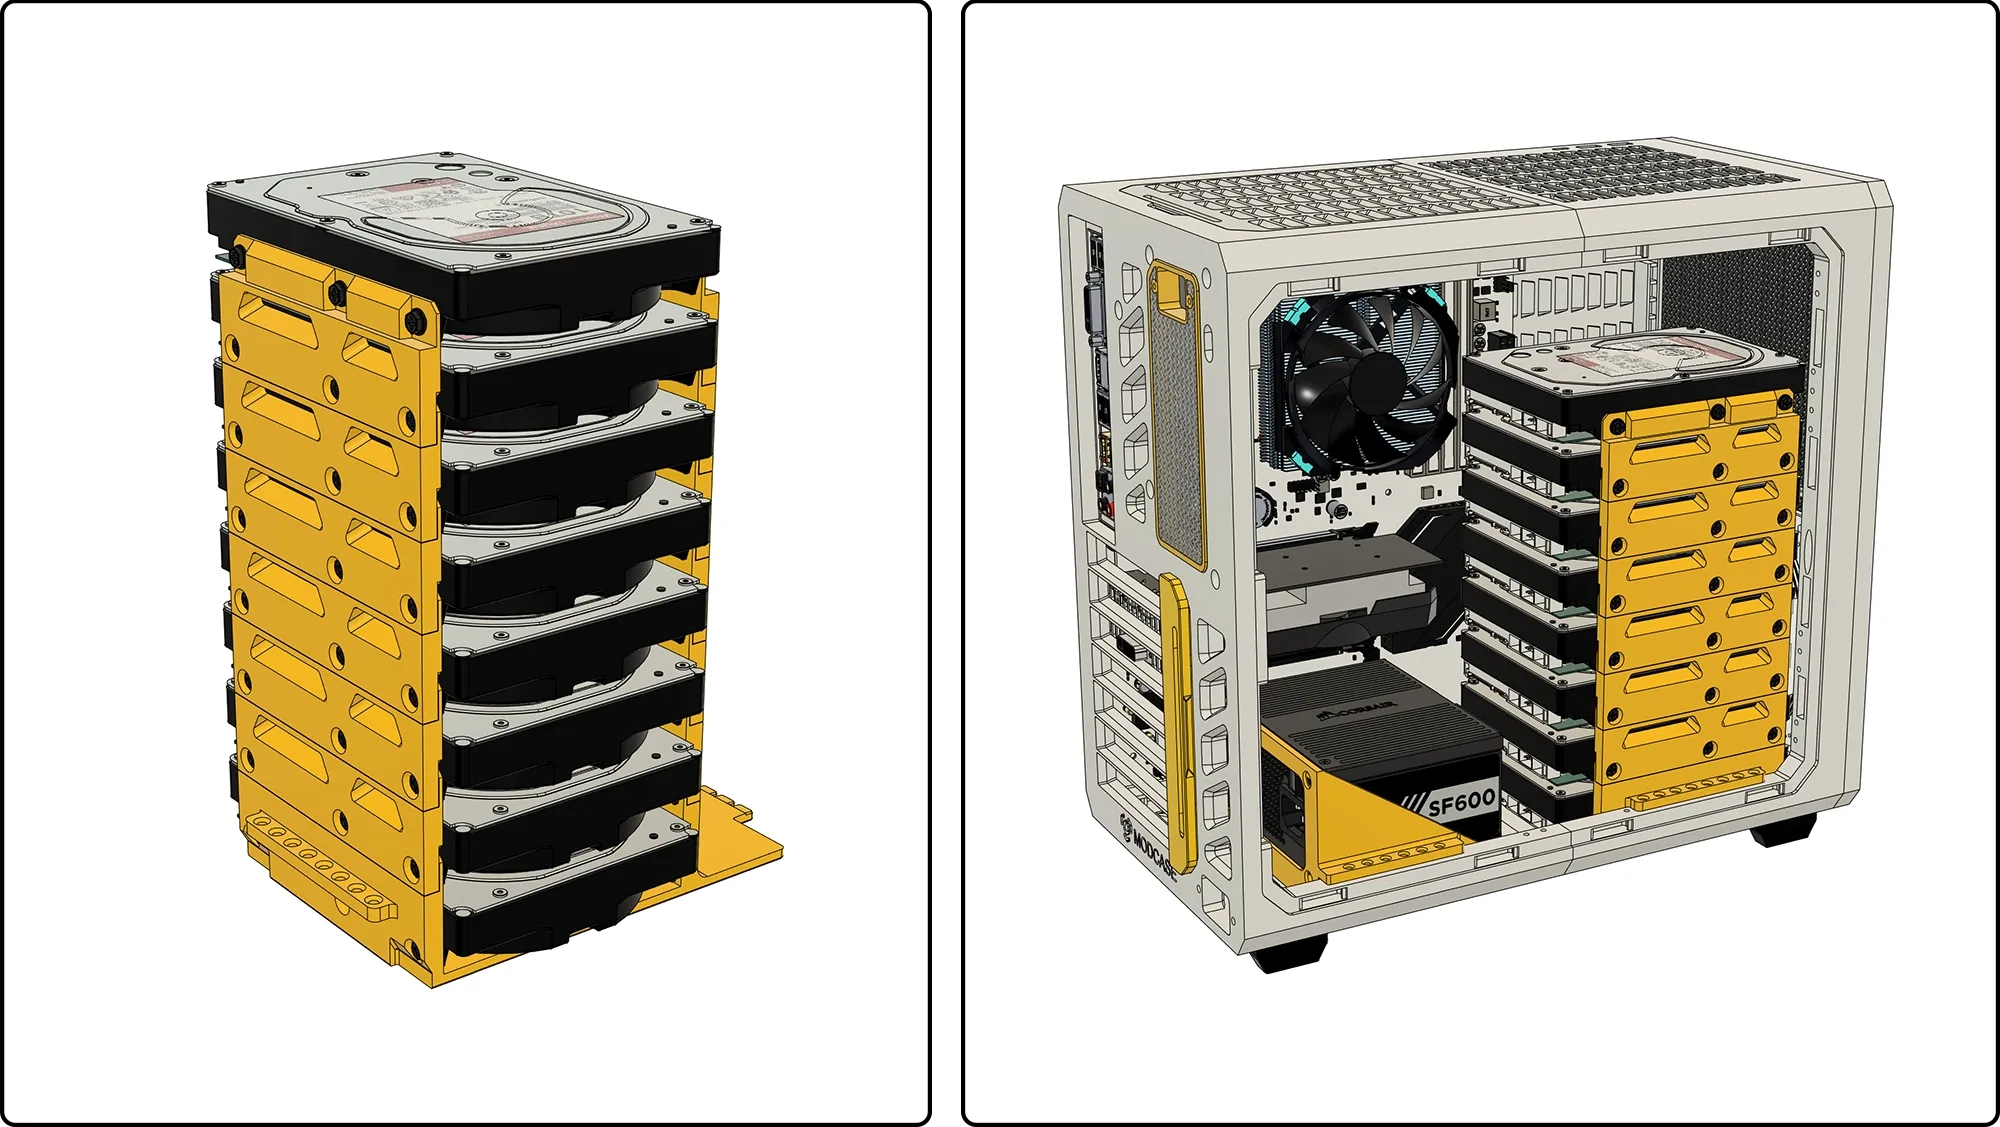
Adaptateur pour Disque 2.5" pour Module Empilable
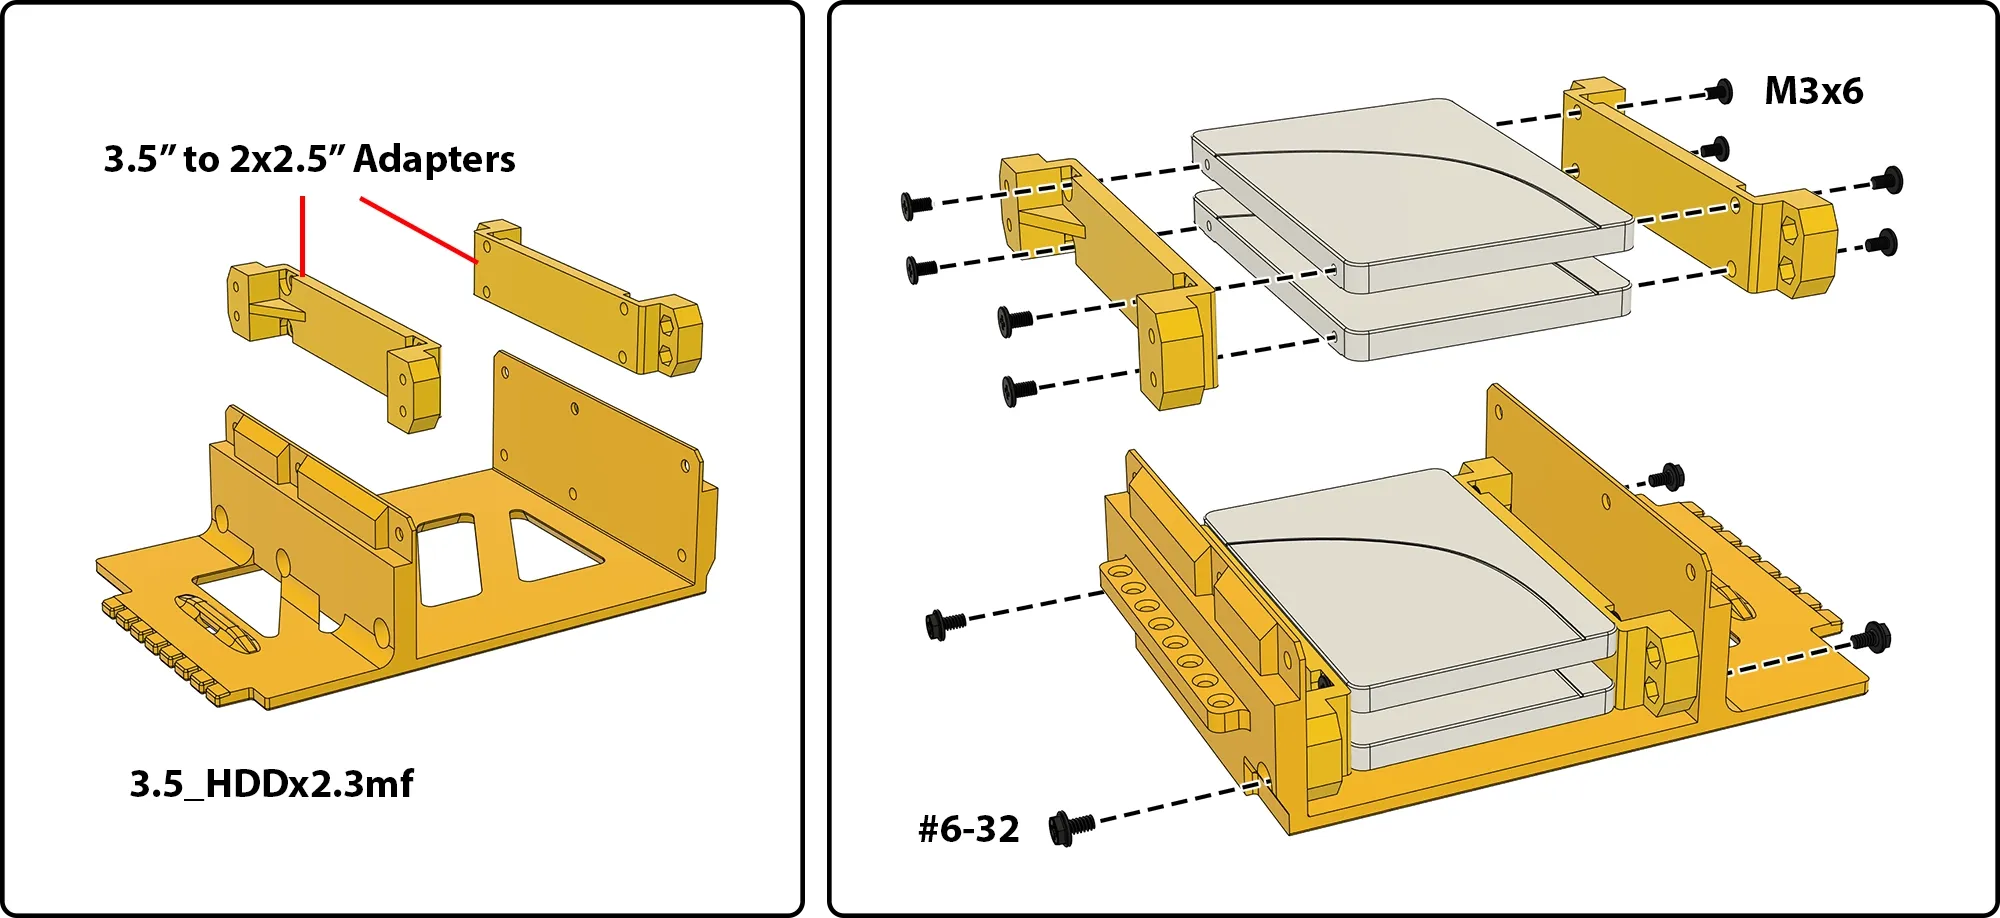
Utiliser des vis standard pour disques PC : M3×6 pour disques 2,5", #6-32 pour disques 3,5".
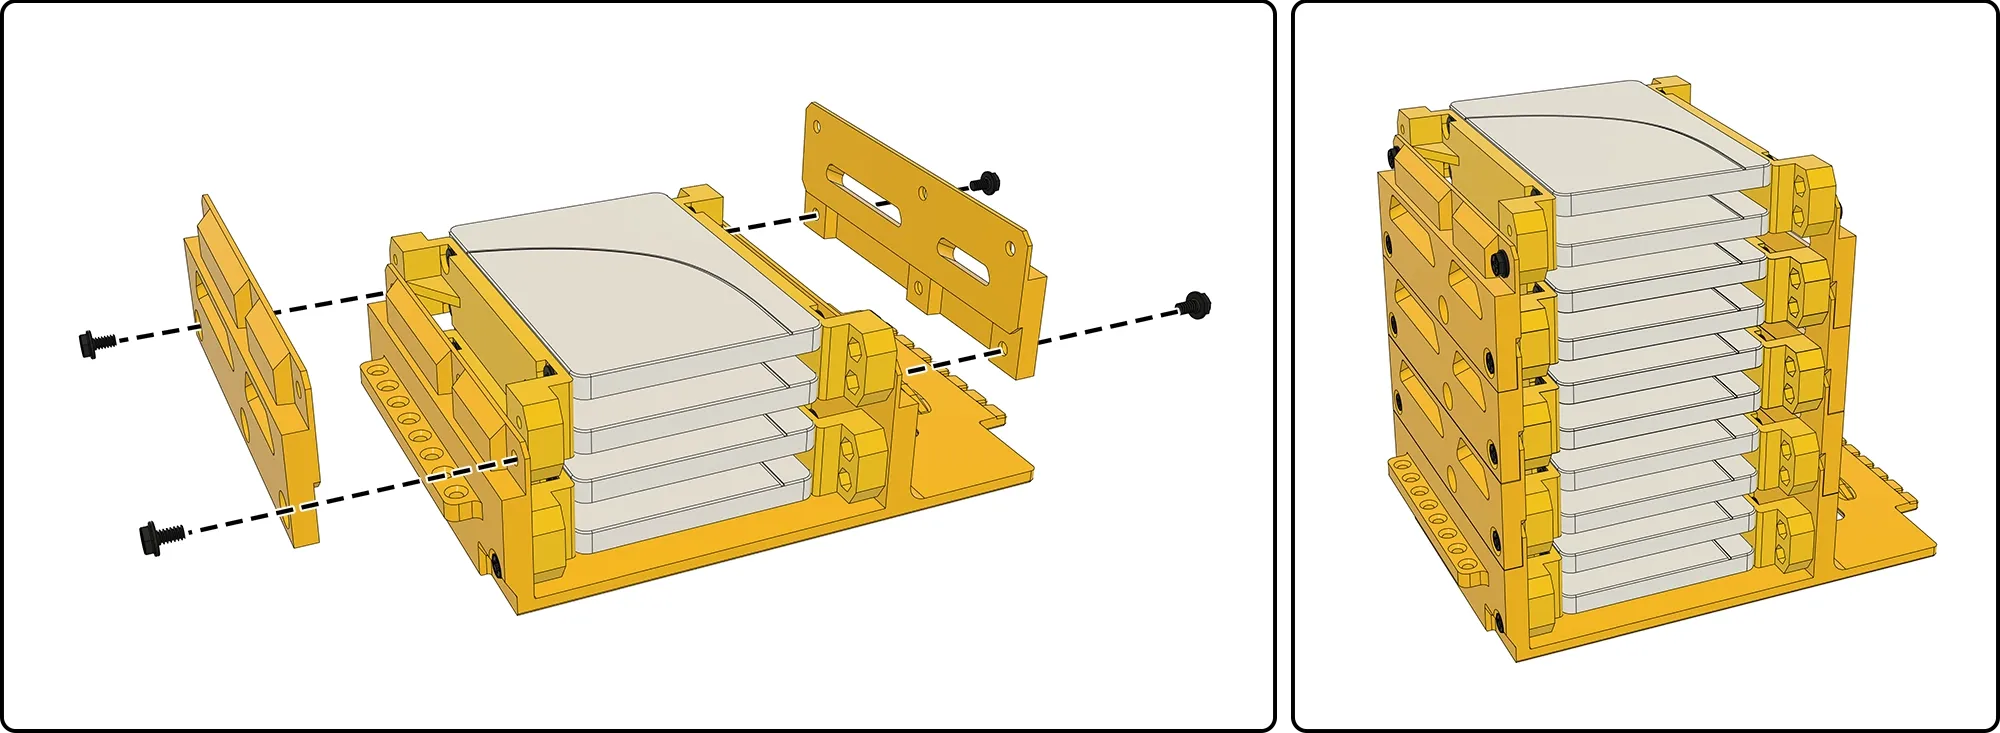
Les disques 2,5" peuvent également être empilés en utilisant des plaques répétées.
Supports pour Disques Latéraux
USB et Bouton d'Alimentation
- Câble USB-A (Lien) - 👉Couper les ailettes en caoutchouc (c'est souple) et utiliser des vis standard pour ordinateur (#6-32*6) pour fixer le câble.
- Câble USB-C (Lien) - Des câbles similaires pourraient fonctionner.
Installer le BOUTON D'ALIMENTATION (Lien)
👉C'est un trou standard de Ø16mm, pour s'adapter aux boutons d'alimentation PC ronds de 16mm communément disponibles.
Panneaux Latéraux et Ports
4 panneaux latéraux divisés sont inclus pour les imprimantes plus petites
Installation du Couvercle Arrière
Le nouveau couvercle arrière s'installe par l'intérieur et se fixe avec des vis.
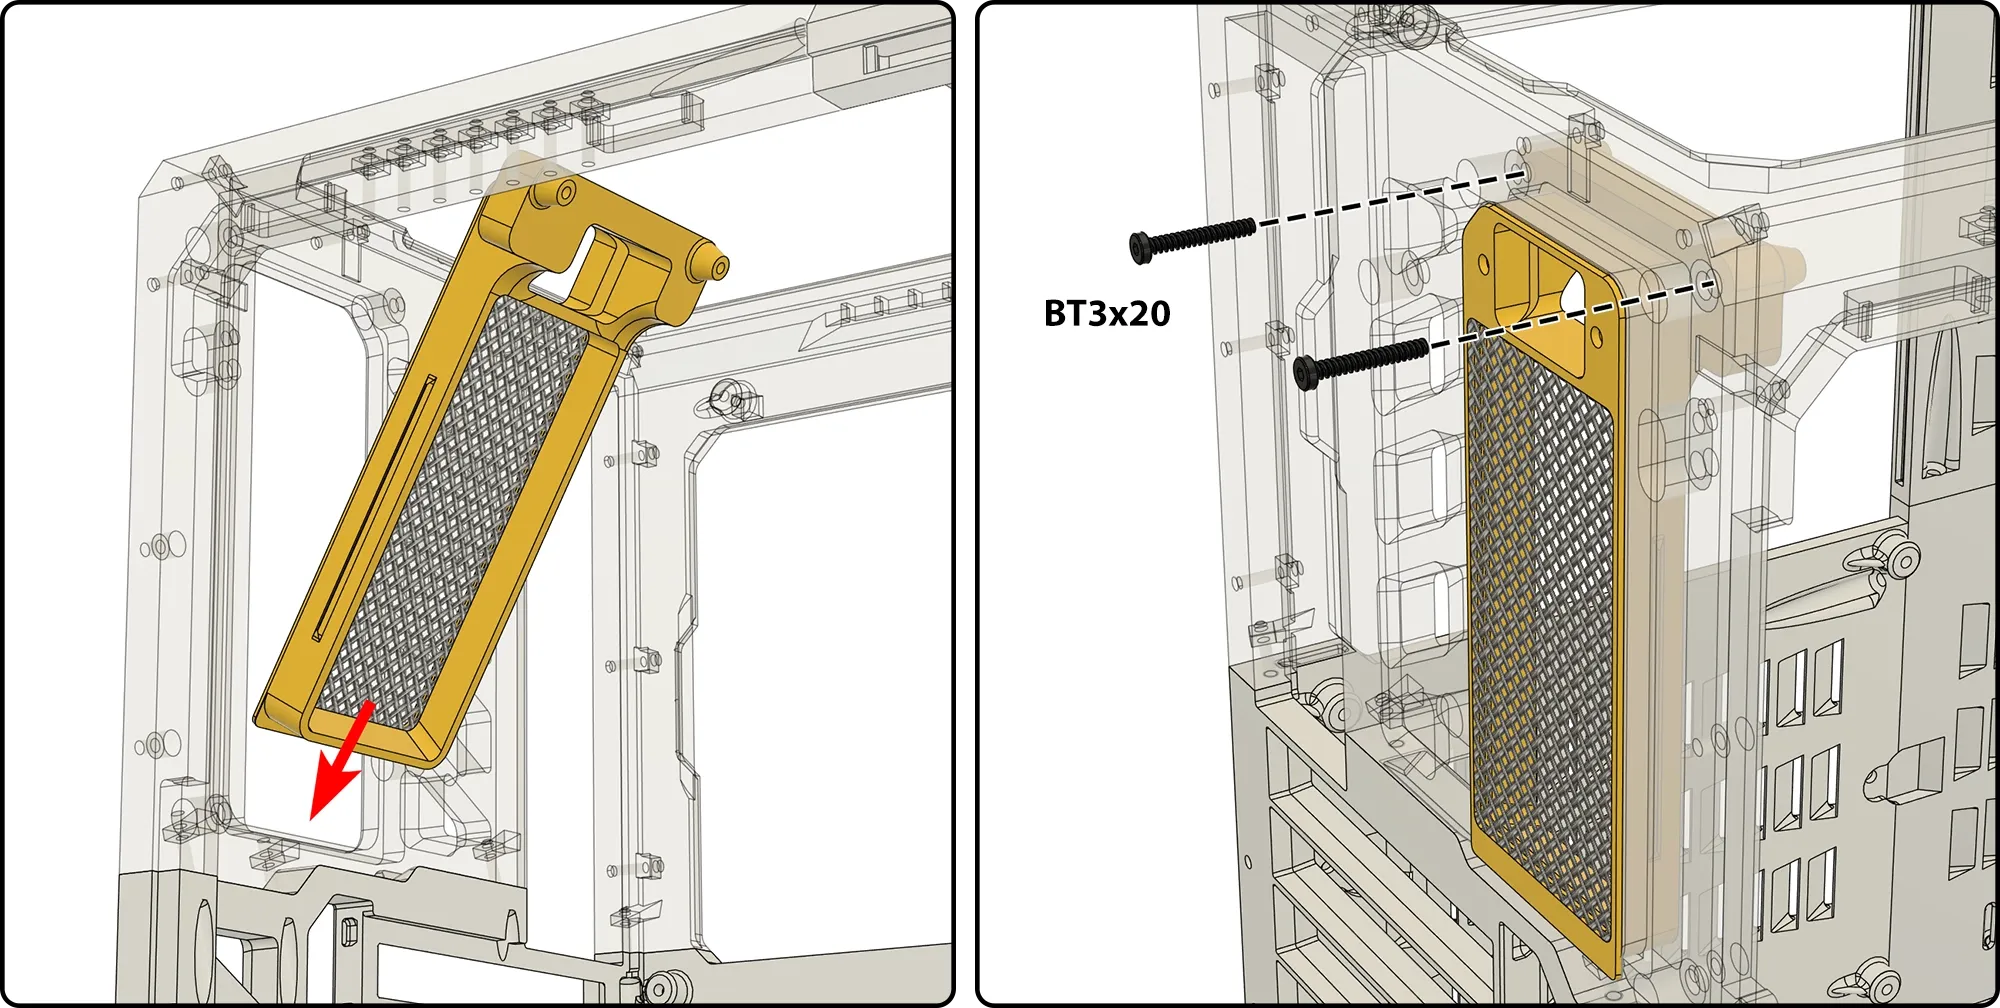
Ce couvercle arrière dispose d'un point de montage pour le câble PSU.
Panneaux latéraux avec écran
4 panneaux latéraux divisés peuvent loger des écrans de 5" (Lien). Les panneaux latéraux monoblocs peuvent loger des écrans de 7" (Lien) ainsi que de 5".
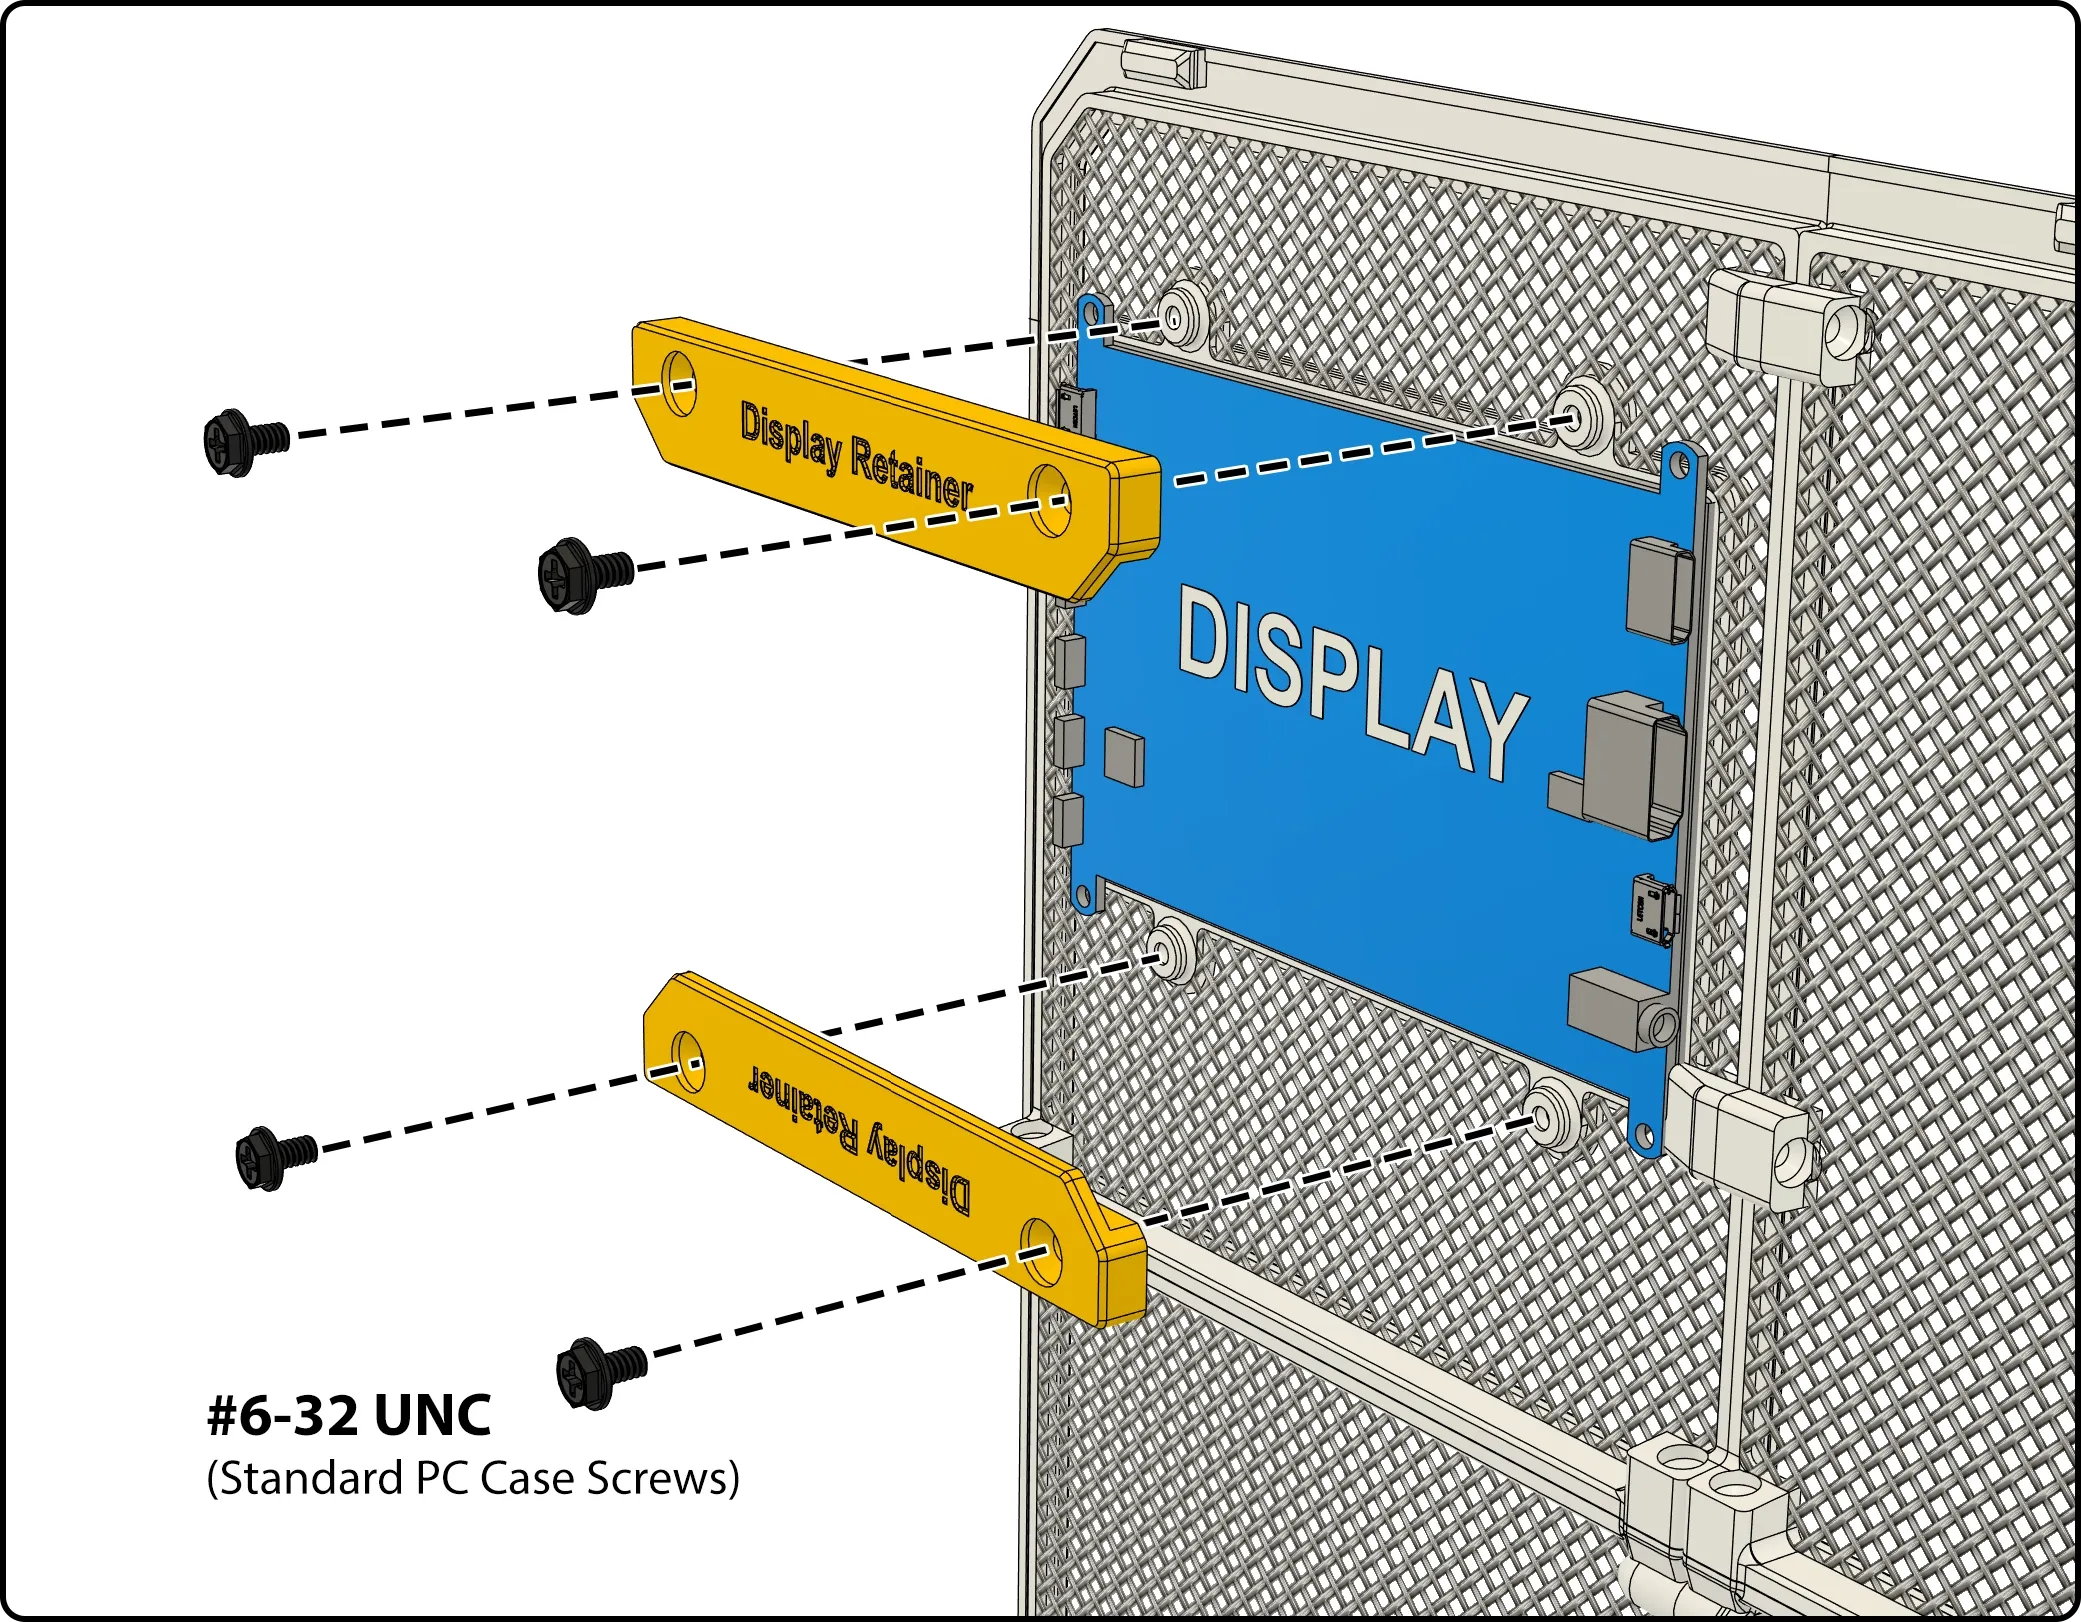
Note : Le panneau latéral avec station d'accueil pour téléphone a été retiré suite aux retours - en raison de considérations de sécurité liées au montage d'appareils alimentés par batterie dans un environnement chauffé. Les supports pour écrans de 5" et 7" sont recommandés pour les écrans de contrôle.
Modification du Panneau Latéral Transparent
Ce châssis vous permet de monter votre propre matériau transparent (acrylique ou polycarbonate) pour une option de panneau latéral transparent. Vous devrez couper votre matériau aux dimensions suivantes et utiliser de la colle cyanoacrylate (super glue) ou de la résine époxy bicomposant pour coller votre panneau au châssis.
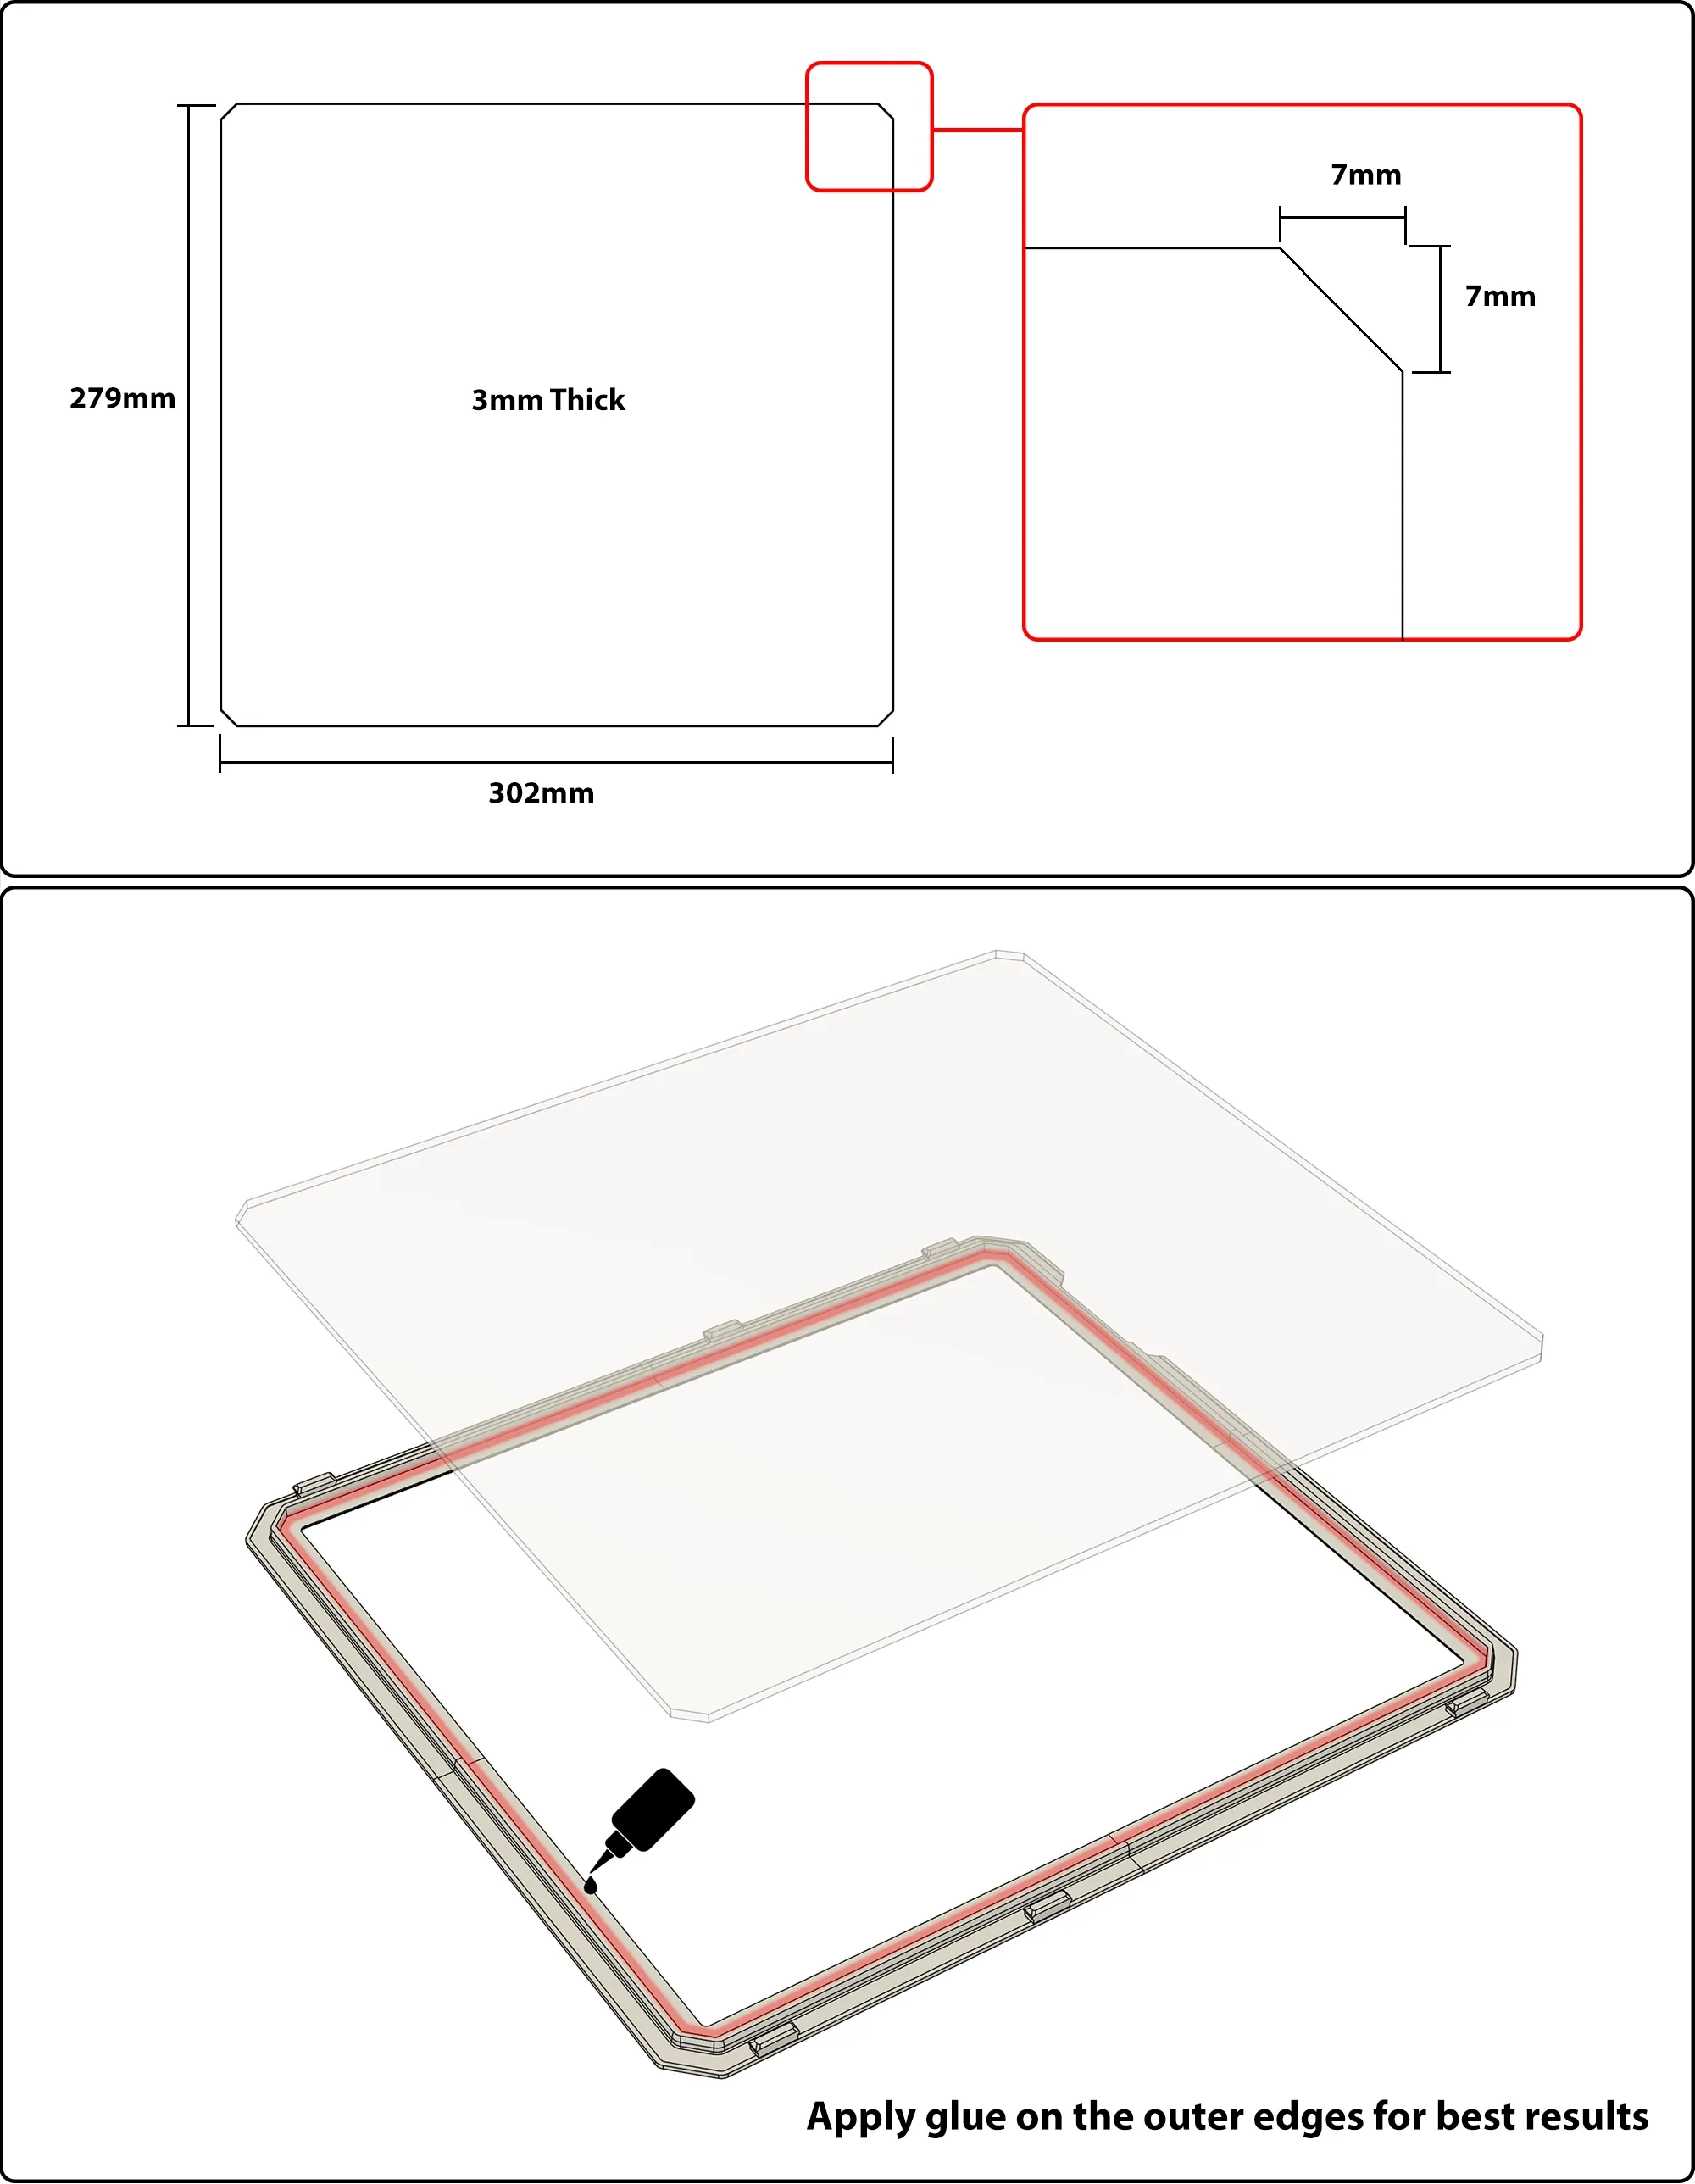
Note : Les panneaux en maille sont recommandés pour un flux d'air optimal. Assurez un refroidissement adéquat lorsque vous utilisez ce panneau latéral solide.
Mise à jour : 3 options de packs d'extension de tailles différentes. Les dimensions du matériau pour les options de panneau latéral étendu sont les suivantes.
| Standard (Sans extension) | 279 x 302 x 3mm |
| Extension 80mm | 279 x 382 x 3mm |
| Extension 100mm | 279 x 402 x 3mm |
| Extension 120mm | 279 x 422 x 3mm |
Module Vertical
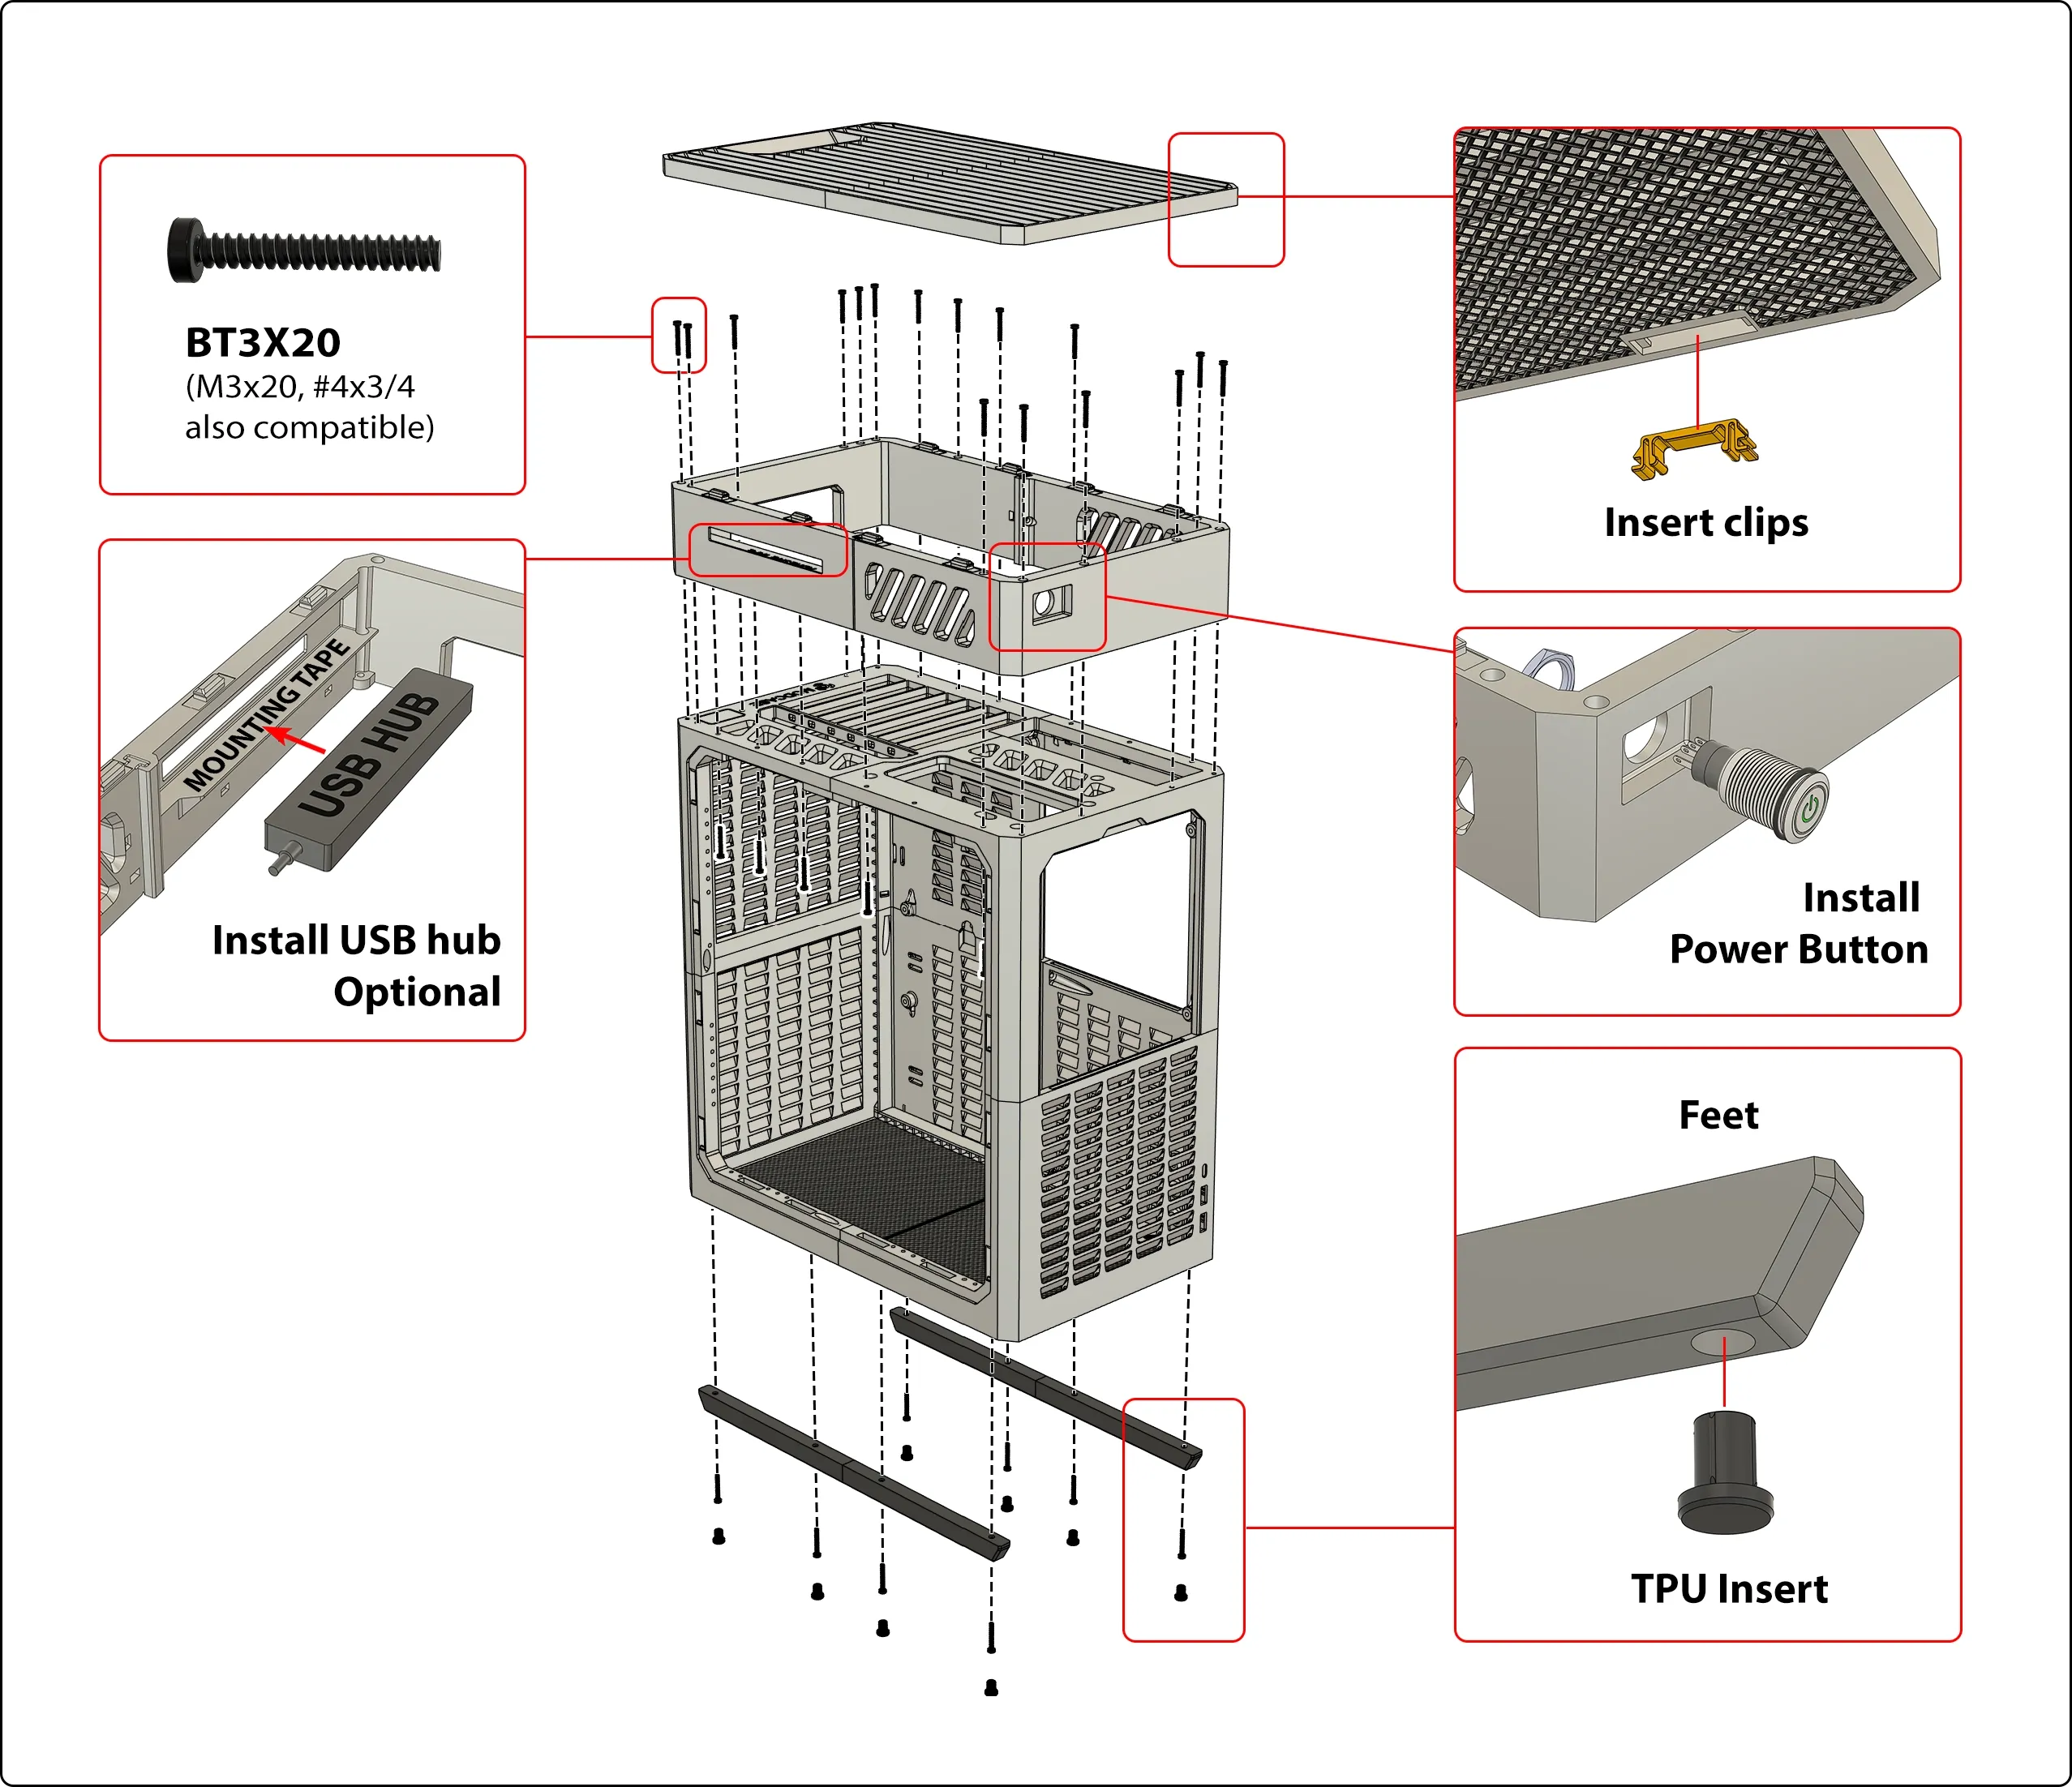
Le module vertical ajoute une poignée et vous permet d'utiliser votre boîtier à la verticale pour un encombrement minimal. La plaque supérieure est amovible pour un accès facile à tous vos ports IO.
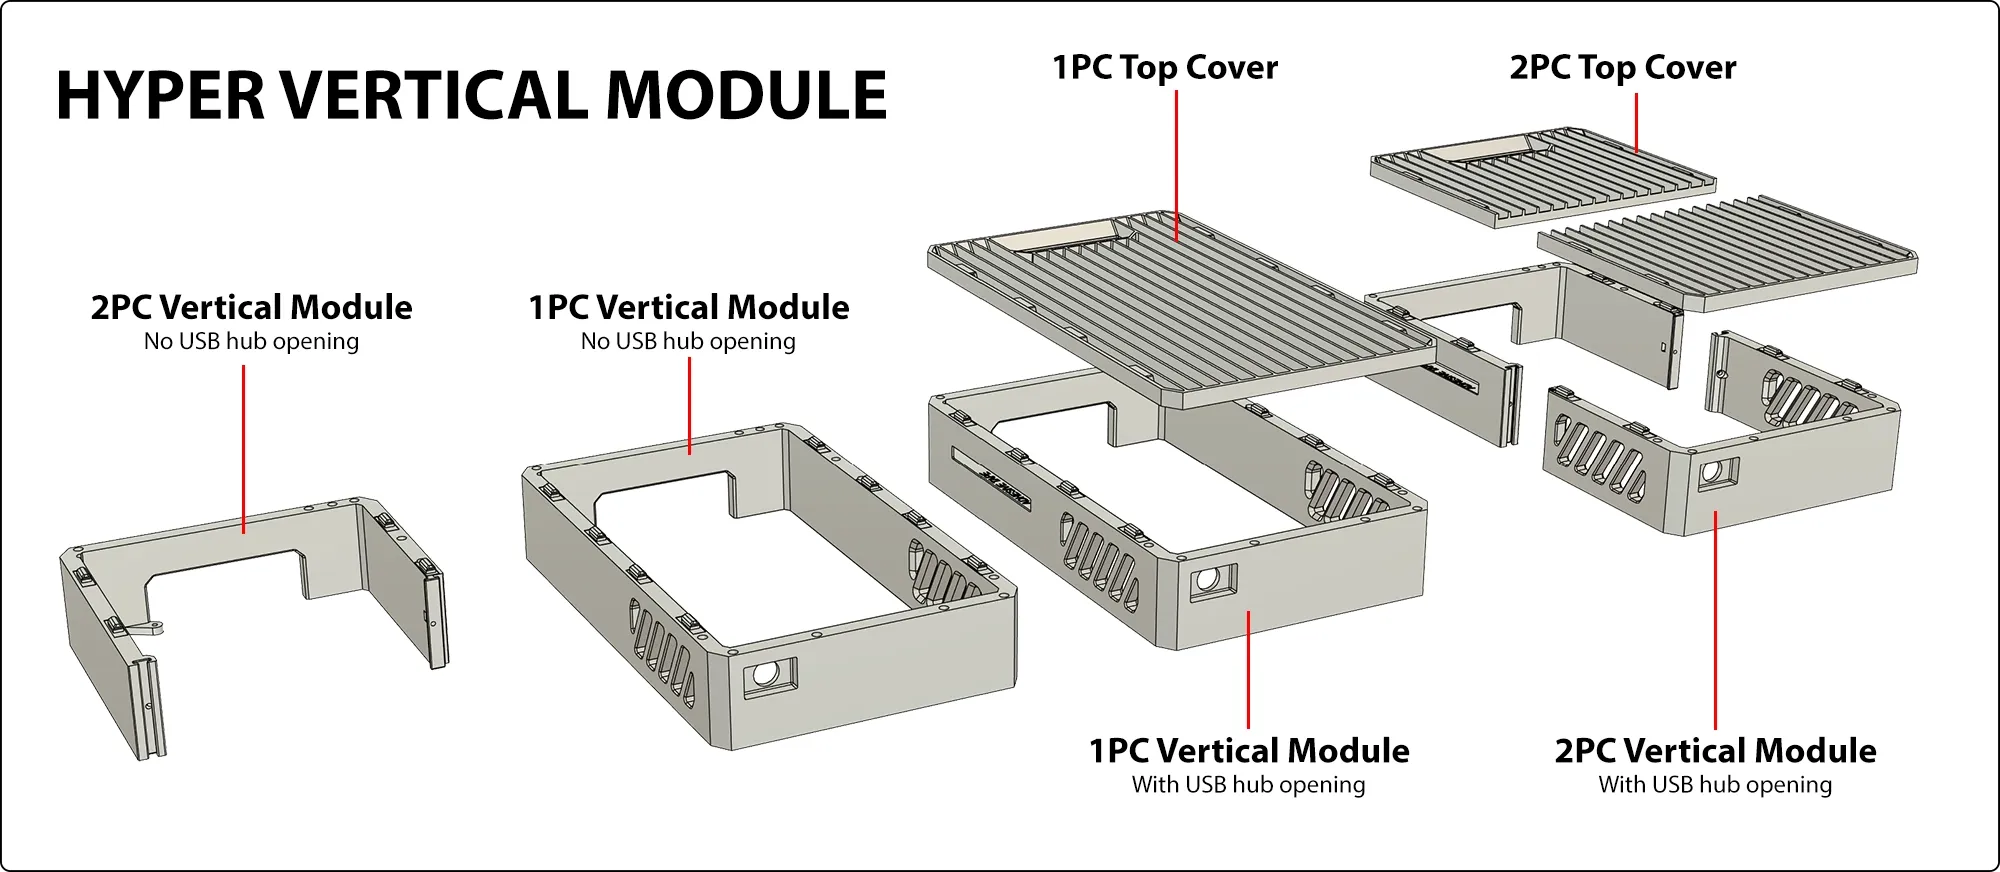
Une variante de montage optionnelle pour le hub USB est incluse pour étendre vos options IO. Utilisez du ruban adhésif pour le montage. Ce hub (Lien) fonctionne bien avec un câble de rallonge. D'autres hubs fonctionnent également ; la longueur maximale recommandée pour le hub USB est de 155 mm. Les hubs plats de forme rectangulaire sont optimaux.
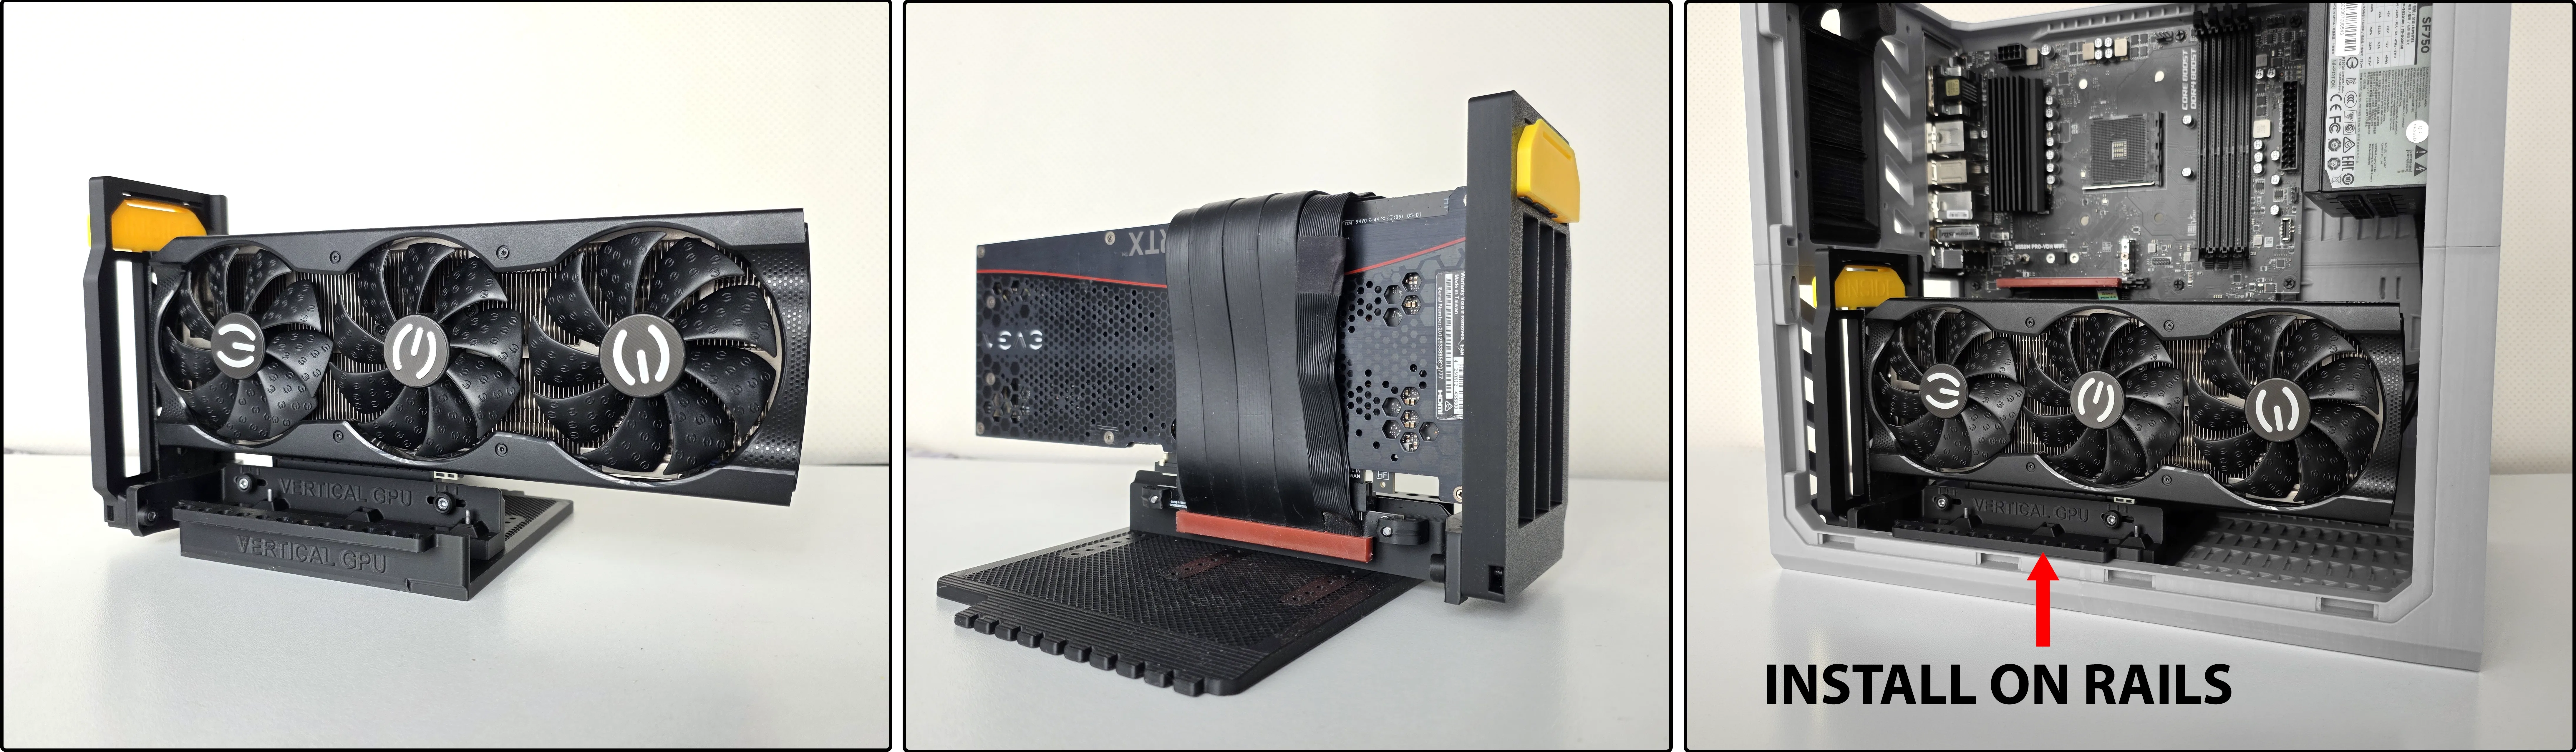
Support GPU Vertical
Ce support GPU vertical peut être réglé dans 3 directions pour s'adapter à votre câble Riser PCIE droit. Il prend en compte les variations de pas et de hauteur des trous de montage sur votre câble.
Tous les câbles riser droits sont pris en charge. Une longueur de 19 cm est recommandée. Ex. PCIE 4.0 Dual Reverse, ou Linkup PCIE 5.0 Dual Reverse. (Comme l'extrémité de la carte mère ne nécessite pas de connecteur inverse, un câble riser simple inverse fonctionne encore mieux, mais ils peuvent être plus difficiles à trouver.)

Vous avez besoin de 2 vis M3x20 et 2 écrous carrés M3 pour les blocs de montage du riser. Le reste peut utiliser des vis autotaraudeuses ou des vis M3 sans écrous dans les emplacements optionnels.
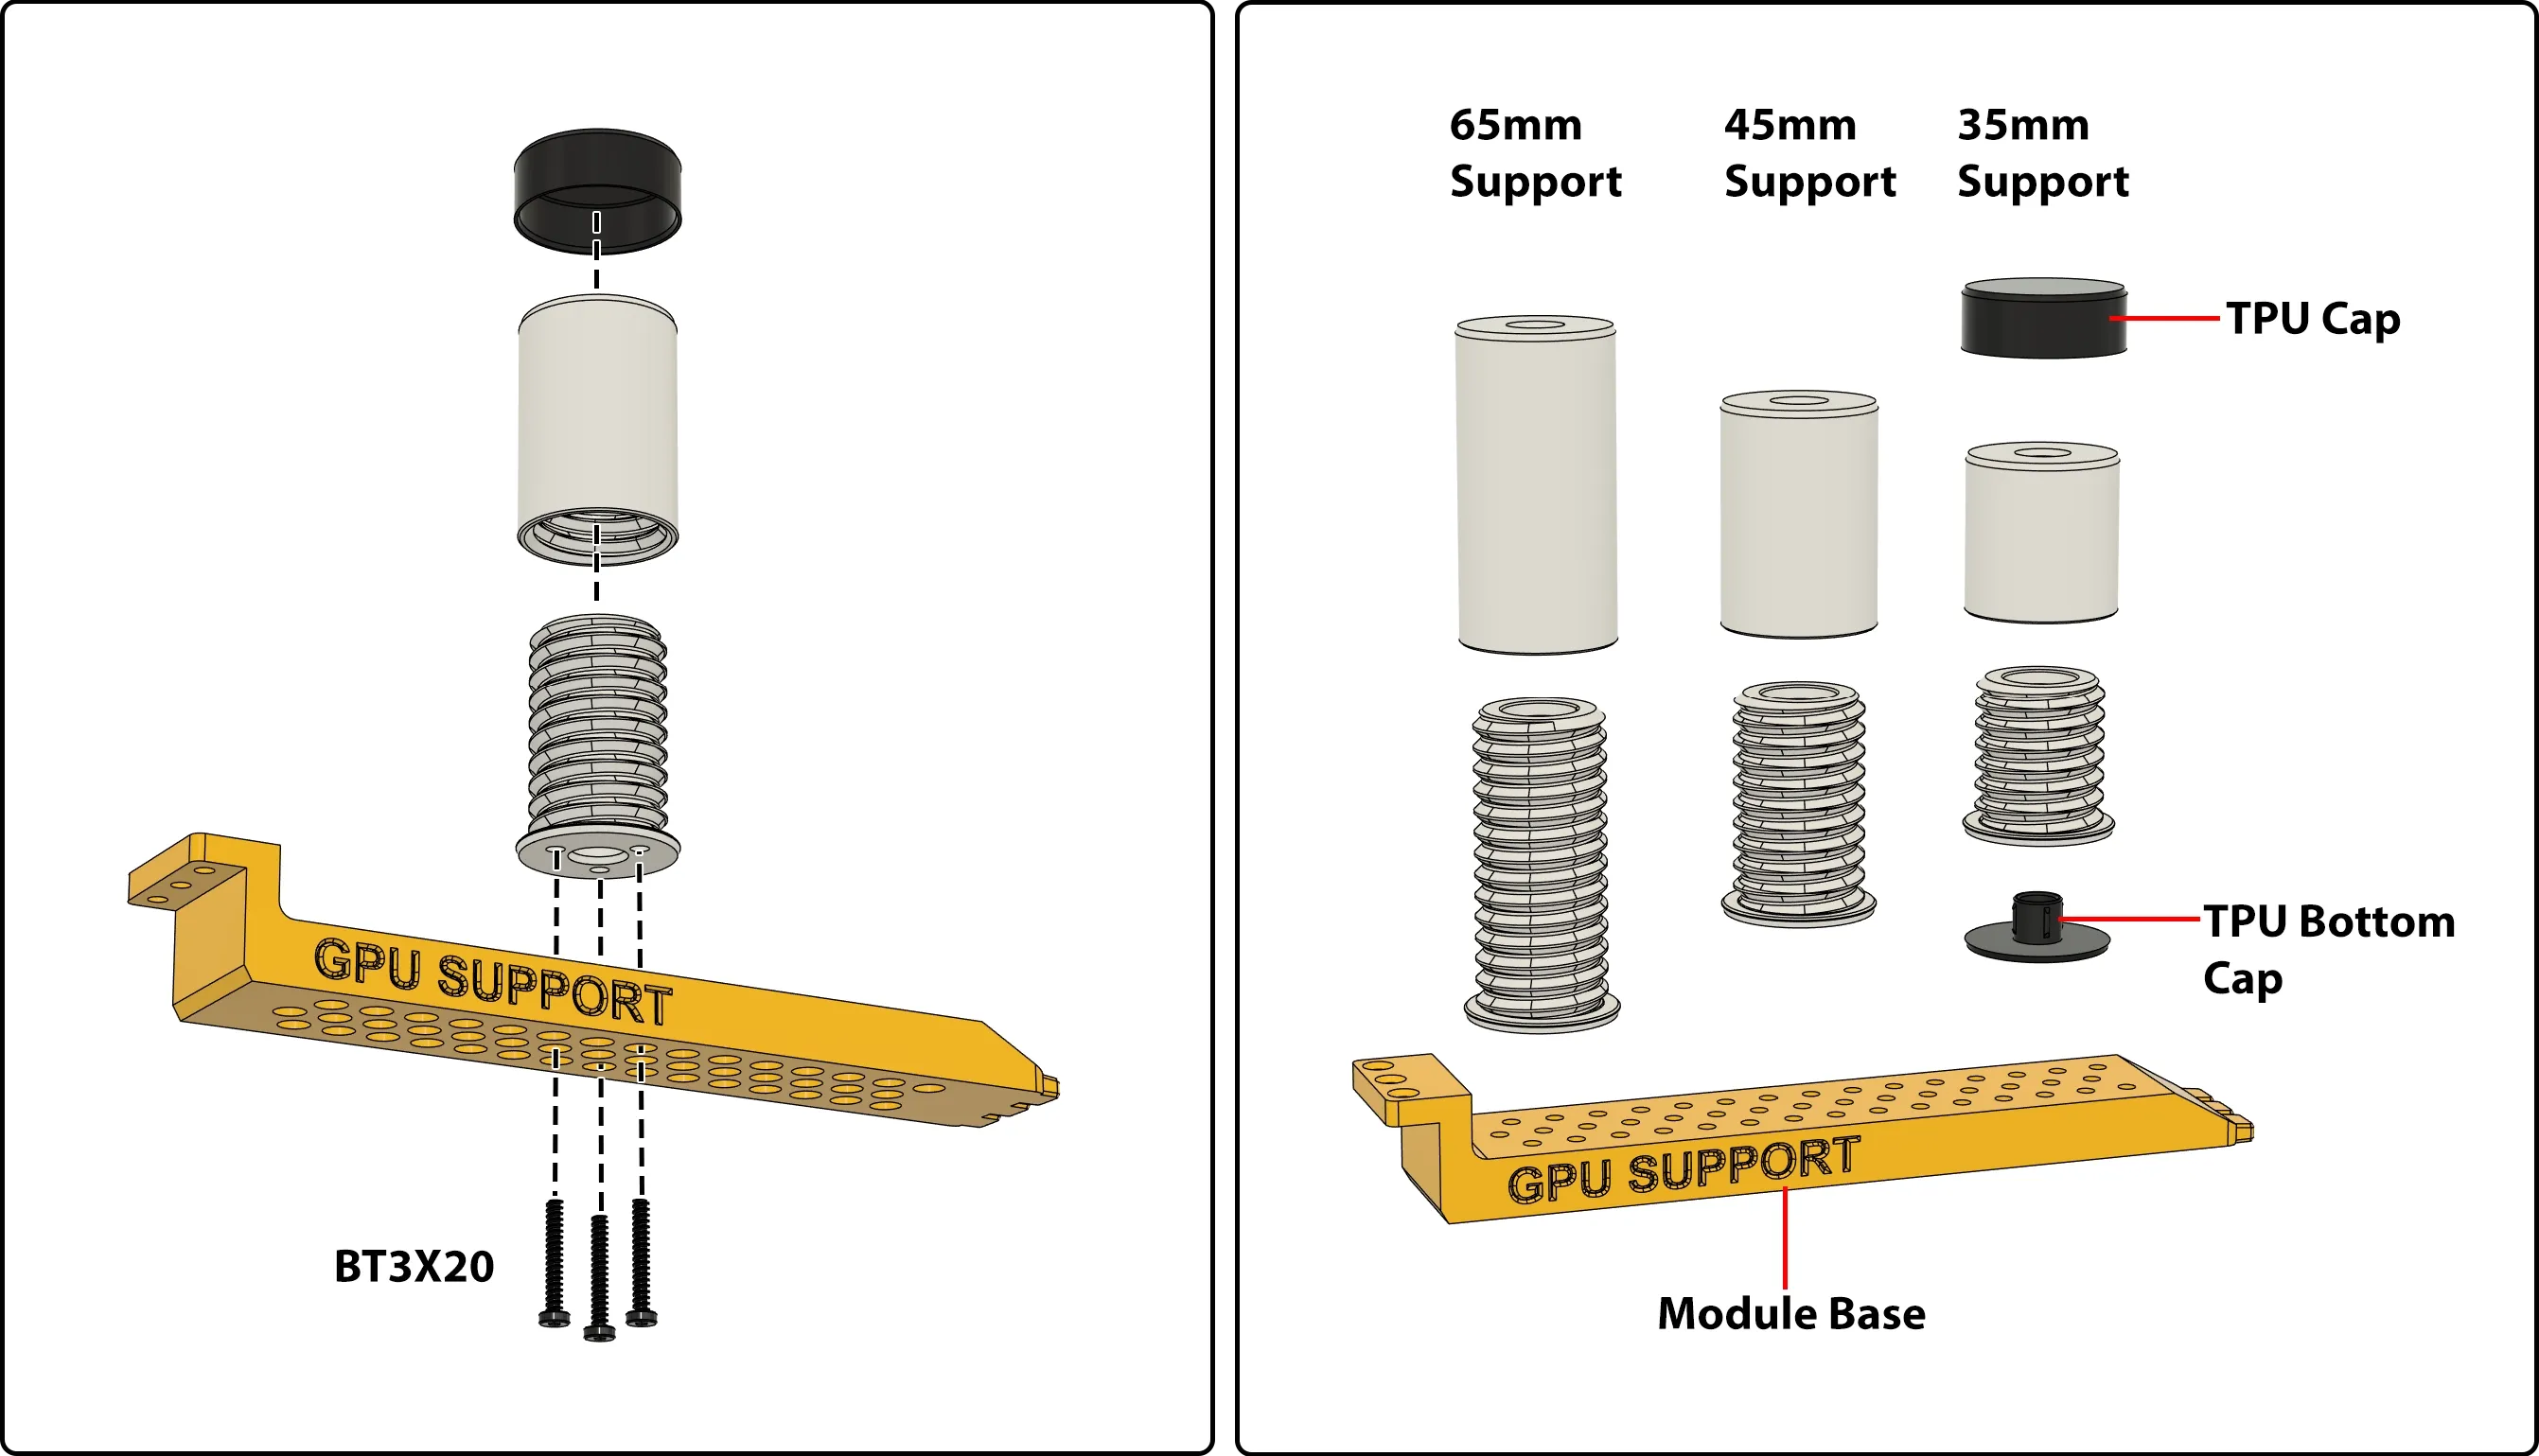
Module de Support GPU
Le support GPU HYPER est disponible en 3 longueurs (35 mm, 45 mm et 65 mm) et peut être monté sur le boîtier avec une base montée sur rail, ou utilisé seul. Deux styles d'embouts en caoutchouc sont inclus pour un contact doux avec vos composants.
Lorsqu'il est monté sur la base sur les rails universels, le support sera fixé solidement même lorsque le boîtier PC est déplacé fréquemment.
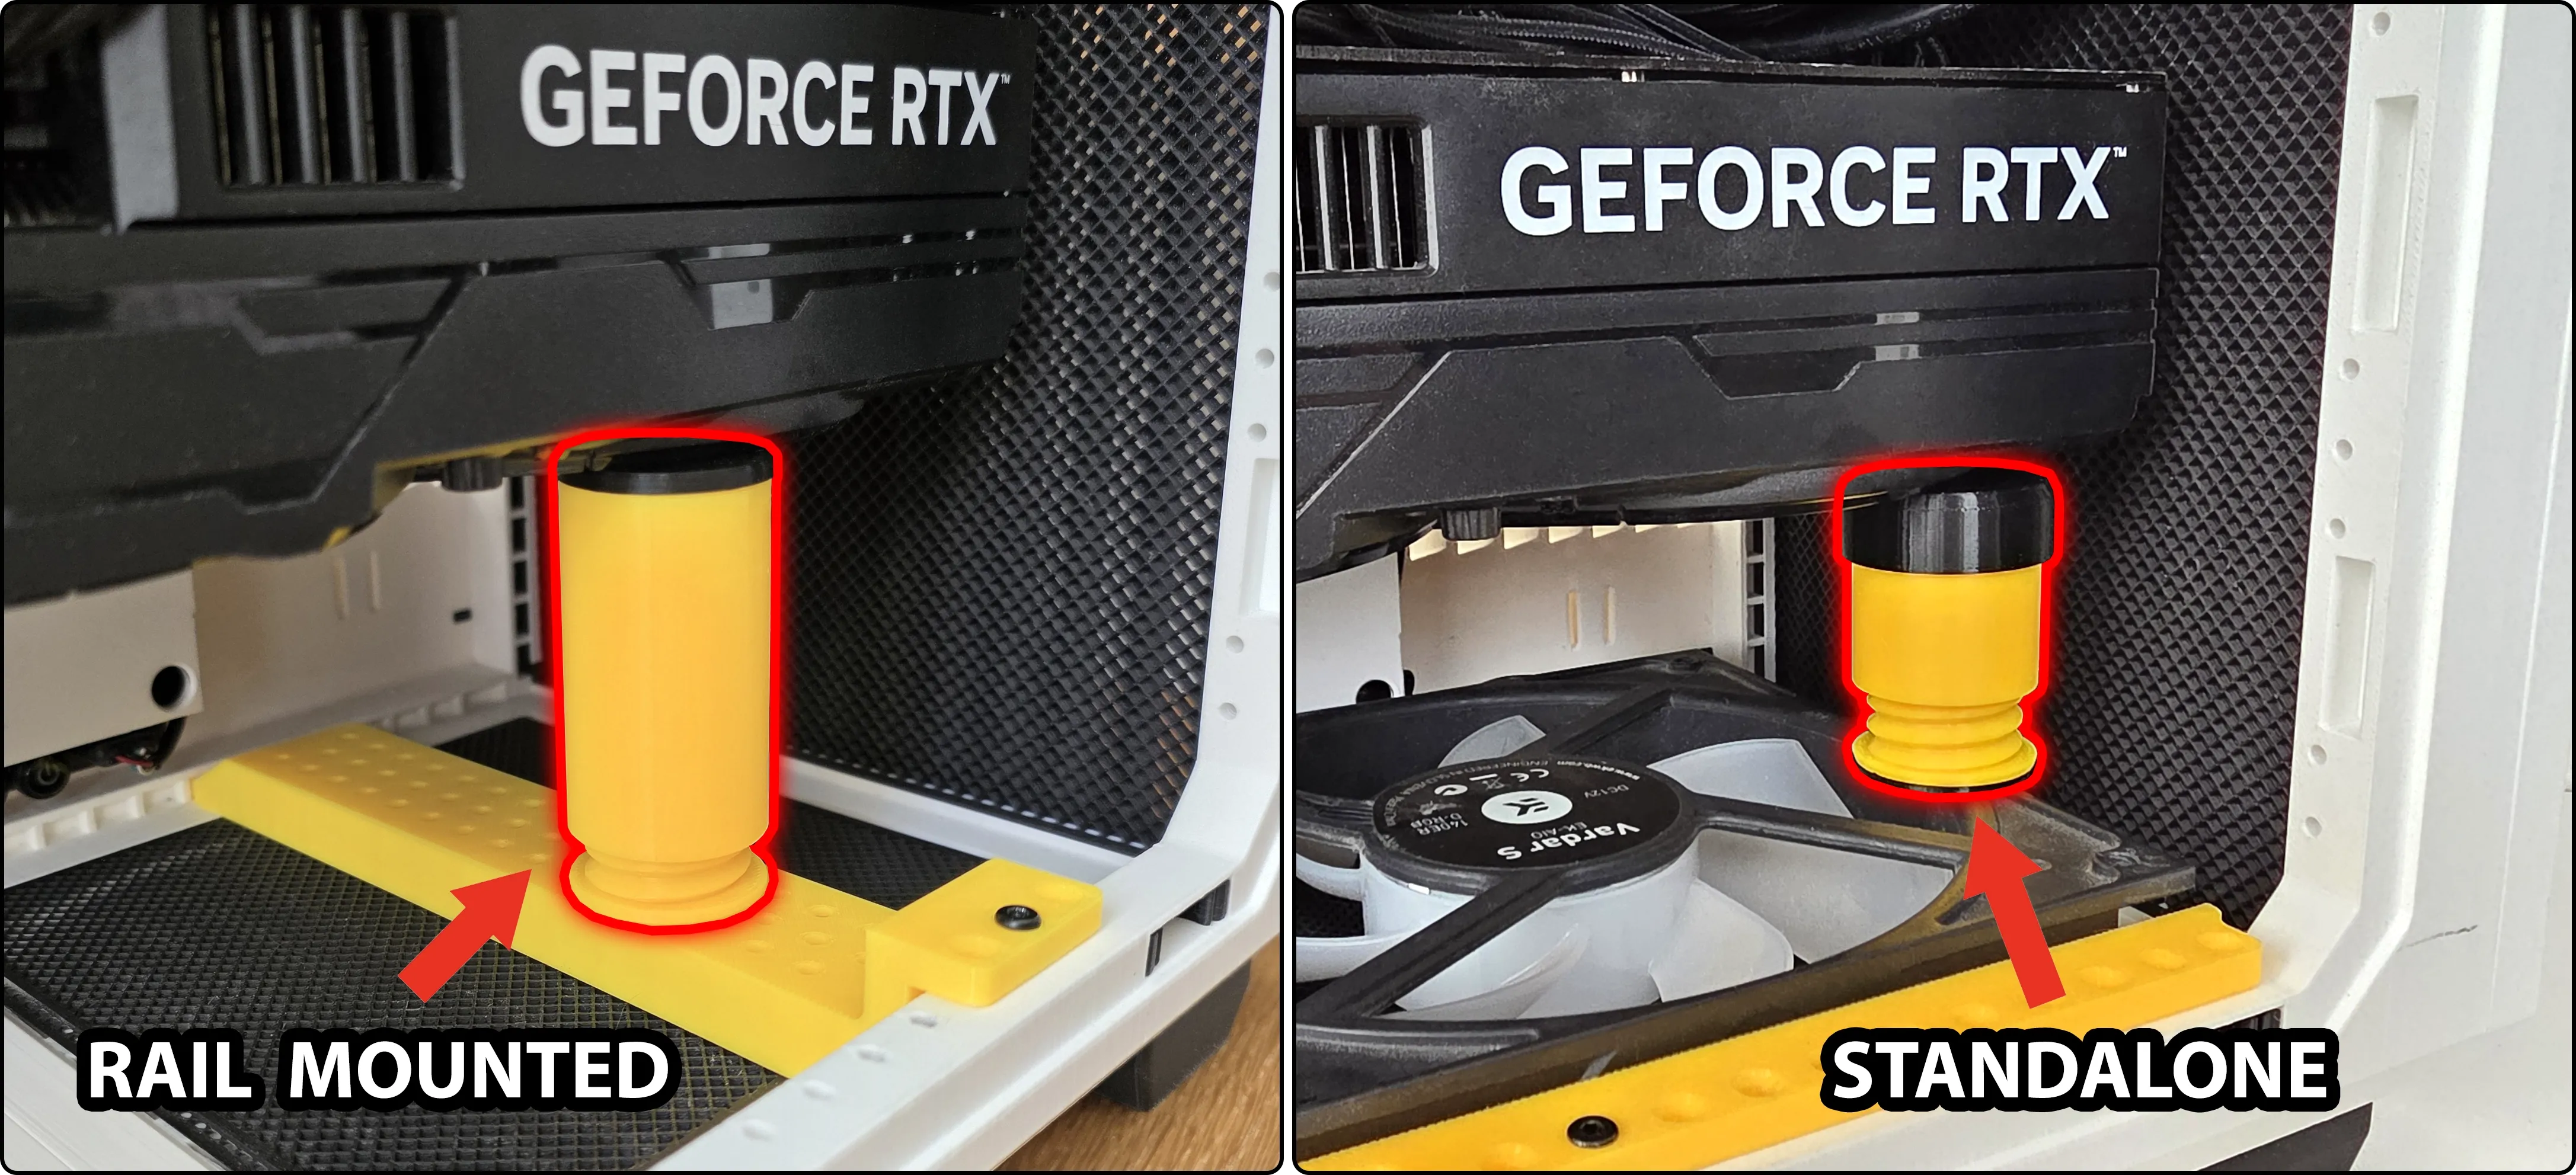
En option, le support peut également être utilisé seul sans la base, afin de pouvoir être empilé au-dessus d'autres composants comme des ventilateurs ou des disques.
Inserts pour Écrous Métalliques
Les écrous carrés M3 (Lien) peuvent être insérés derrière les trous. L'insert à écrou captif est une option de secours. Utilisez-les avec les vis à métaux M3 (Lien).
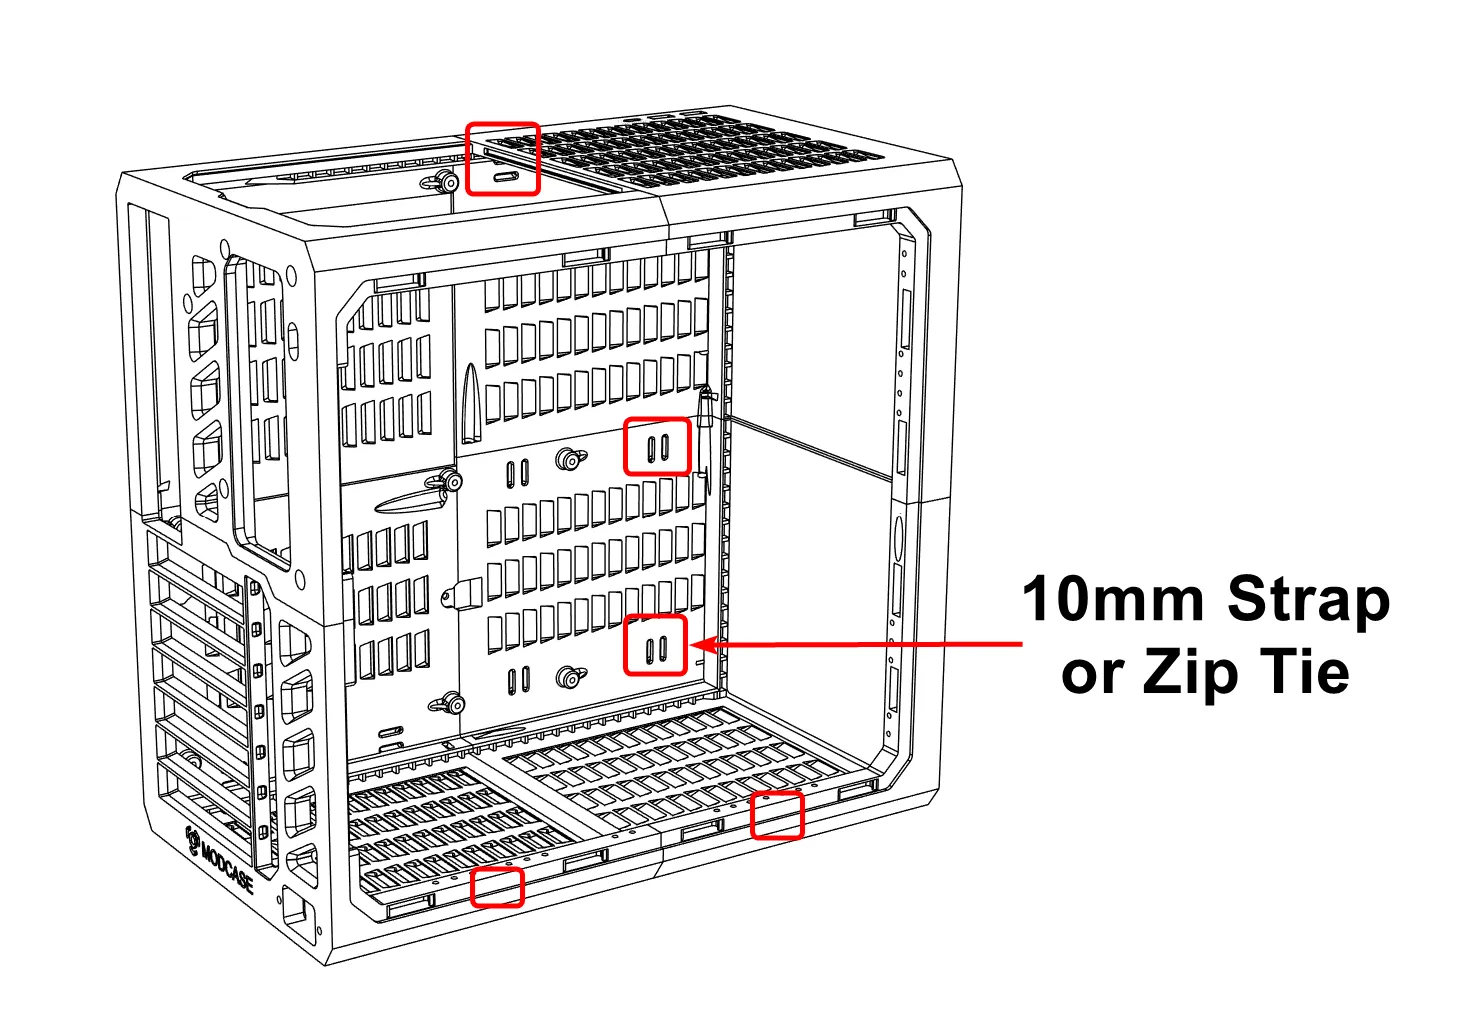
GESTION DES CÂBLES
Des fentes sont situées à l'intérieur du boîtier pour des serre-câbles ou des bandes Velcro de 10 mm de large.
SPÉCIFICATIONS
| Paramètre | Prise en charge |
|---|---|
| Carte Mère | E-ATX, ATX, mATX, ITX |
| GPU | 7 slots PCIE × 450 mm de longueur × 168 mm de hauteur |
| Ventirad CPU | Jusqu'à 168 mm (Noctua NH-D15 confirmé) |
| PSU | ATX, SFX, SFX-L |
| Ventilateurs | 6× 140 mm ou 7× 120 mm |
*Les modules d'extension sont disponibles, ils débloquent désormais les GPU de 450mm, les radiateurs de 360mm, 18× disques de 3,5" et plus encore.
EXEMPLE DE CONFIGURATION
- AMD Ryzen 9800X3D
- Ventirad NH-D15
- GPU Palit 5070 ti 16g
- Carte mère ATX NZXT B650 N7
- Alimentation SF1000W SFX Platinum
- 64 Go RAM Dominator
BOM - Nomenclature
| Pièce | Notes |
|---|---|
| Vis BT3x20 (40 pcs) | Compatibles également avec les vis #4×3/4" et les vis mécaniques M3×20 (les vis mécaniques nécessitent simplement plus de tours pour avancer). Tous les types de têtes fonctionnent : tête à six pans creux, tête bombée, tête cylindrique et tête fraisée. |
| Bouton d'alimentation Ø16mm | |
Optionnel
| Pièce | Notes |
|---|---|
| Câble d'alimentation interne | Pour repositionner le bloc d'alimentation ailleurs qu'à l'arrière. |
| Câble USB-A | Des câbles similaires peuvent fonctionner. |
| Câble USB-C | Des câbles similaires peuvent fonctionner. |
| Écrous carrés | Les écrous captifs se placent derrière le trou et sont extrêmement robustes — il faudrait arracher toute la pièce imprimée pour qu'ils lâchent. À utiliser avec des vis mécaniques M3×20. Il est recommandé de commencer uniquement avec les vis autotaraudeuses. HYPER est conçu pour des vis de 20mm avec une insertion profonde du filetage dans le matériau environnant, vous pourriez donc ne pas avoir besoin de cette option de secours. |
| Vis mécaniques M3×20 | À utiliser avec l'option écrou captif ci-dessus. |
| Serre-câbles ou Bandes Velcro 10mm | Pour la gestion des câbles — des fentes sont présentes à l'intérieur du boîtier. |
| Écran 5" / Écran 7" | Pour une utilisation comme écran intégré sur les options de châssis et de panneau latéral compatibles. |
| Panneau transparent (acrylique ou polycarbonate) | Pour la modification du panneau latéral transparent. 302 × 279 × 3mm avec chanfreins d'angle de 7 × 7mm. Voir les instructions pour les détails des angles et les dimensions pour les options étendues. À acheter dans les quincailleries locales ou les magasins en ligne de découpe plastique sur mesure. |
Vis PC
HYPER utilise des vis PC standard pour le montage des composants. (Vous en avez peut-être déjà.)
Expédition et garantie
Expédition et garantie
Tous les produits disponibles en stock seront livrés dans un délai moyen de 24/48 heures.
Garantie Italie avec support de conseil dédié, contactez-nous !