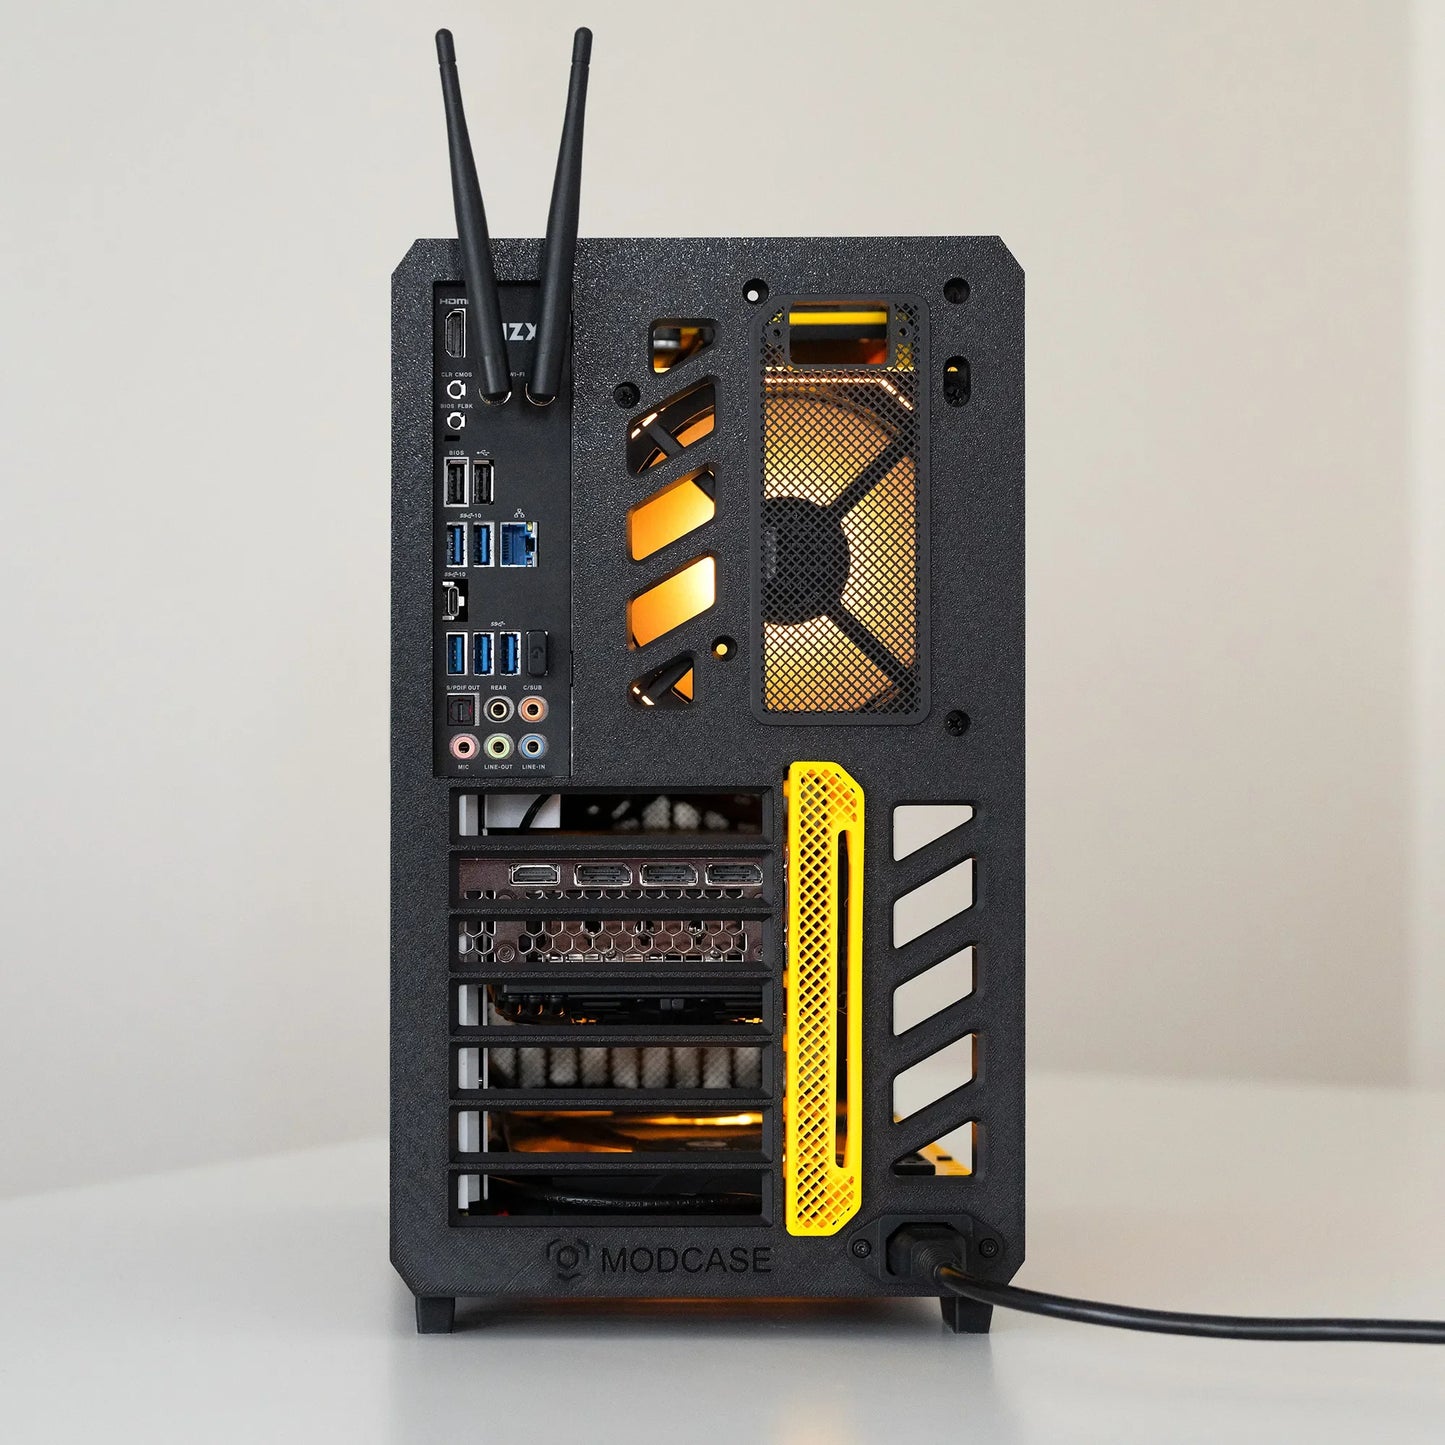
Universal PC Case - 3D Printed
Universal PC Case - 3D Printed
Couldn't load pickup availability


ITEM PRODUCED ON REQUEST. DUE TO THE VARIOUS CUSTOMIZATION OPTIONS, PLEASE CONTACT US TO DISCUSS THE MOST SUITABLE CONFIGURATION FOR YOUR EQUIPMENT OR USE.
Step 1: Choose your frame

Note:
❶ The E-ATX frame has the USB-C port removed to accommodate E-ATX motherboards. Otherwise, it has the same dimensions as the ATX frame.
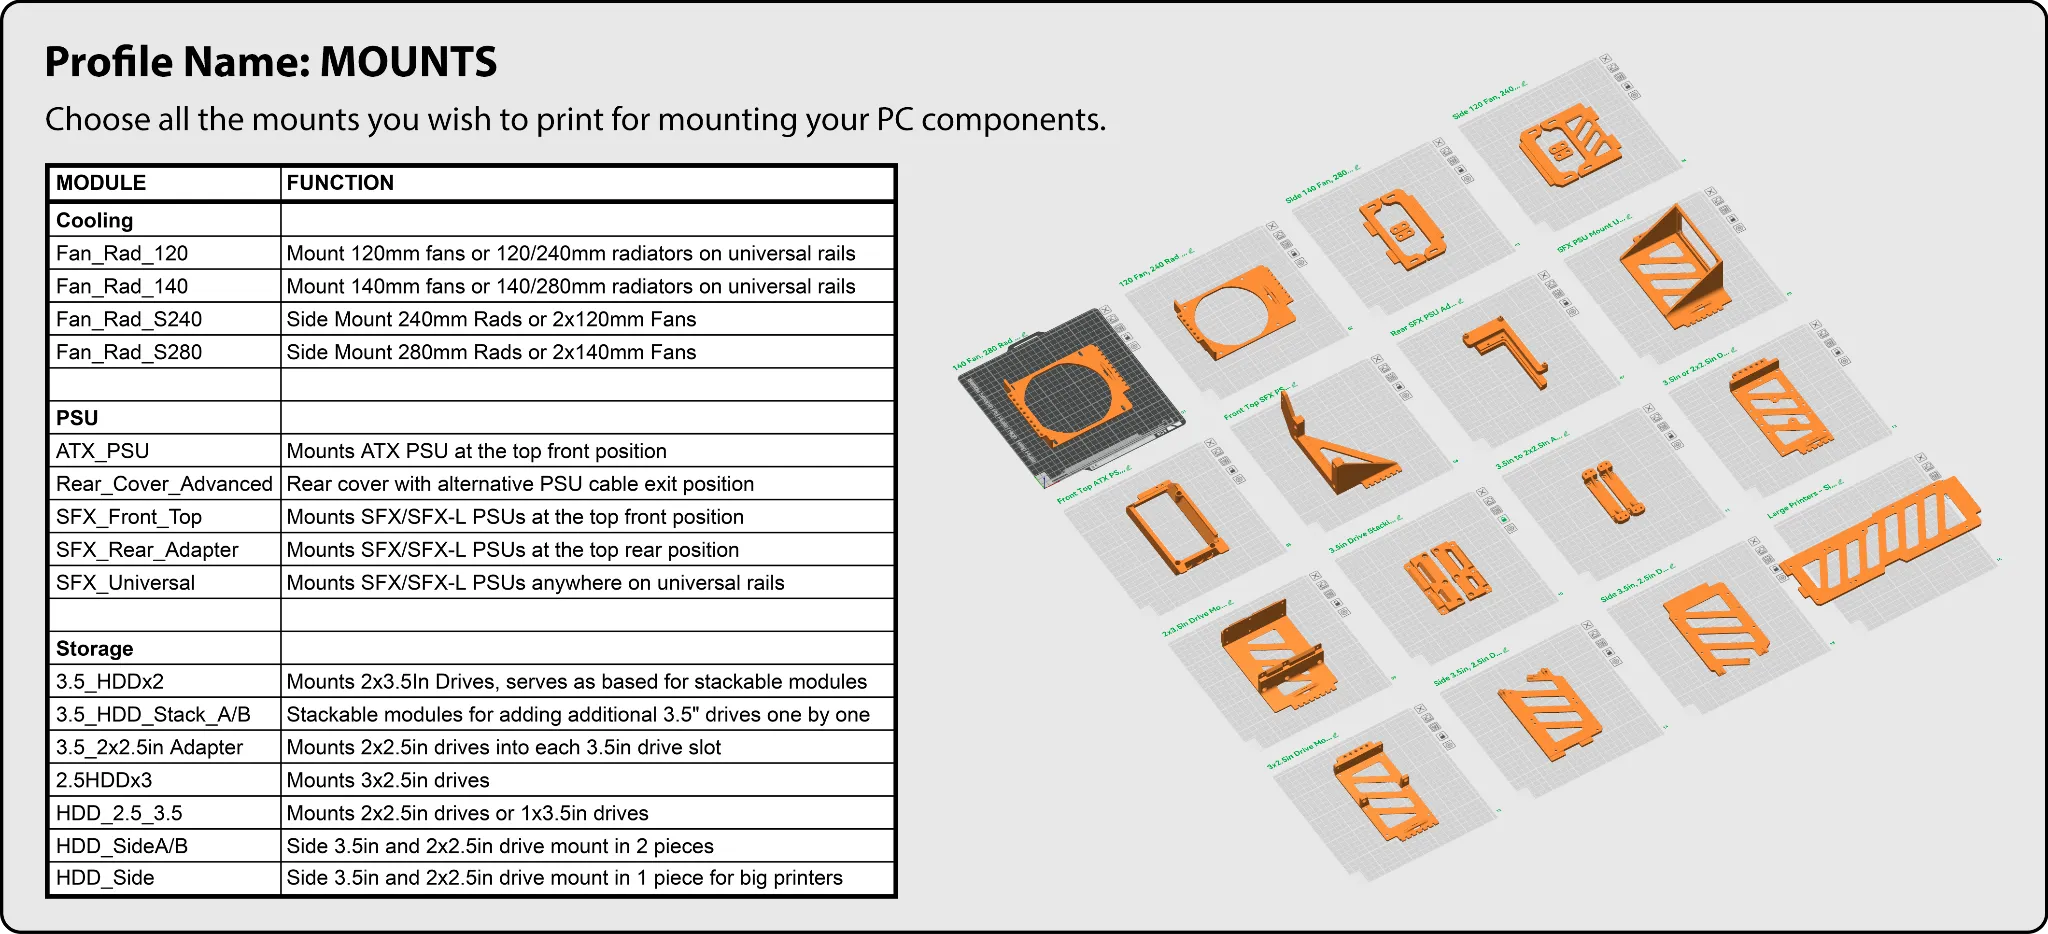
Step 2: Choose your mounts
OPTIONAL: Choose your expansion
These allow you to increase the length of your case to accommodate 360mm radiators, 450mm long GPUs, add more drive support, more fans, and allow more components to be mounted together.
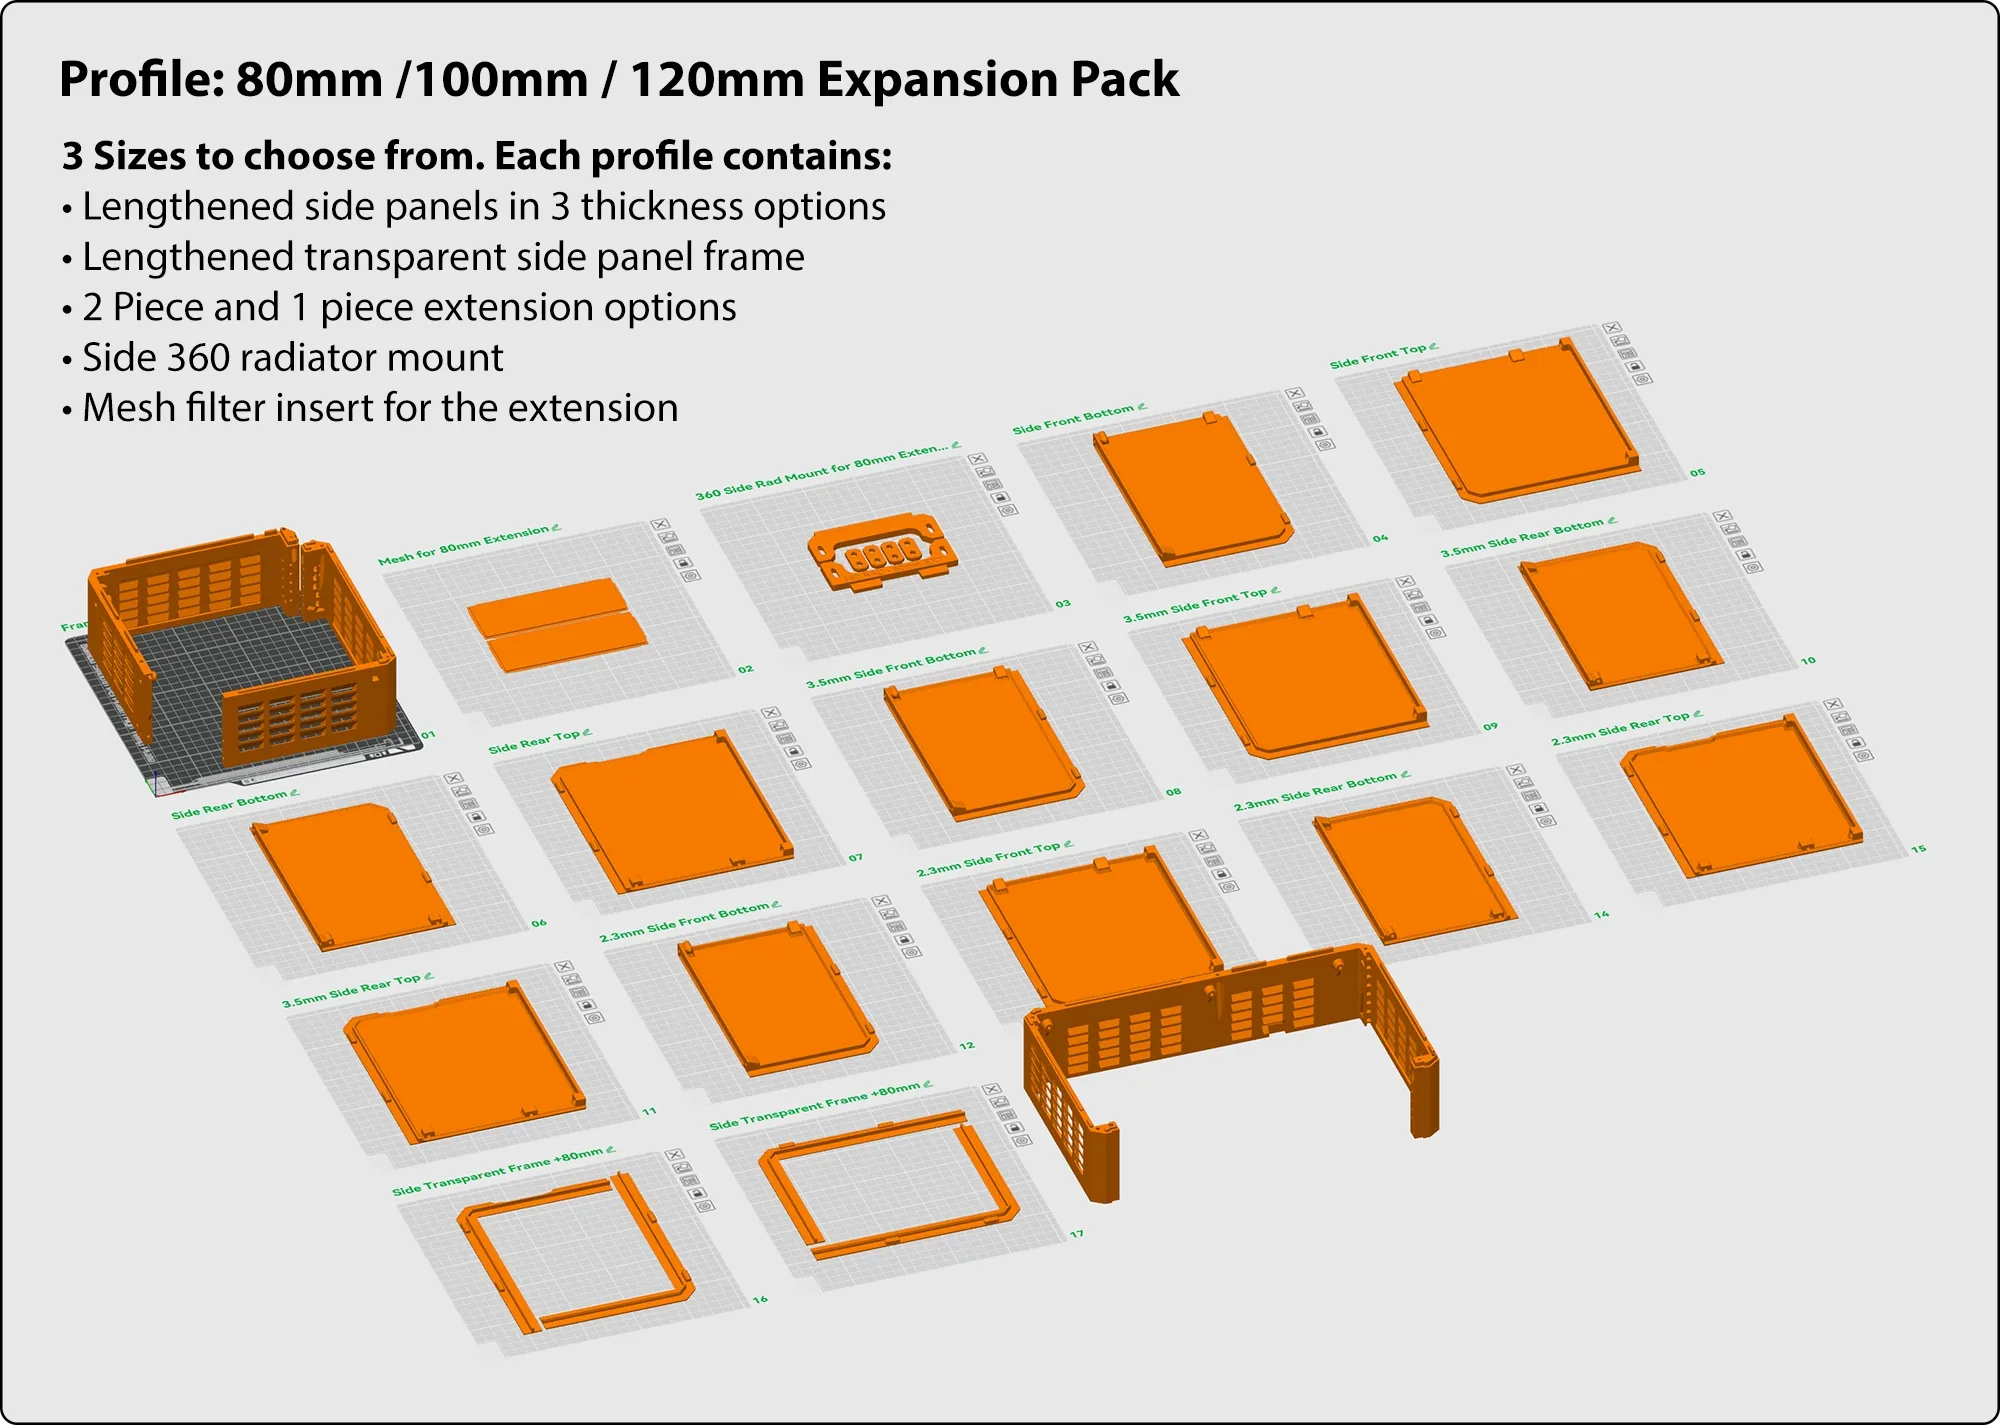
Note: Each expansion pack includes the matching lengthened side panels. There is no need to print the standard length side panels below if you are using the expansion pack versions.
Step 3: Choose your side panel

Thinner mesh side panels have greater airflow and better visibility. However, they require stronger materials for the same rigidity. PAHT and PPA-CF have been tested materials. PPA-CF is recommended for the 2.3mm panel.
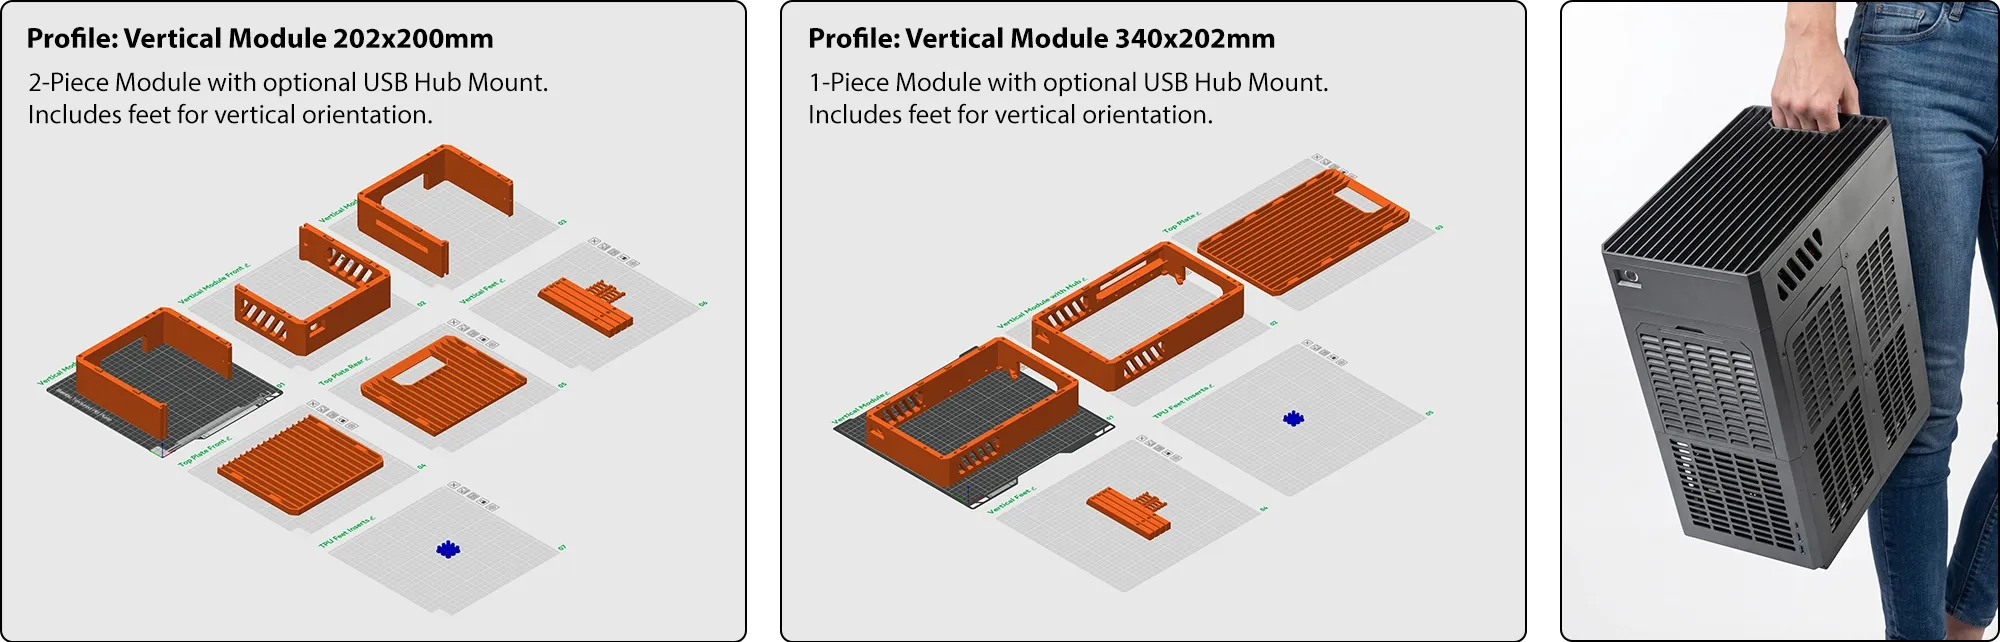
OPTIONAL: Vertical Module
Add a handle and use your case vertically for a minimal footprint.
ASSEMBLY
Step 1:
Assemble the front and back quarters with BT3x20 self-tapping screws
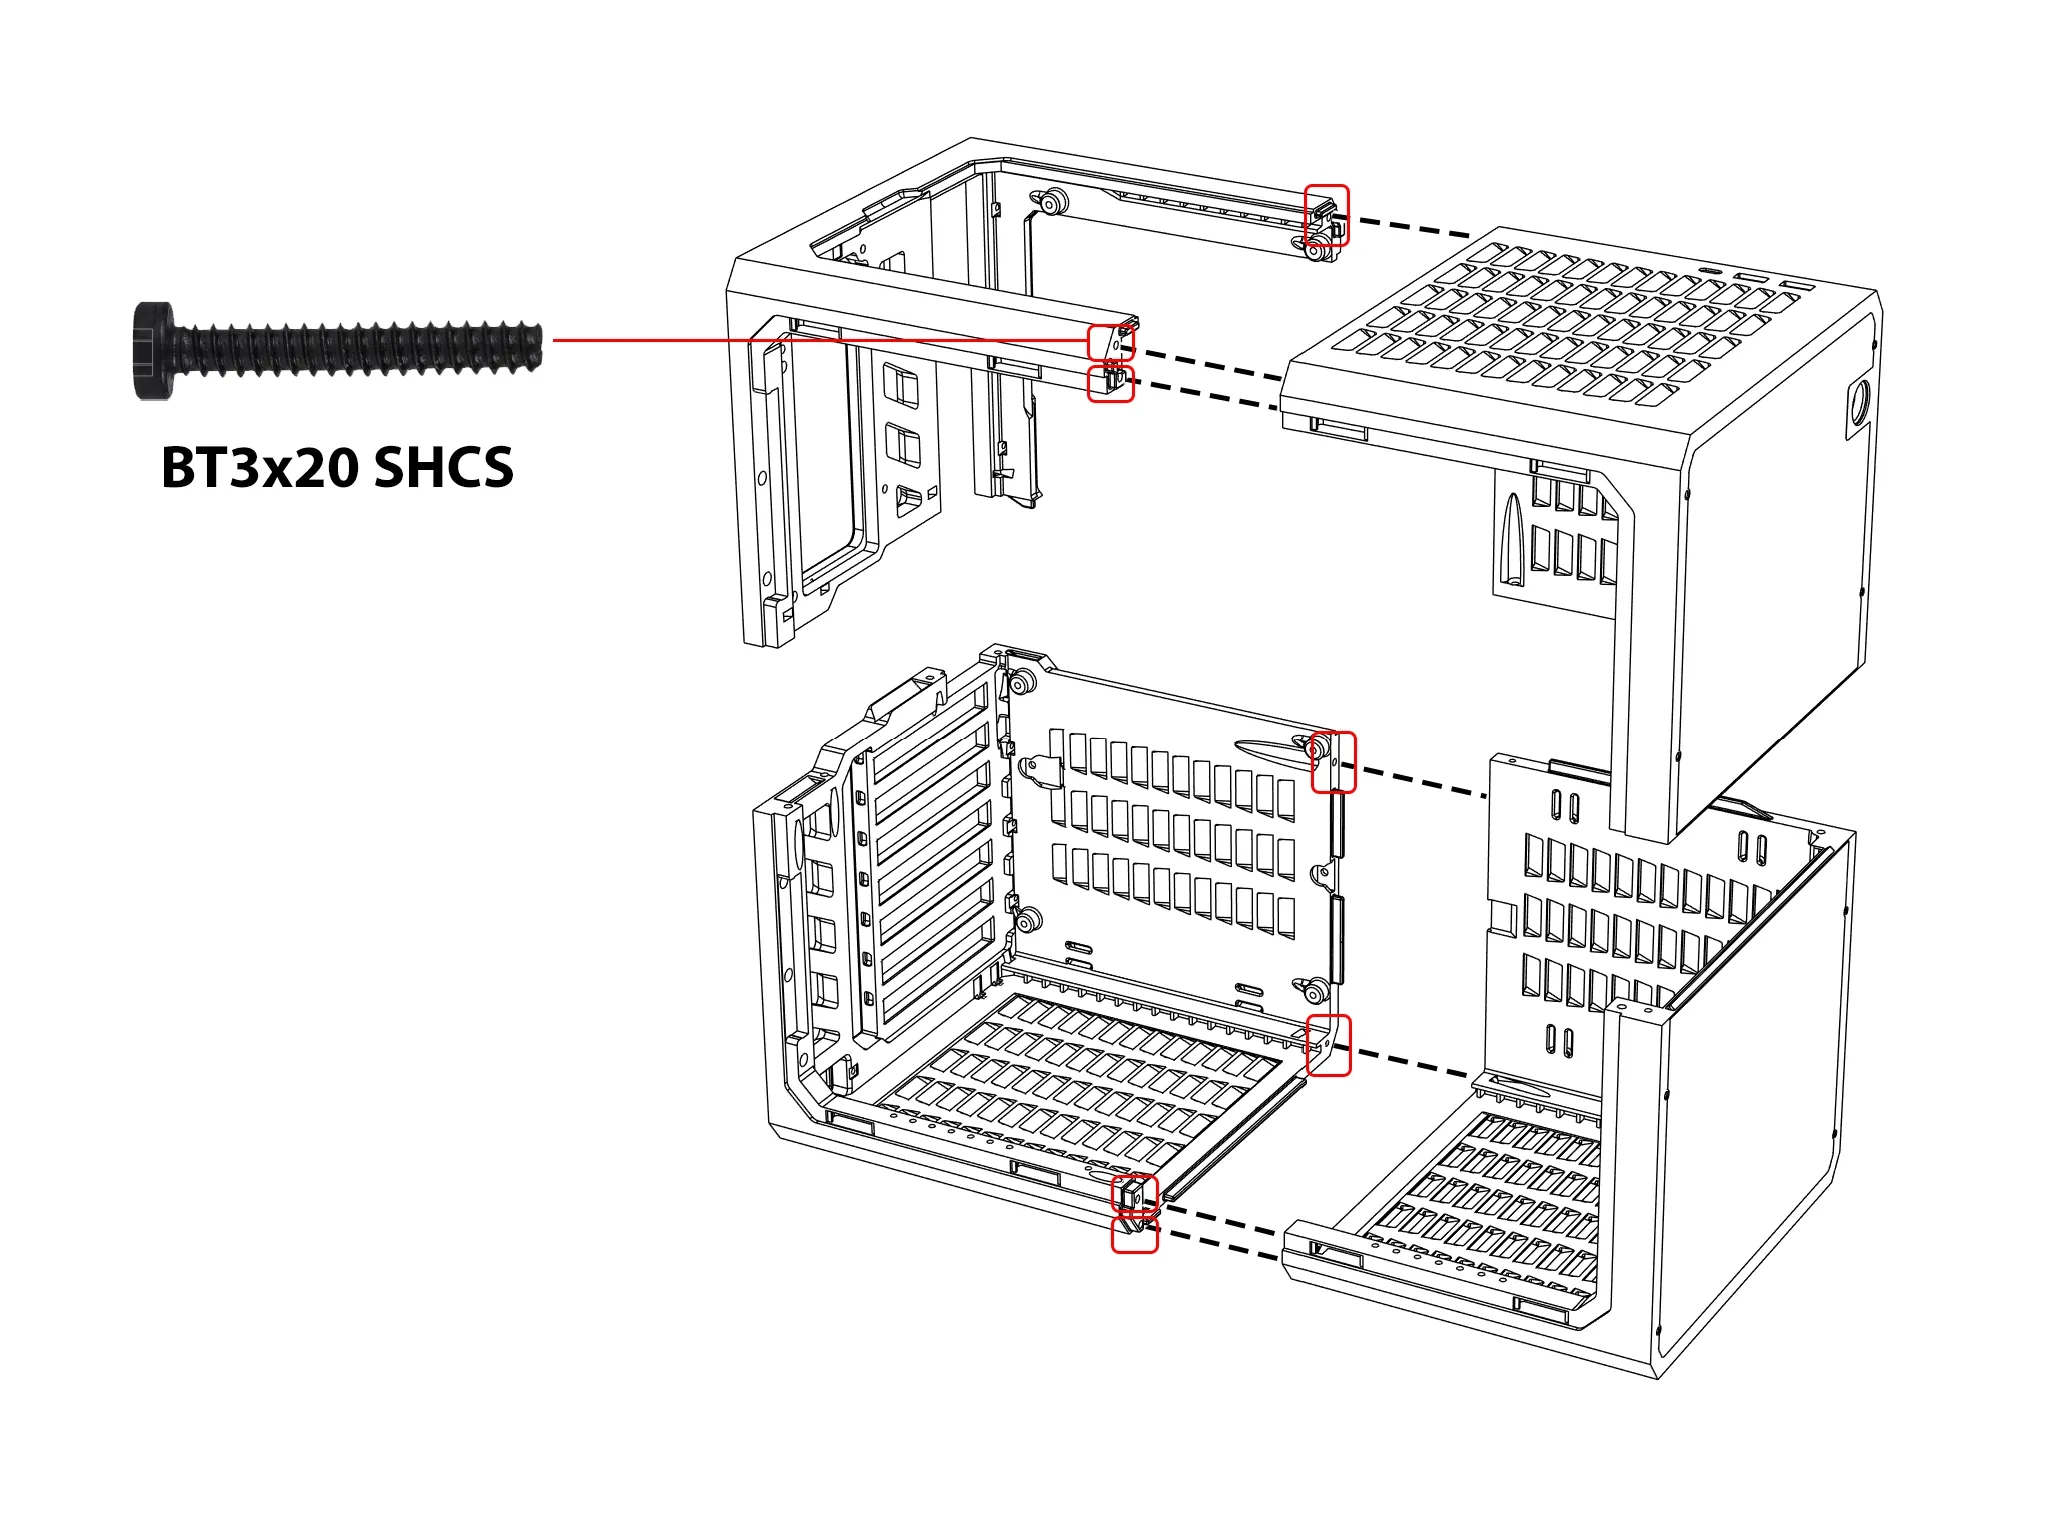
M3x20 and #4x3/4 screws are also compatible.
Step 2:
Join the two halves
OPTIONAL:
Install the front plates
Expansion module installation
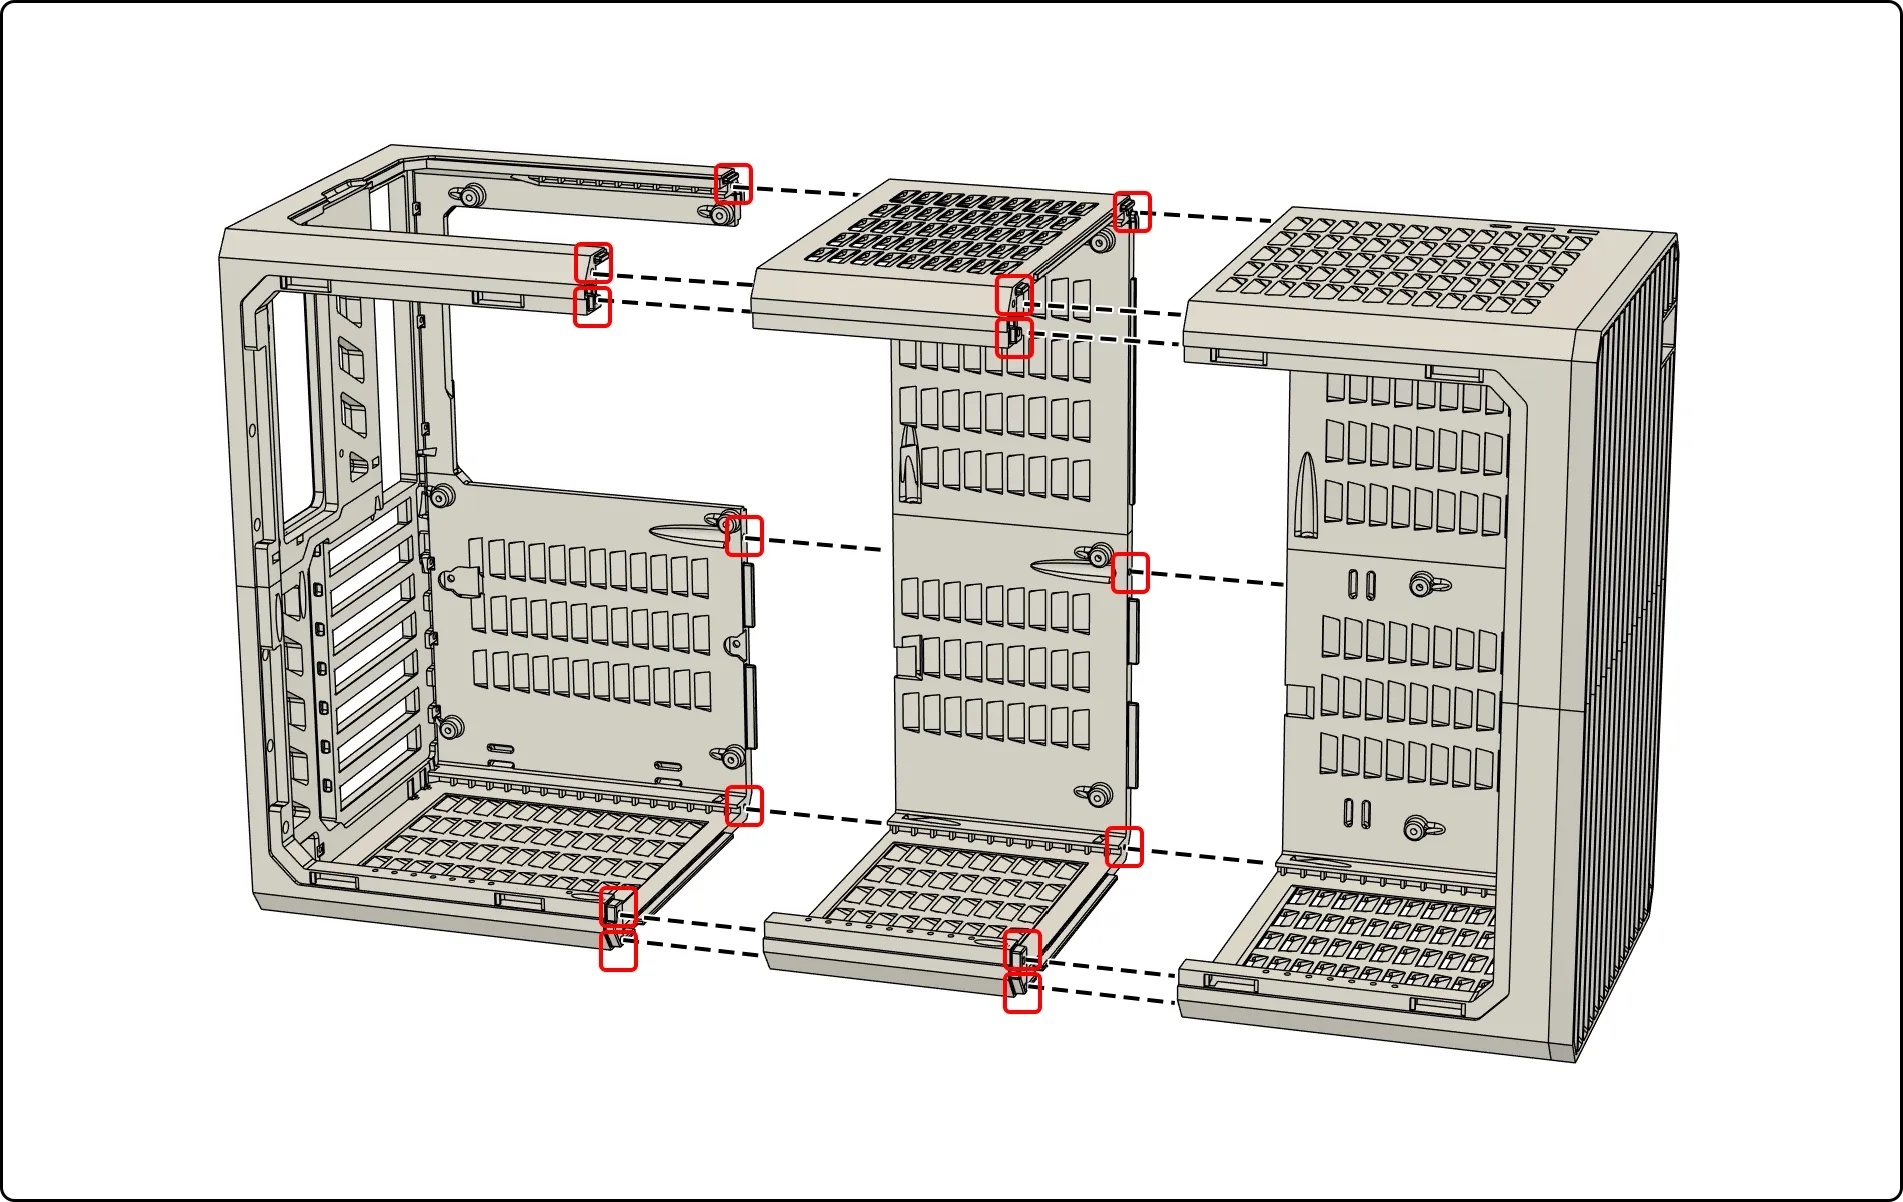
Note: HYPER v2.1 added 2 additional screws to join the middle section on the side panel side for increased rigidity. There is no need to reprint original frames, a single screw works well with the side panel installed and has been verified by builders over the past 8 months on the original version.
Motherboard Installation
E-ATX, ATX, MATX, ITX - Mount directly using standard PC case screws.
Insert the included standoffs for MATX motherboards .
GPU / PCIE Installation
PSU Installation
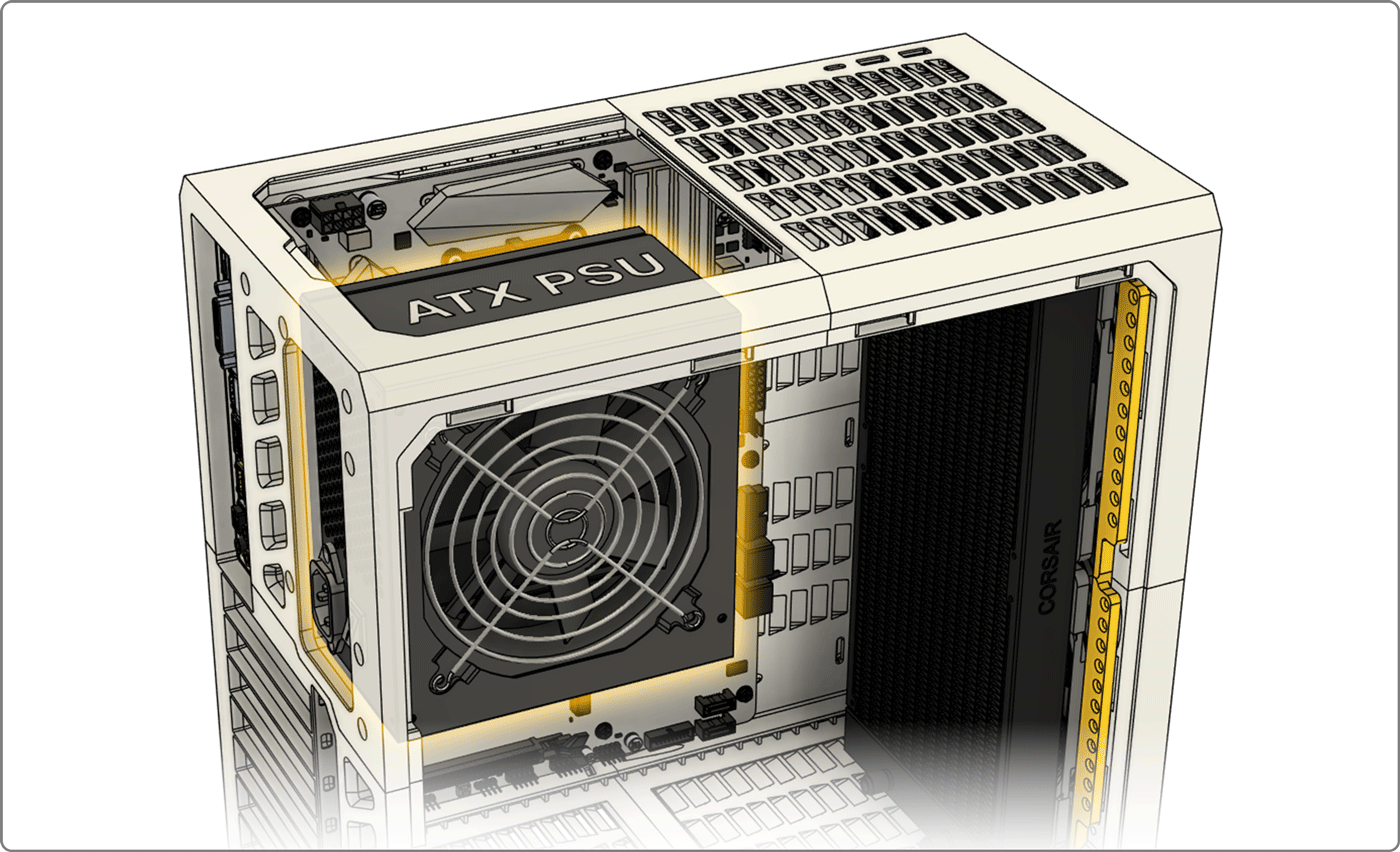
Front ATX PSU Option
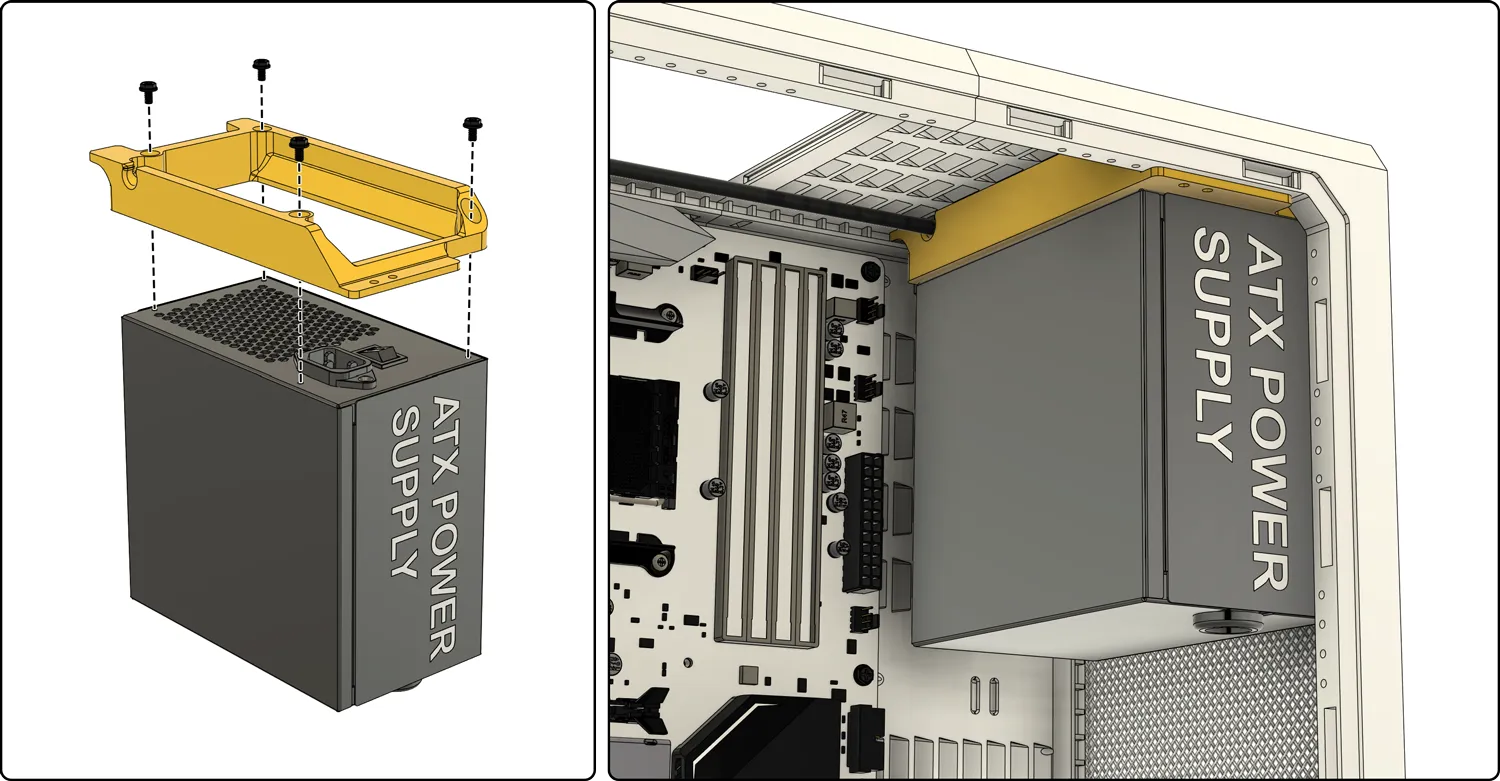
Rear ATX PSU Option
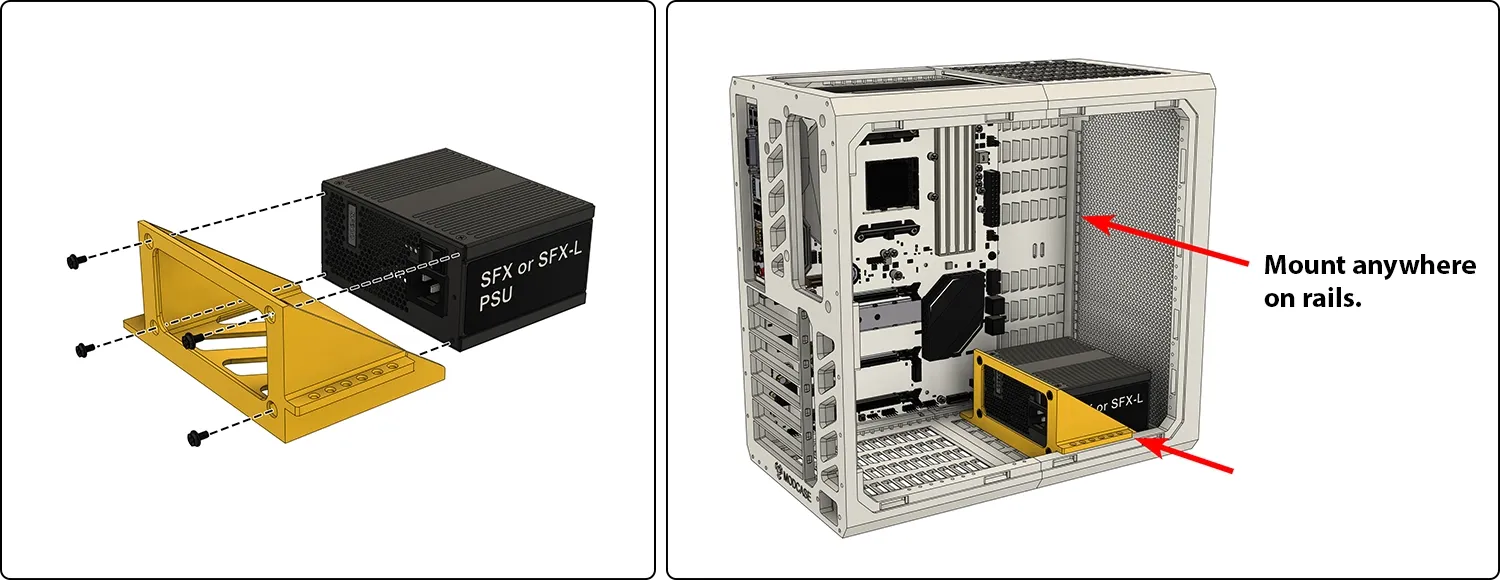
Universal SFX PSU Option
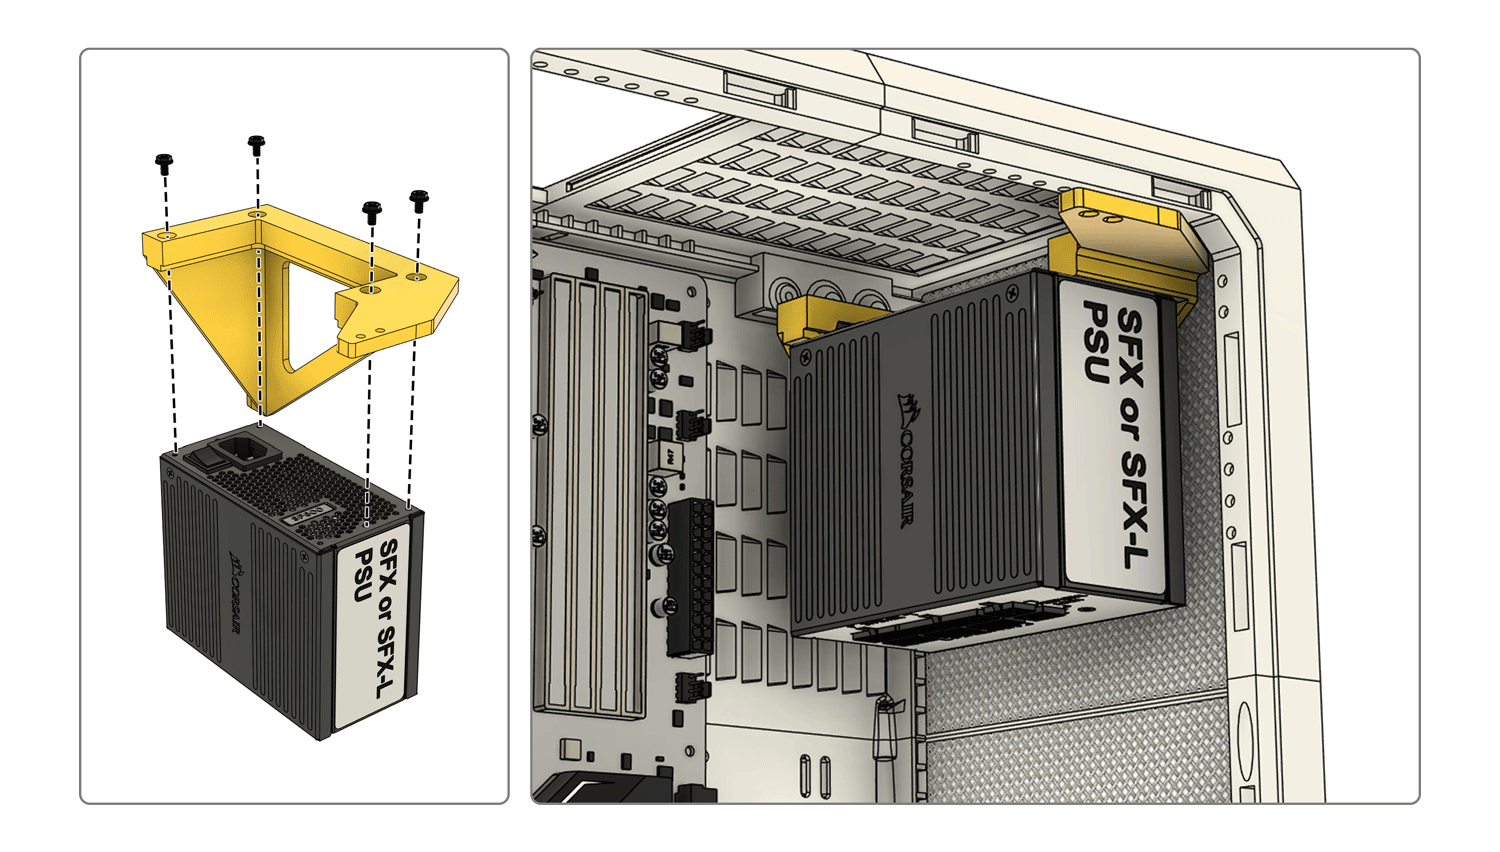
Front SFX Option
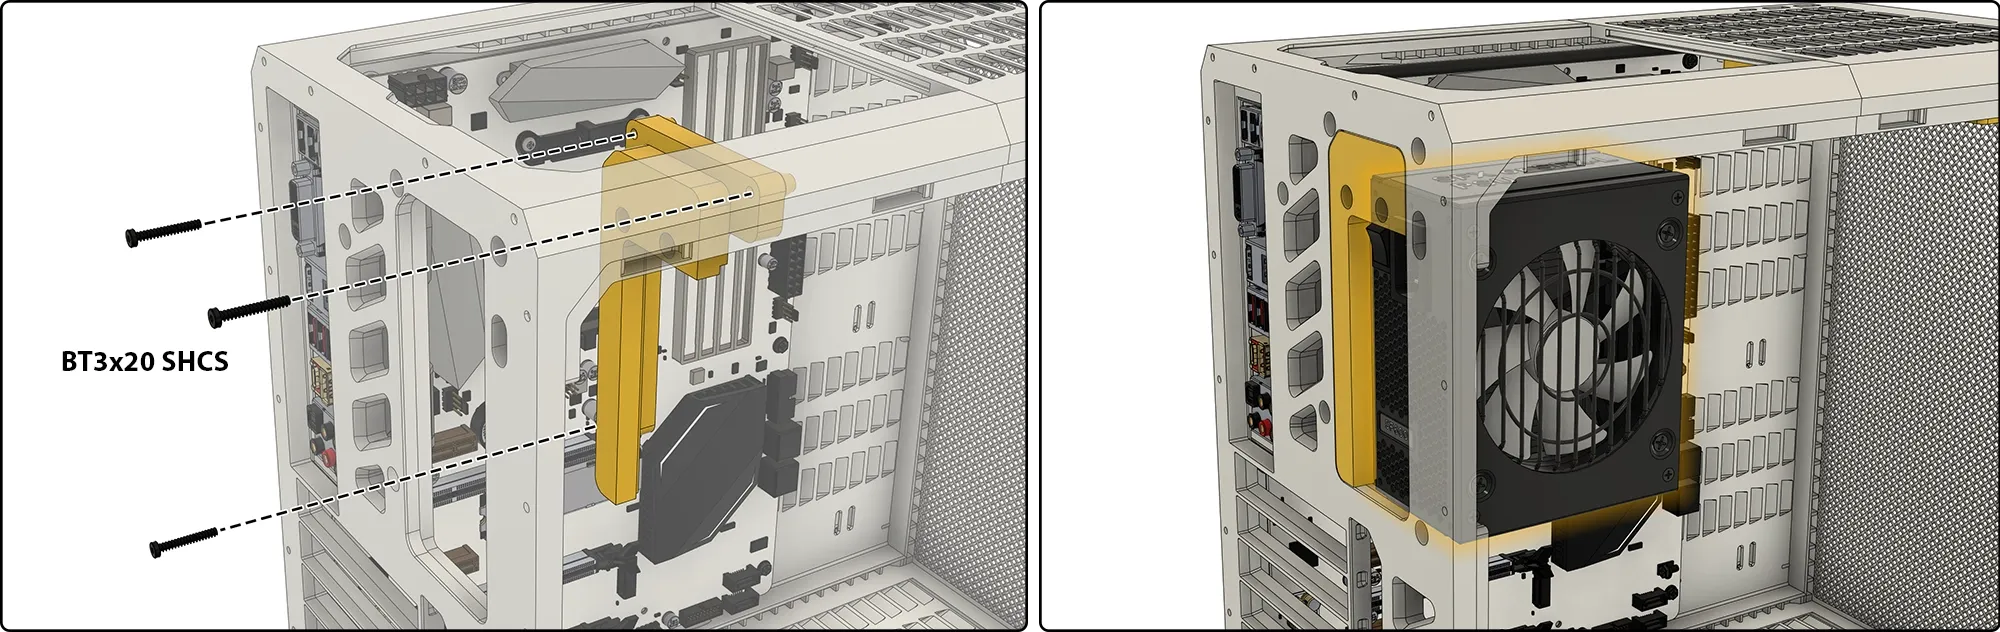
Rear SFX PSU Option
Mesh Inserts
👉Customize your mesh density and hole shape
Fans
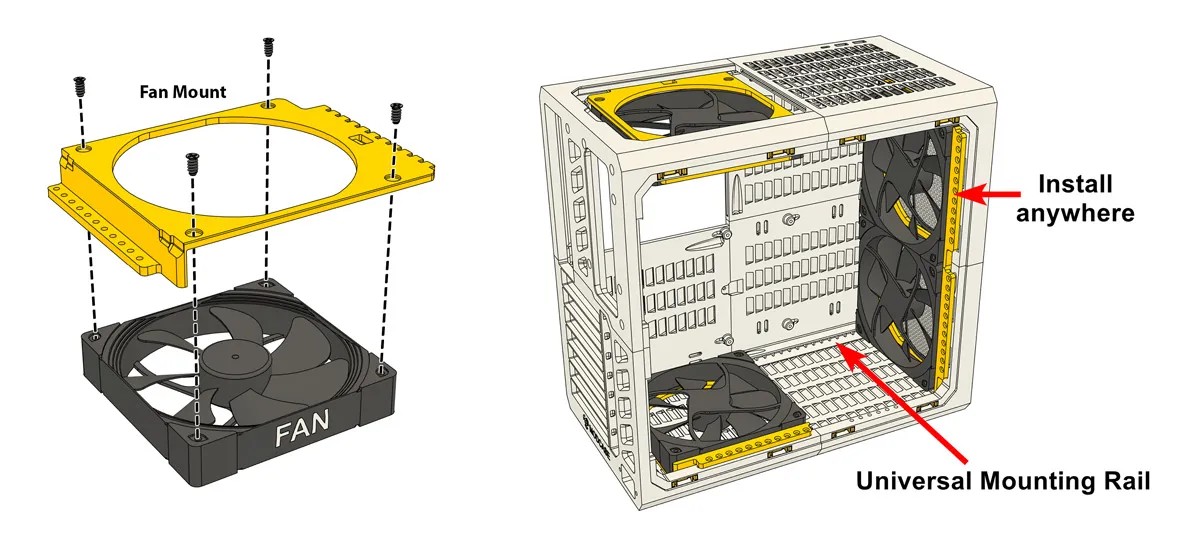
120mm and 140mm fans are mounted on universal brackets that can be installed anywhere along the top, front, and bottom of the case.
Radiators
Use the same bracket as the fans.
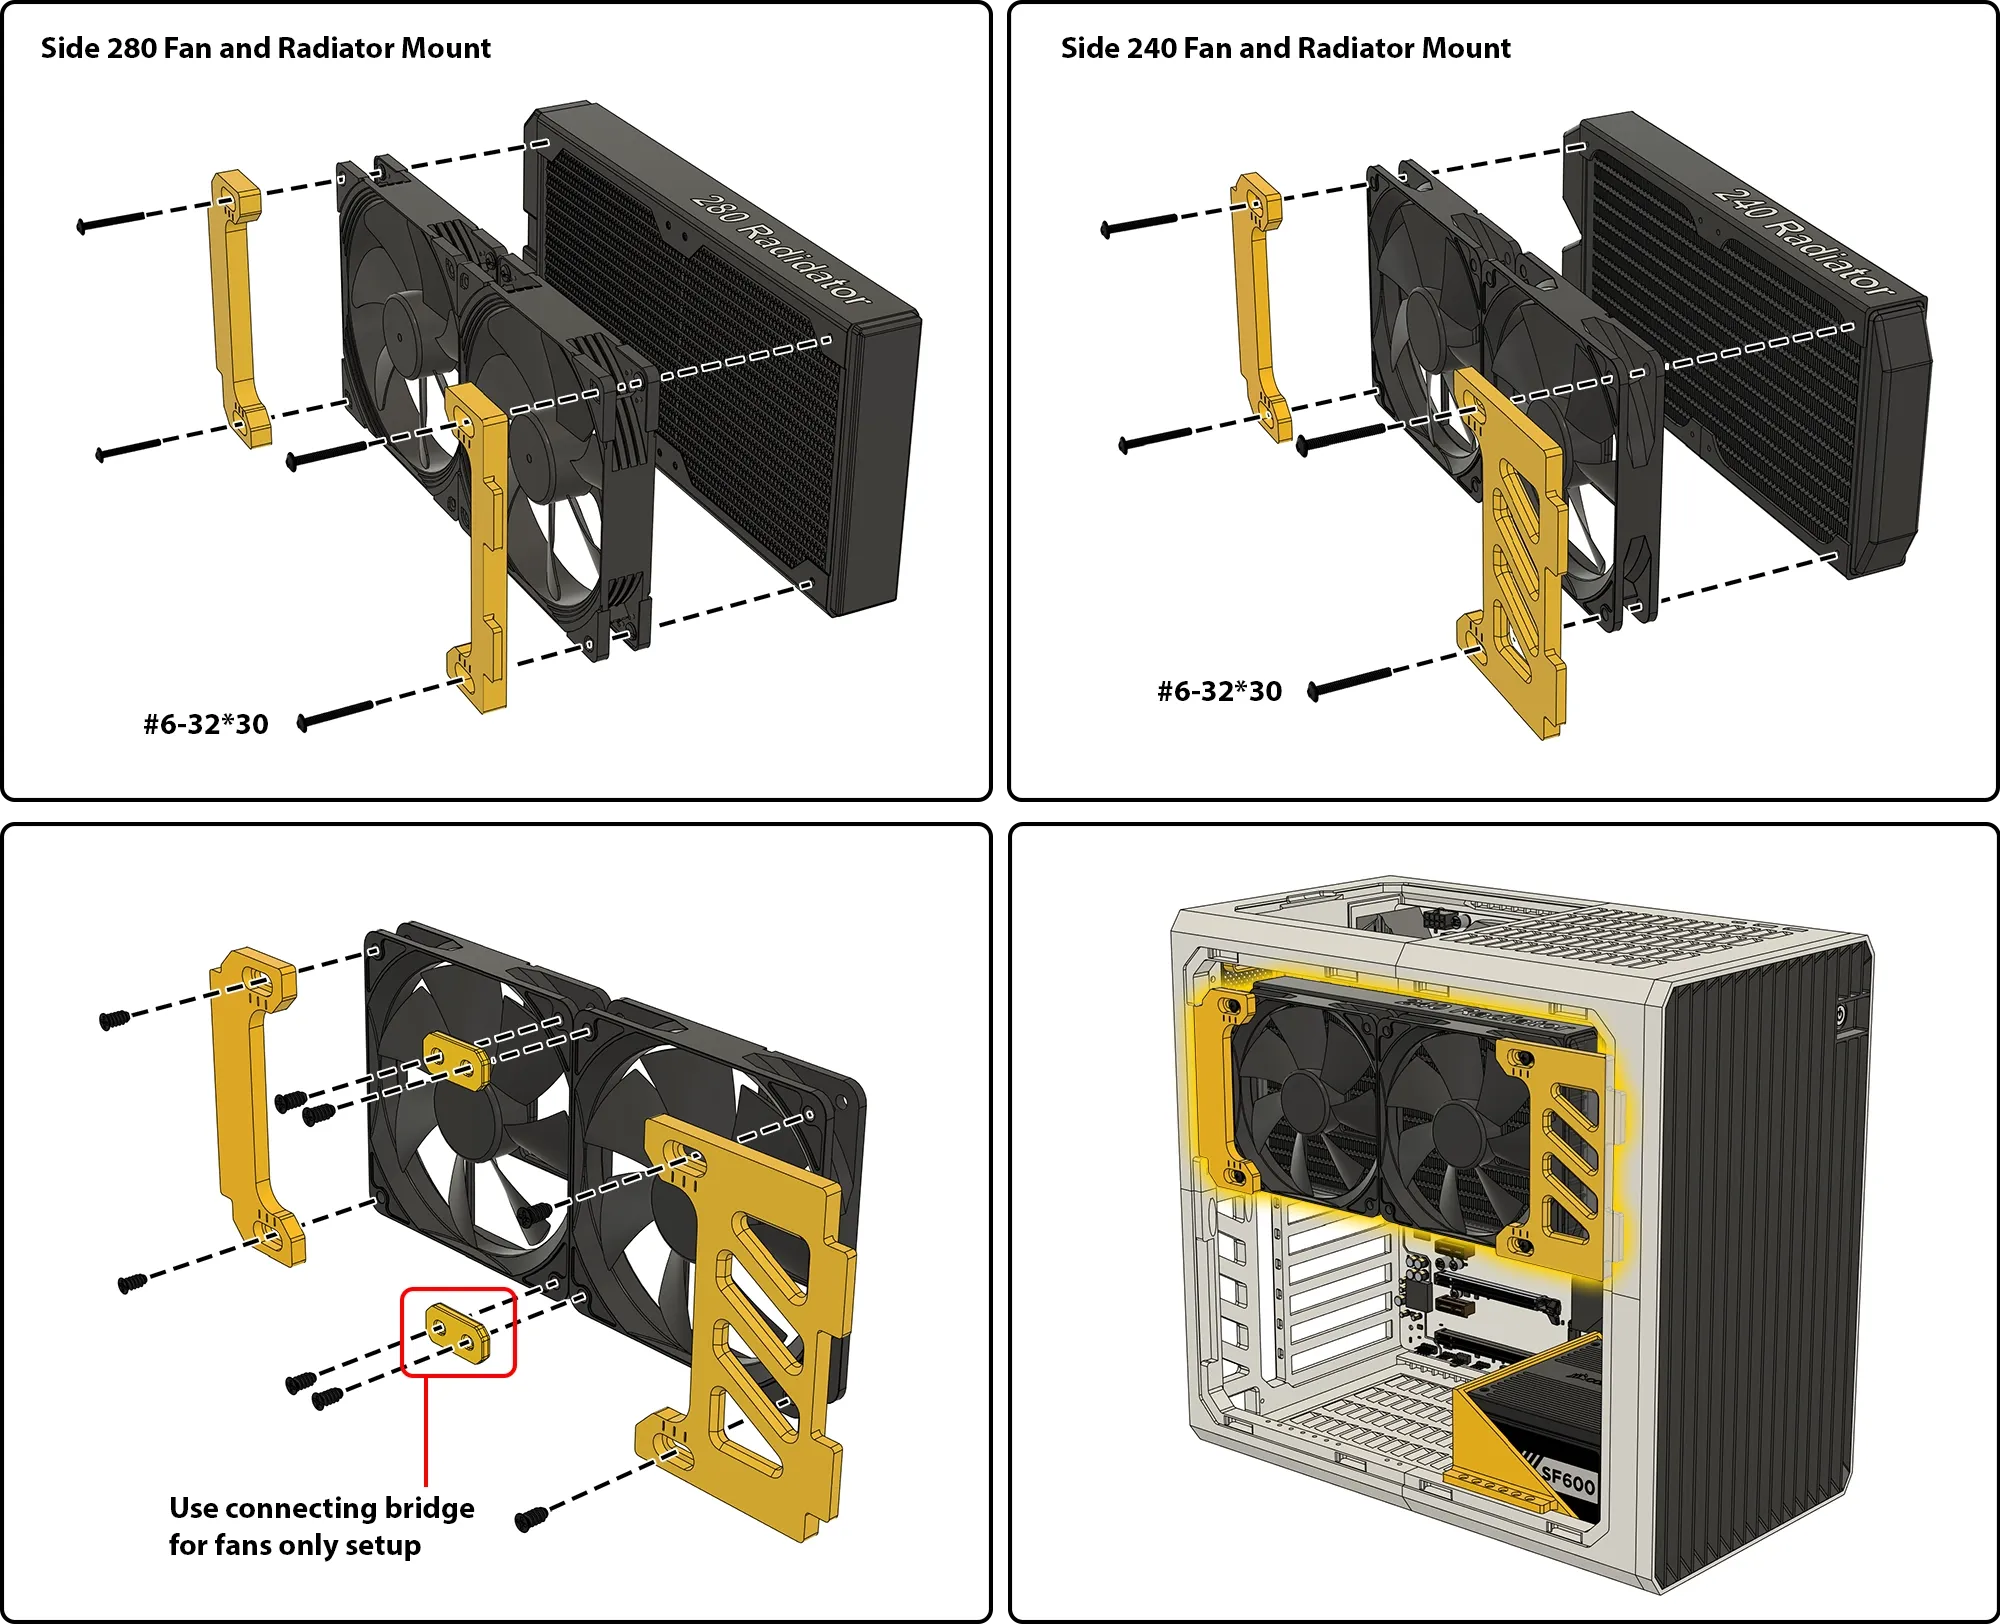
Side Mounted Fans and Radiators
Hard Drives
3.5” or 2.5” HDDs can be mounted on the mounts below. Multiple plates can be used if you have space. Place them anywhere along the top, front, and bottom of your case.
Stackable Drive Module
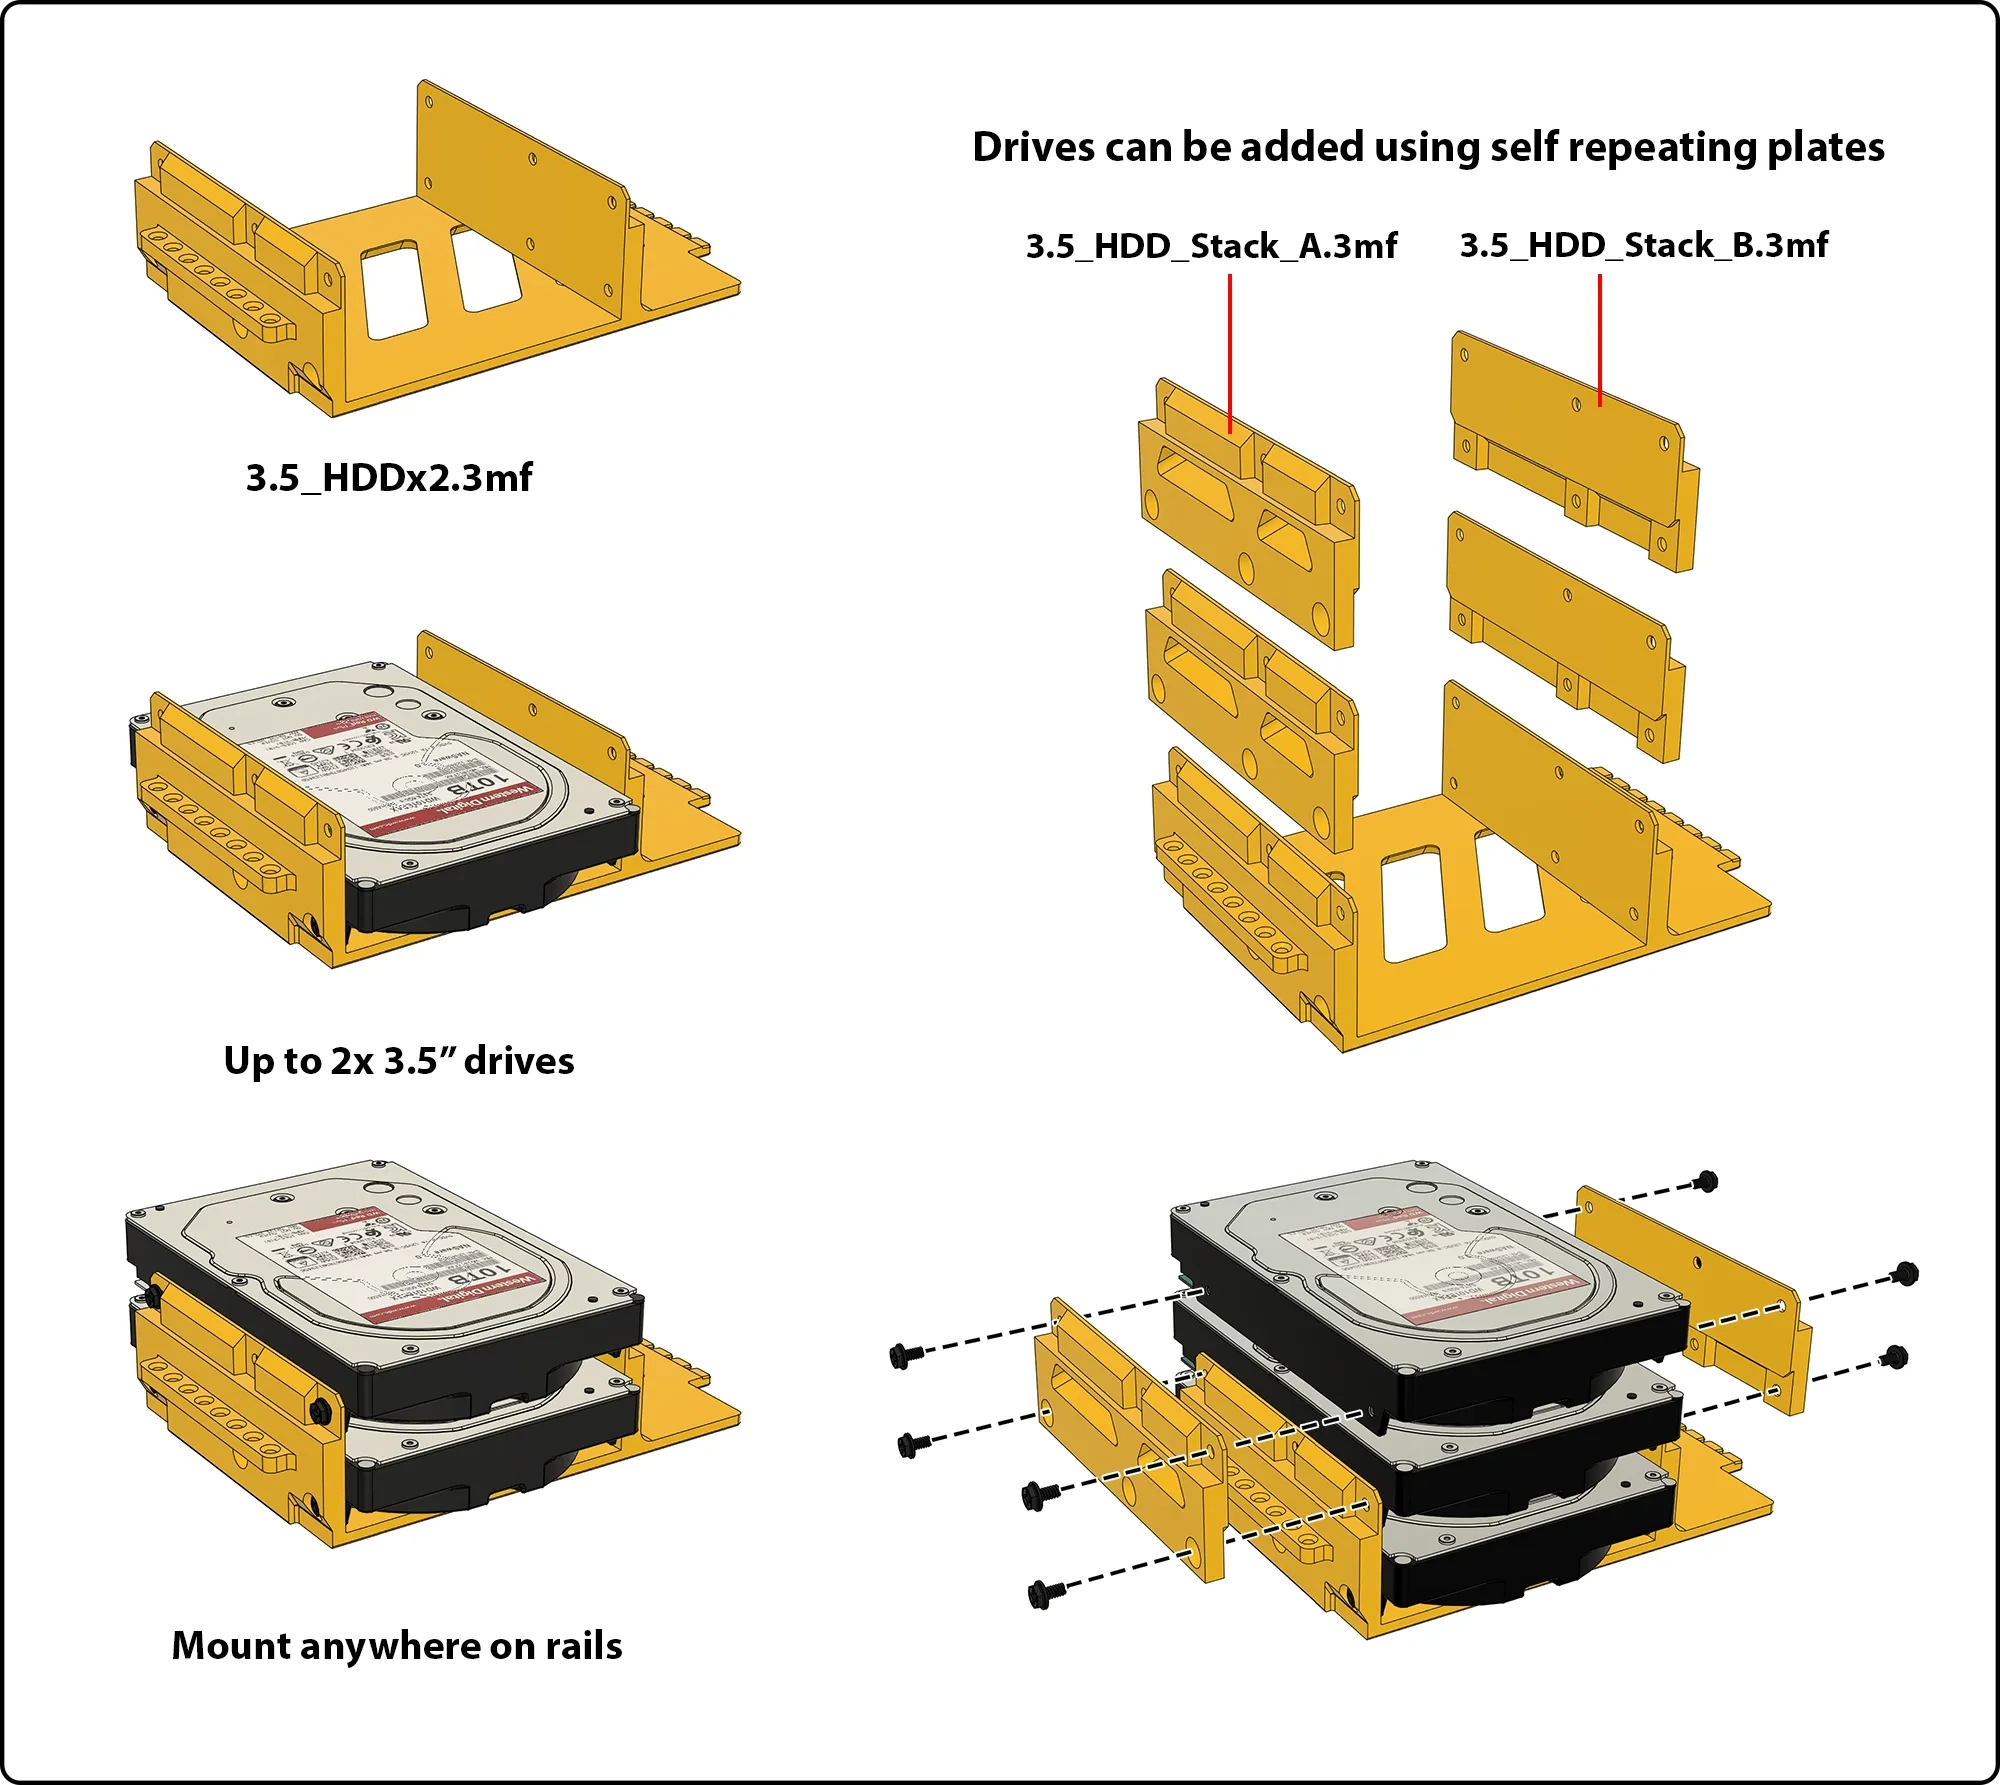
Mounts to universal rails.
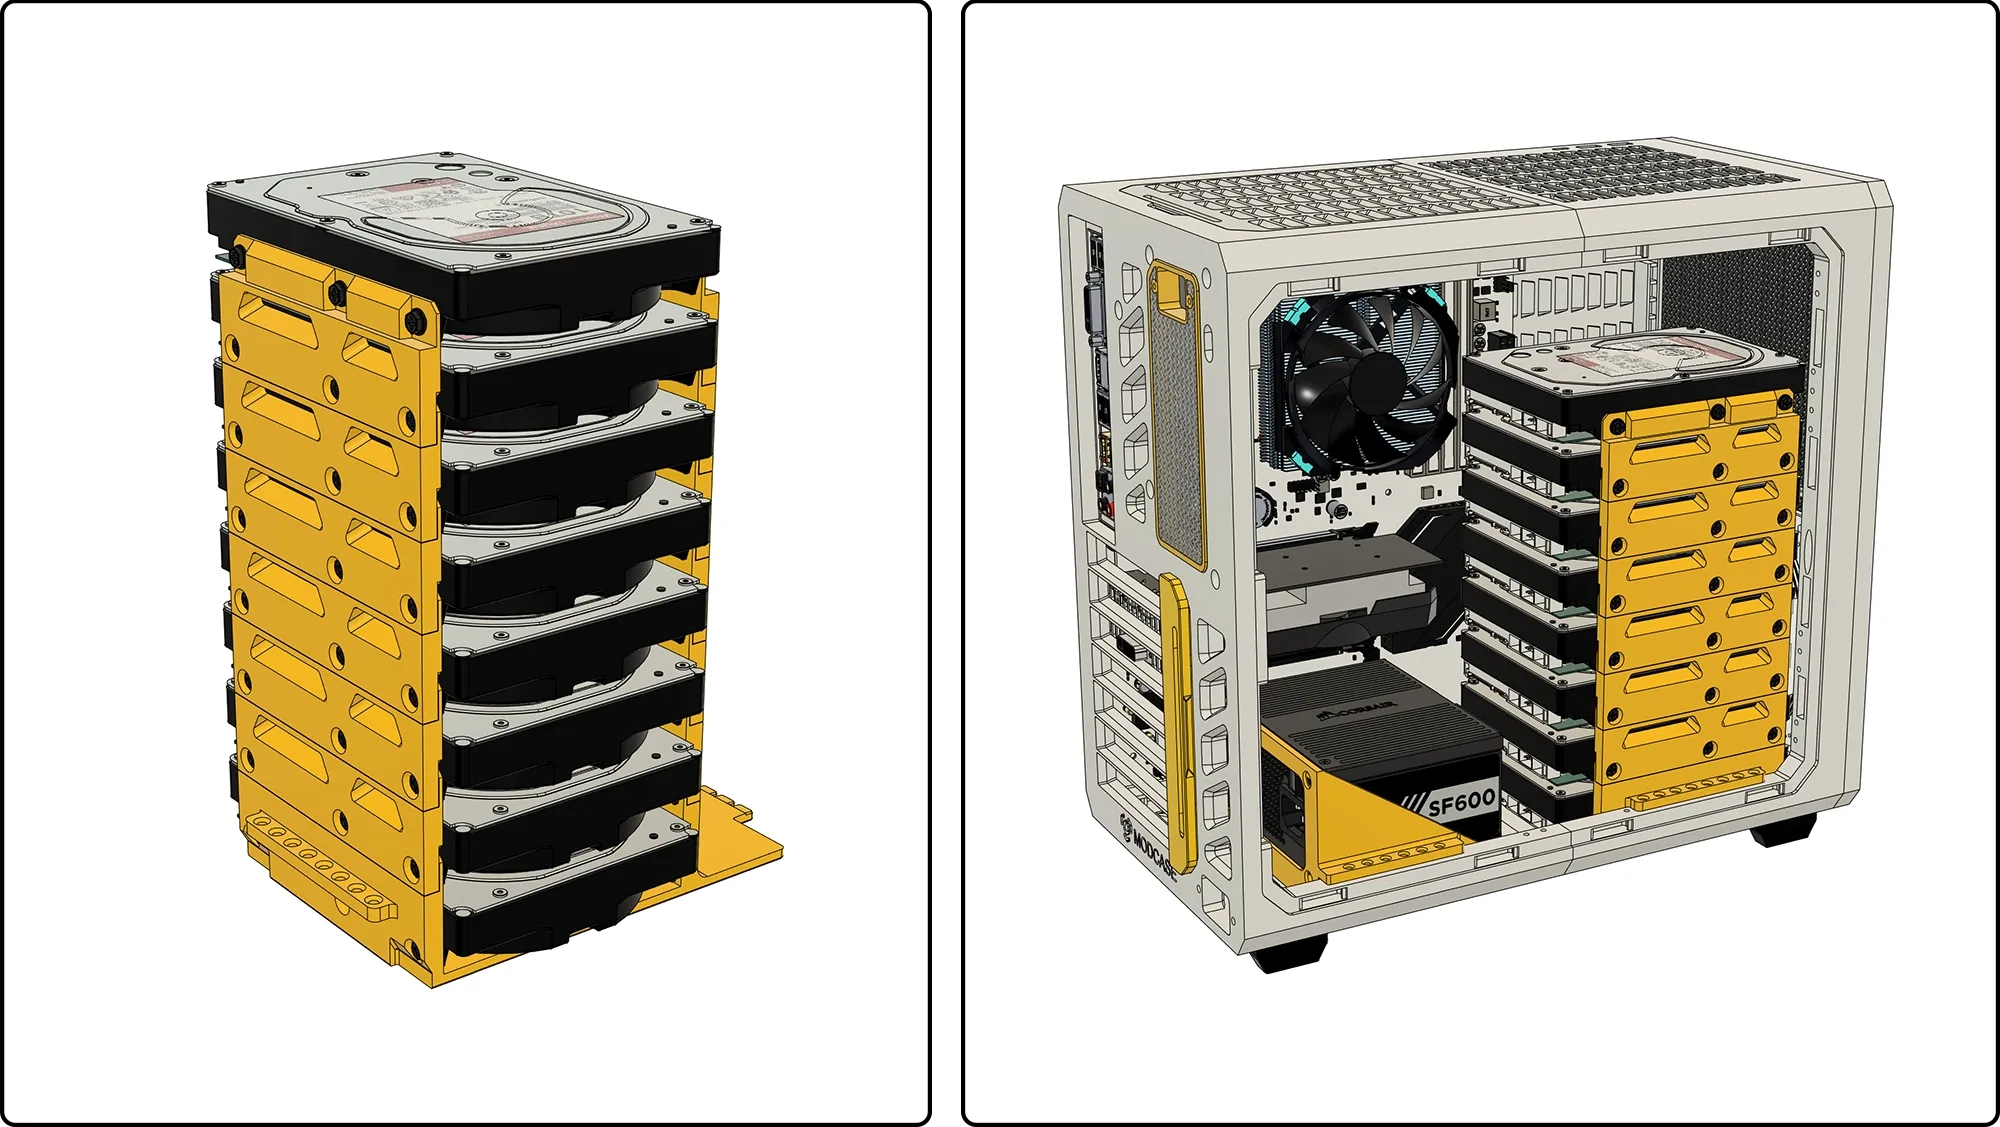
2.5" Drive Adapter for Stackable Module
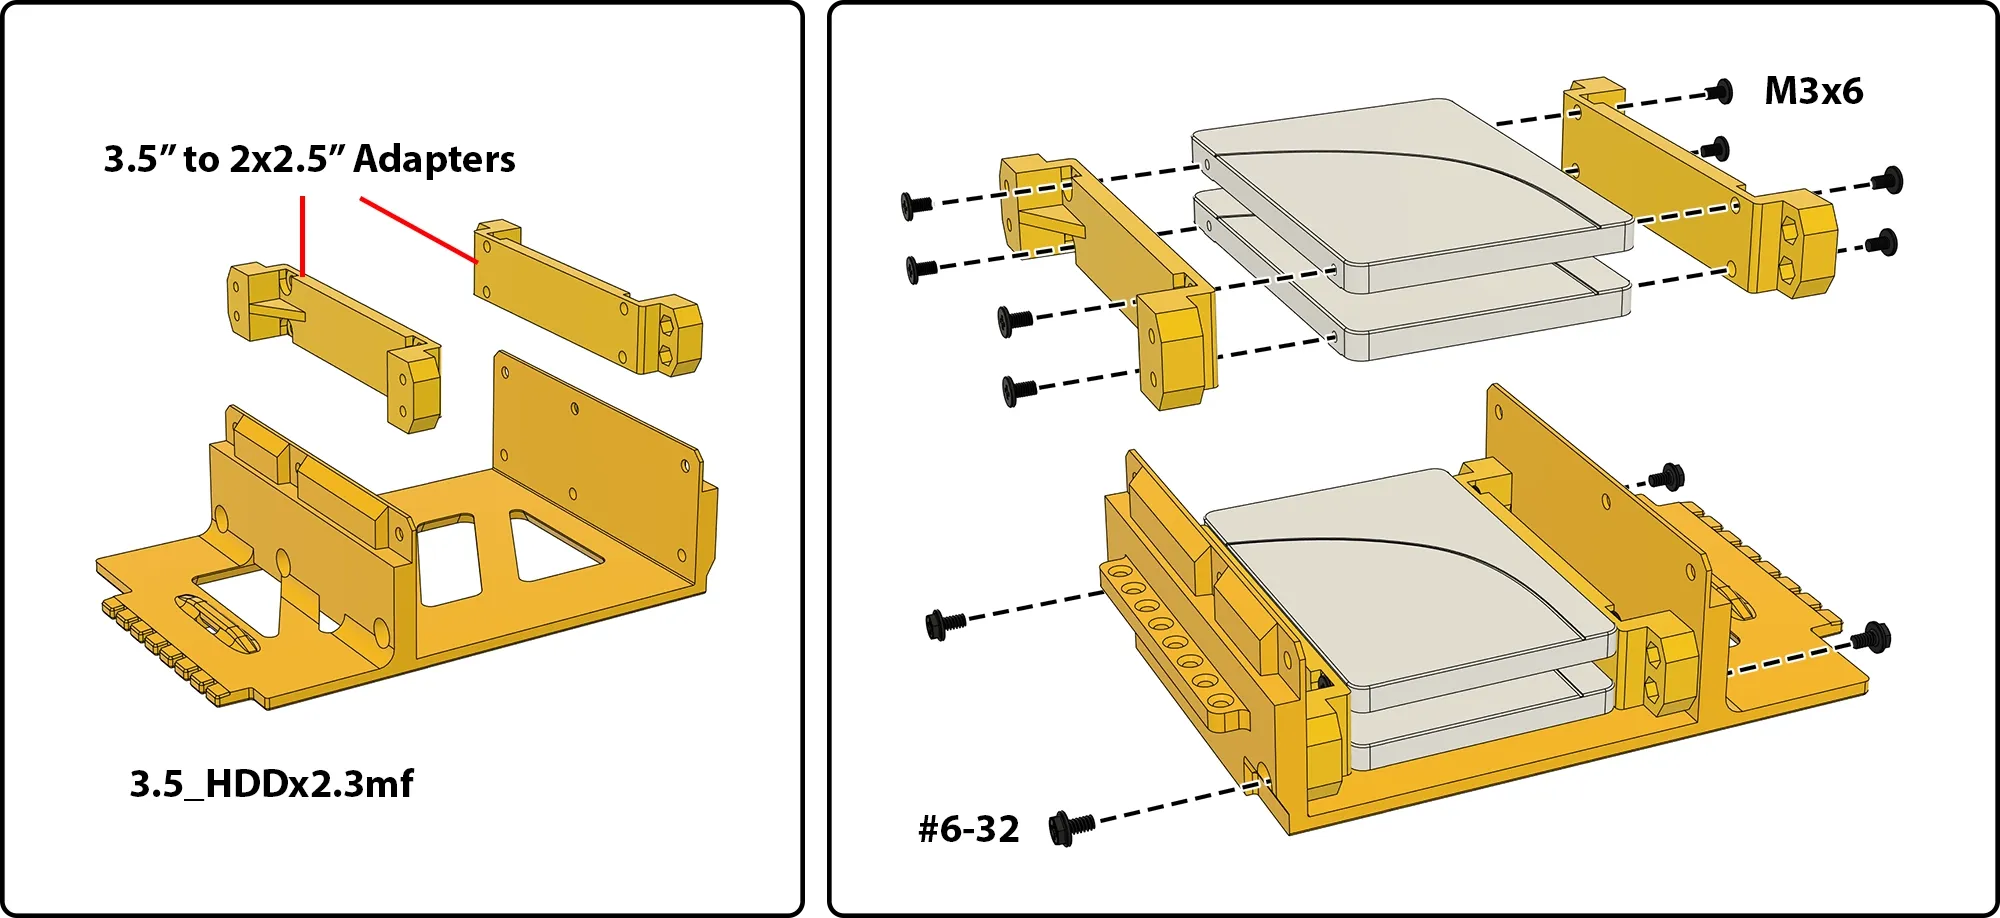
Use standard PC drive screws: M3×6 for 2.5" drives, #6-32 for 3.5" drives.
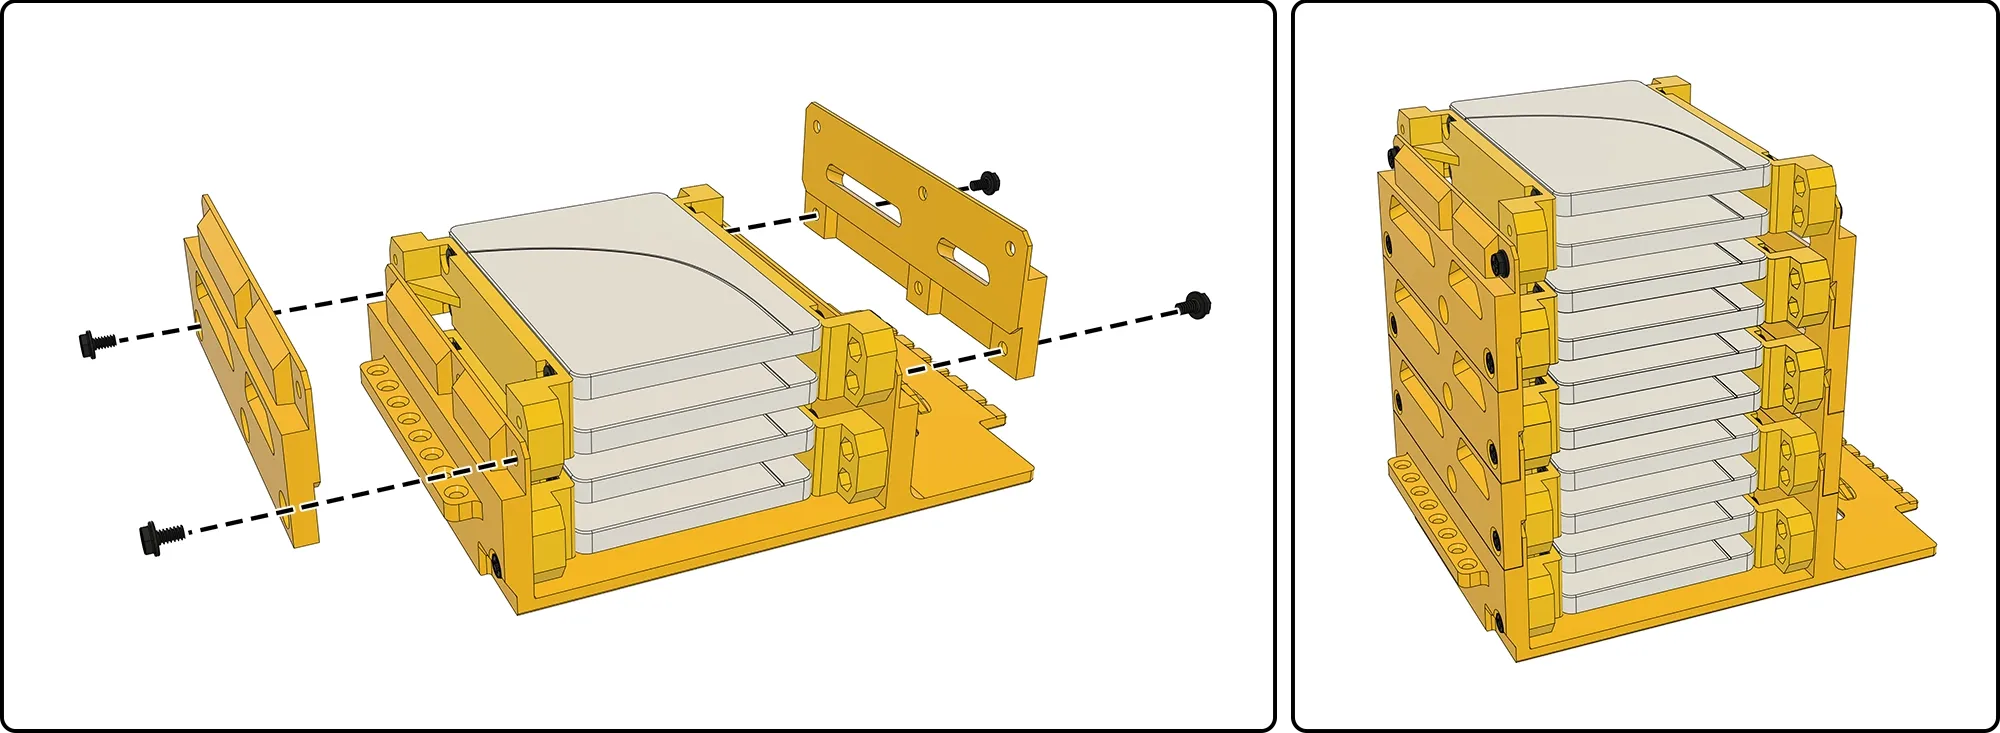
2.5" drives can also be stacked using repeated plates.
Side Drive Mounts
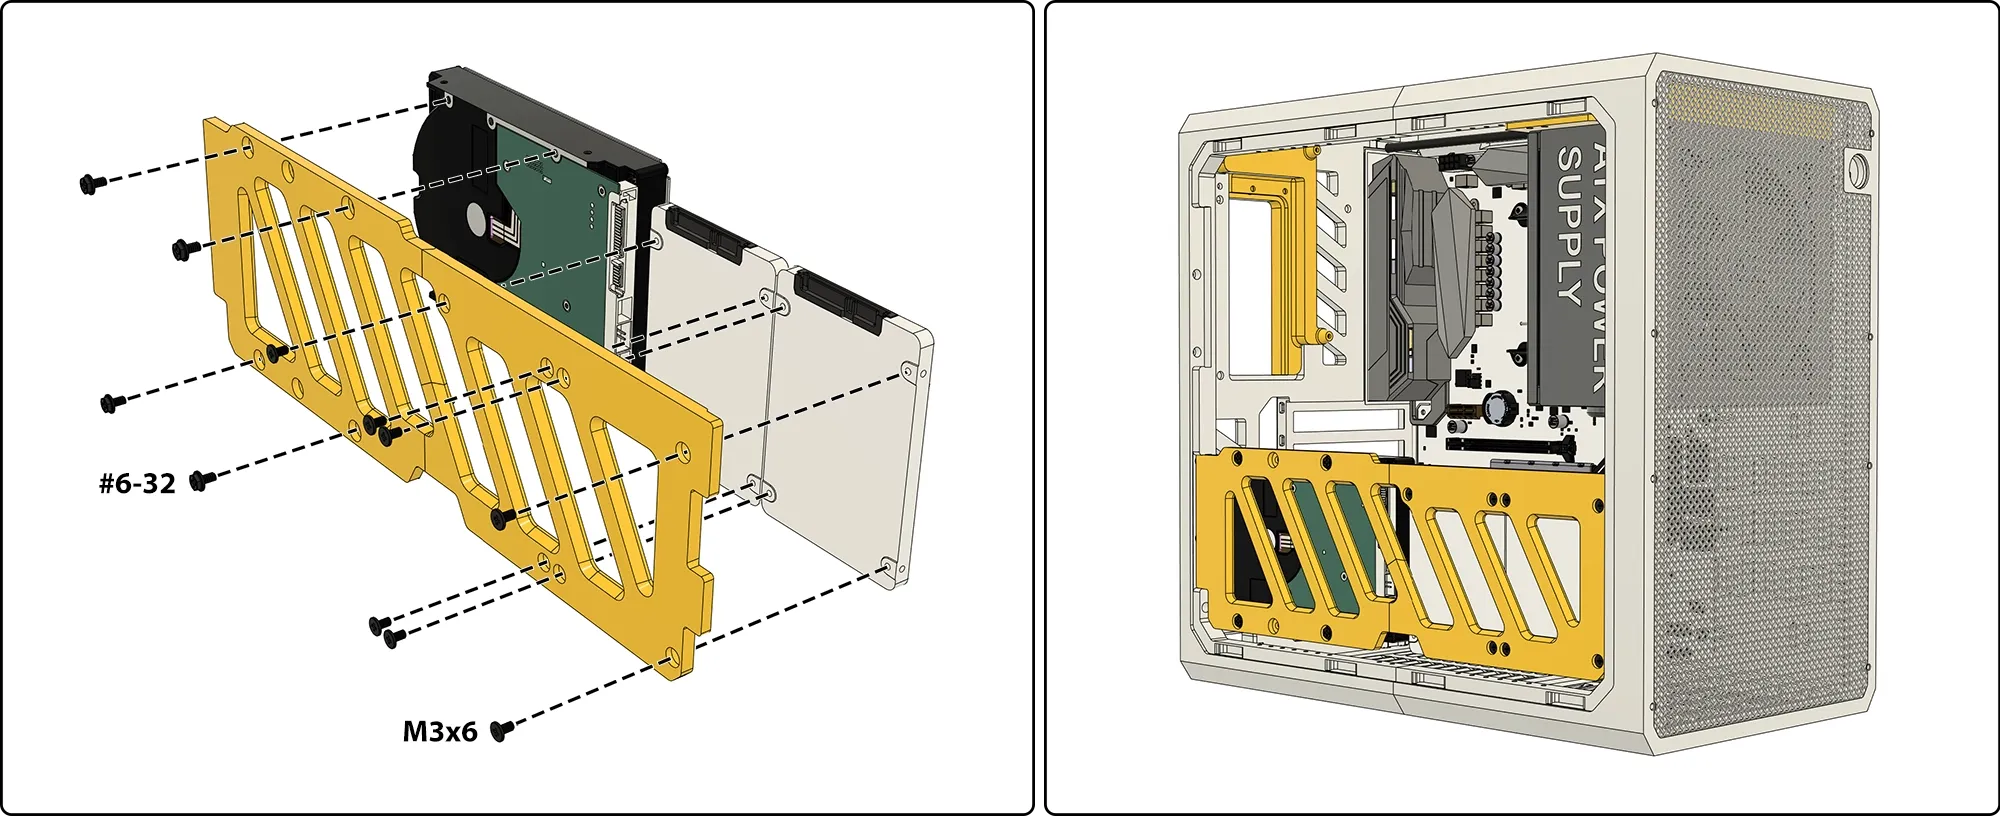
USB and Power Button
- USB-A Cable (Link) - 👉Cut rubber tabs (it's soft) and use standard computer screws (#6-32*6) to secure the cable.
- USB-C Cable (Link) - Similar cables might work.
Install POWER BUTTON (Link)
👉This is a standard Ø16mm hole, to fit commonly available 16mm round PC power buttons.
Side Panels and Ports
4 split side panels are included for smaller printers
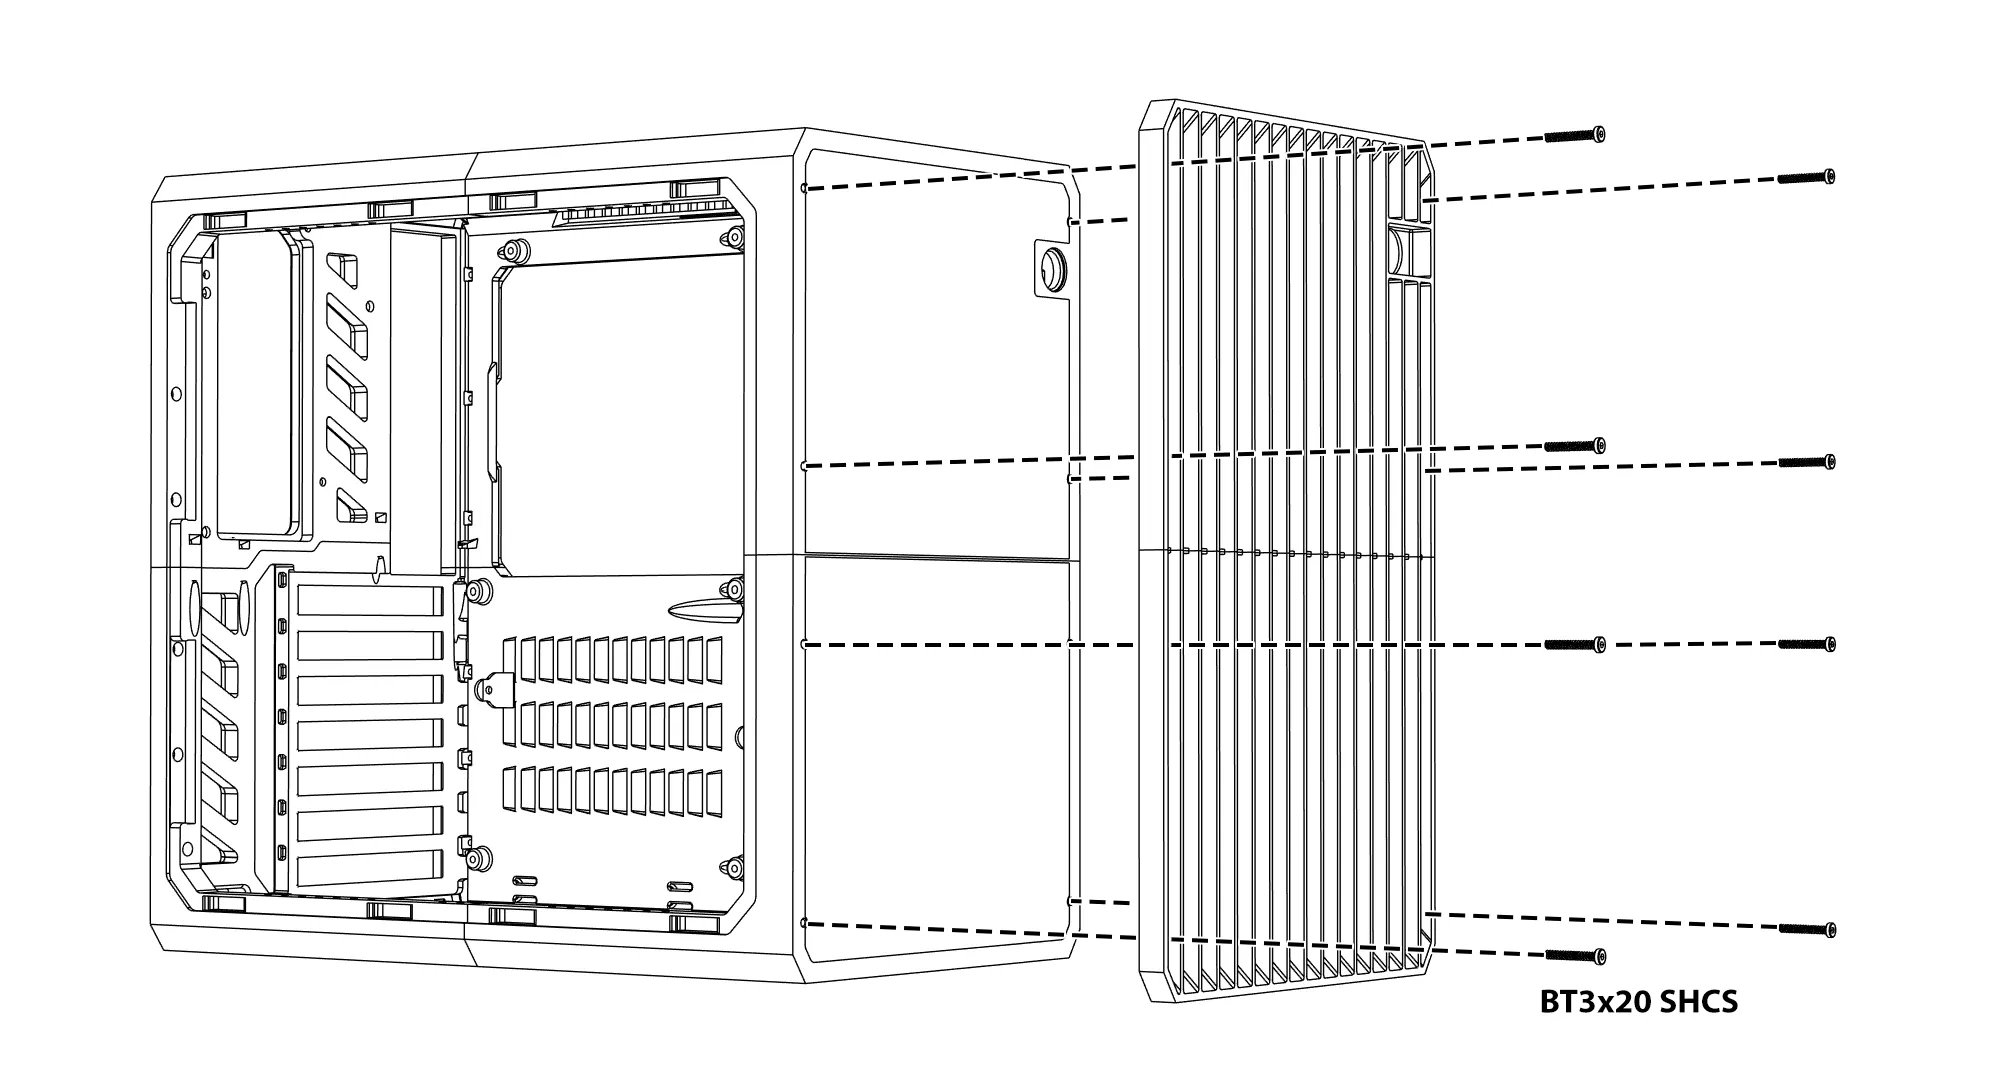
Rear Cover Installation
The new rear cover installs from the inside and screws in.
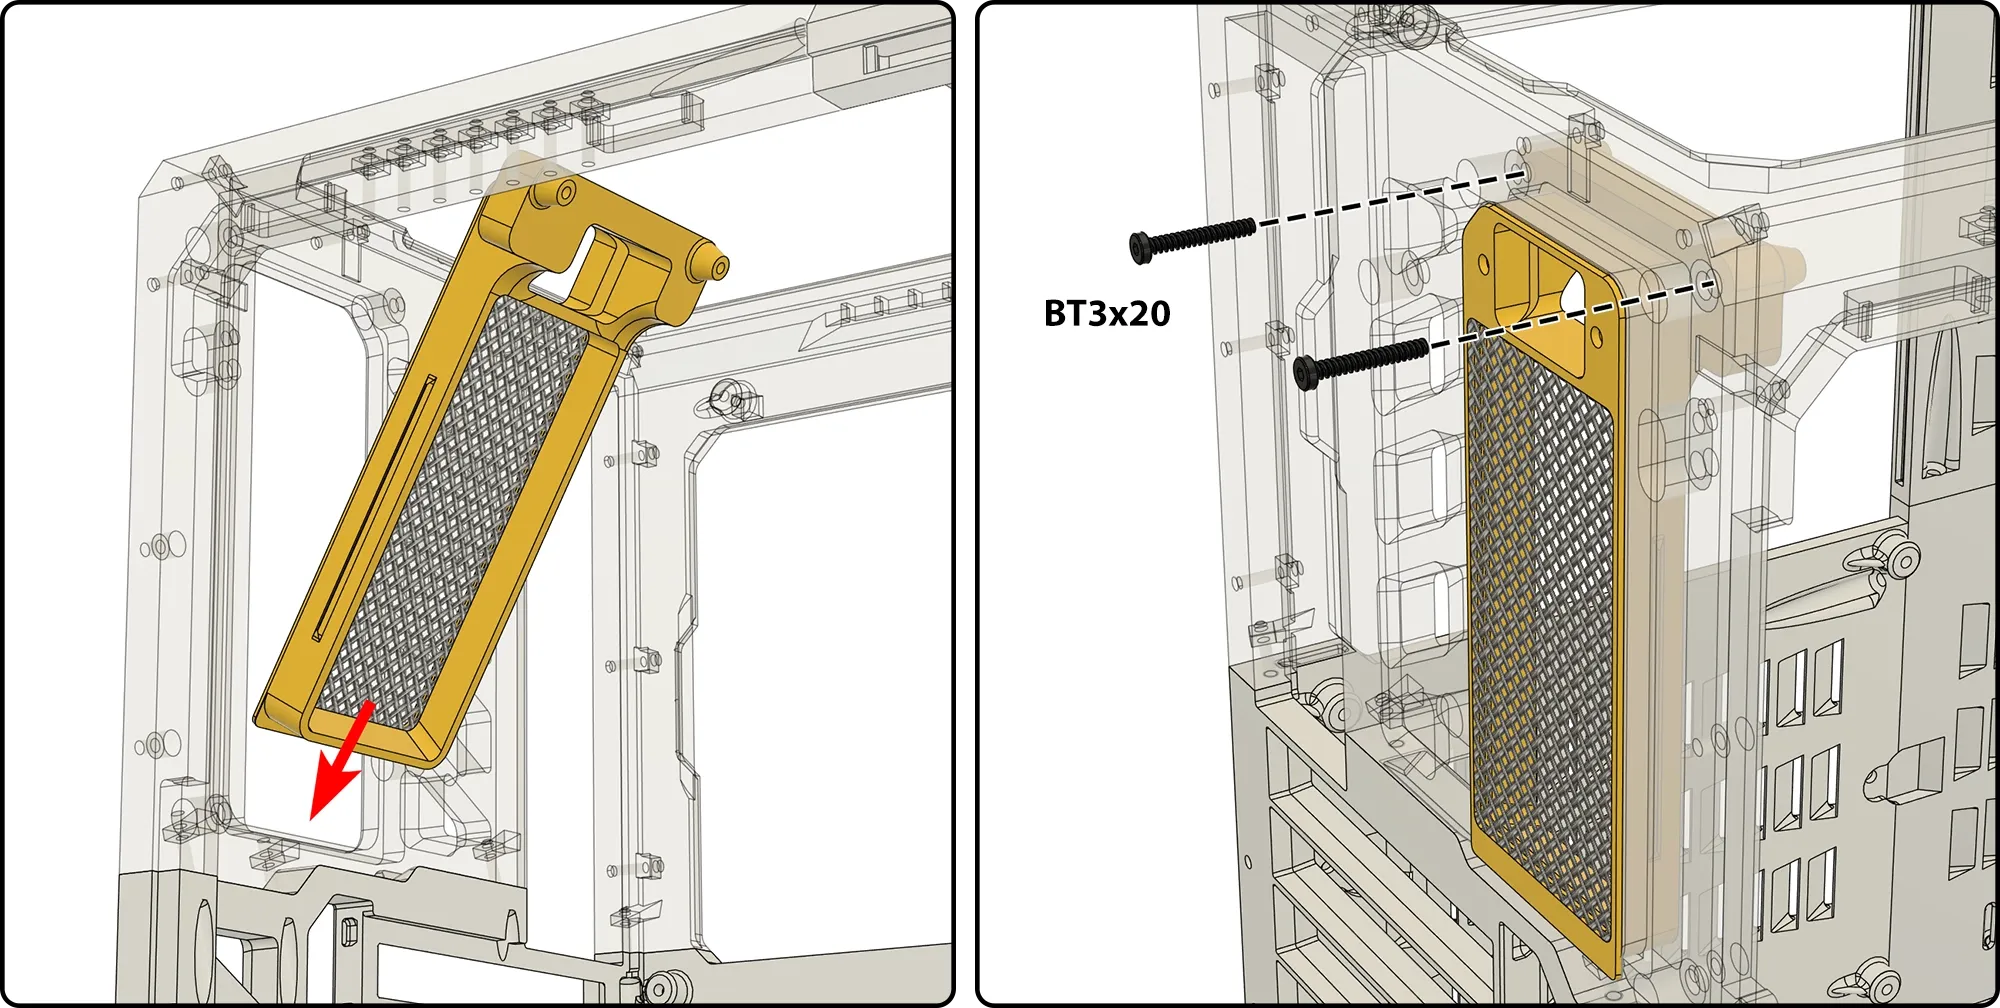
This rear cover has a mounting point for the PSU cable.
Side panels with display
4 split side panels can accommodate 5" displays (Link). One-piece side panels can accommodate 7" displays (Link) as well as 5".
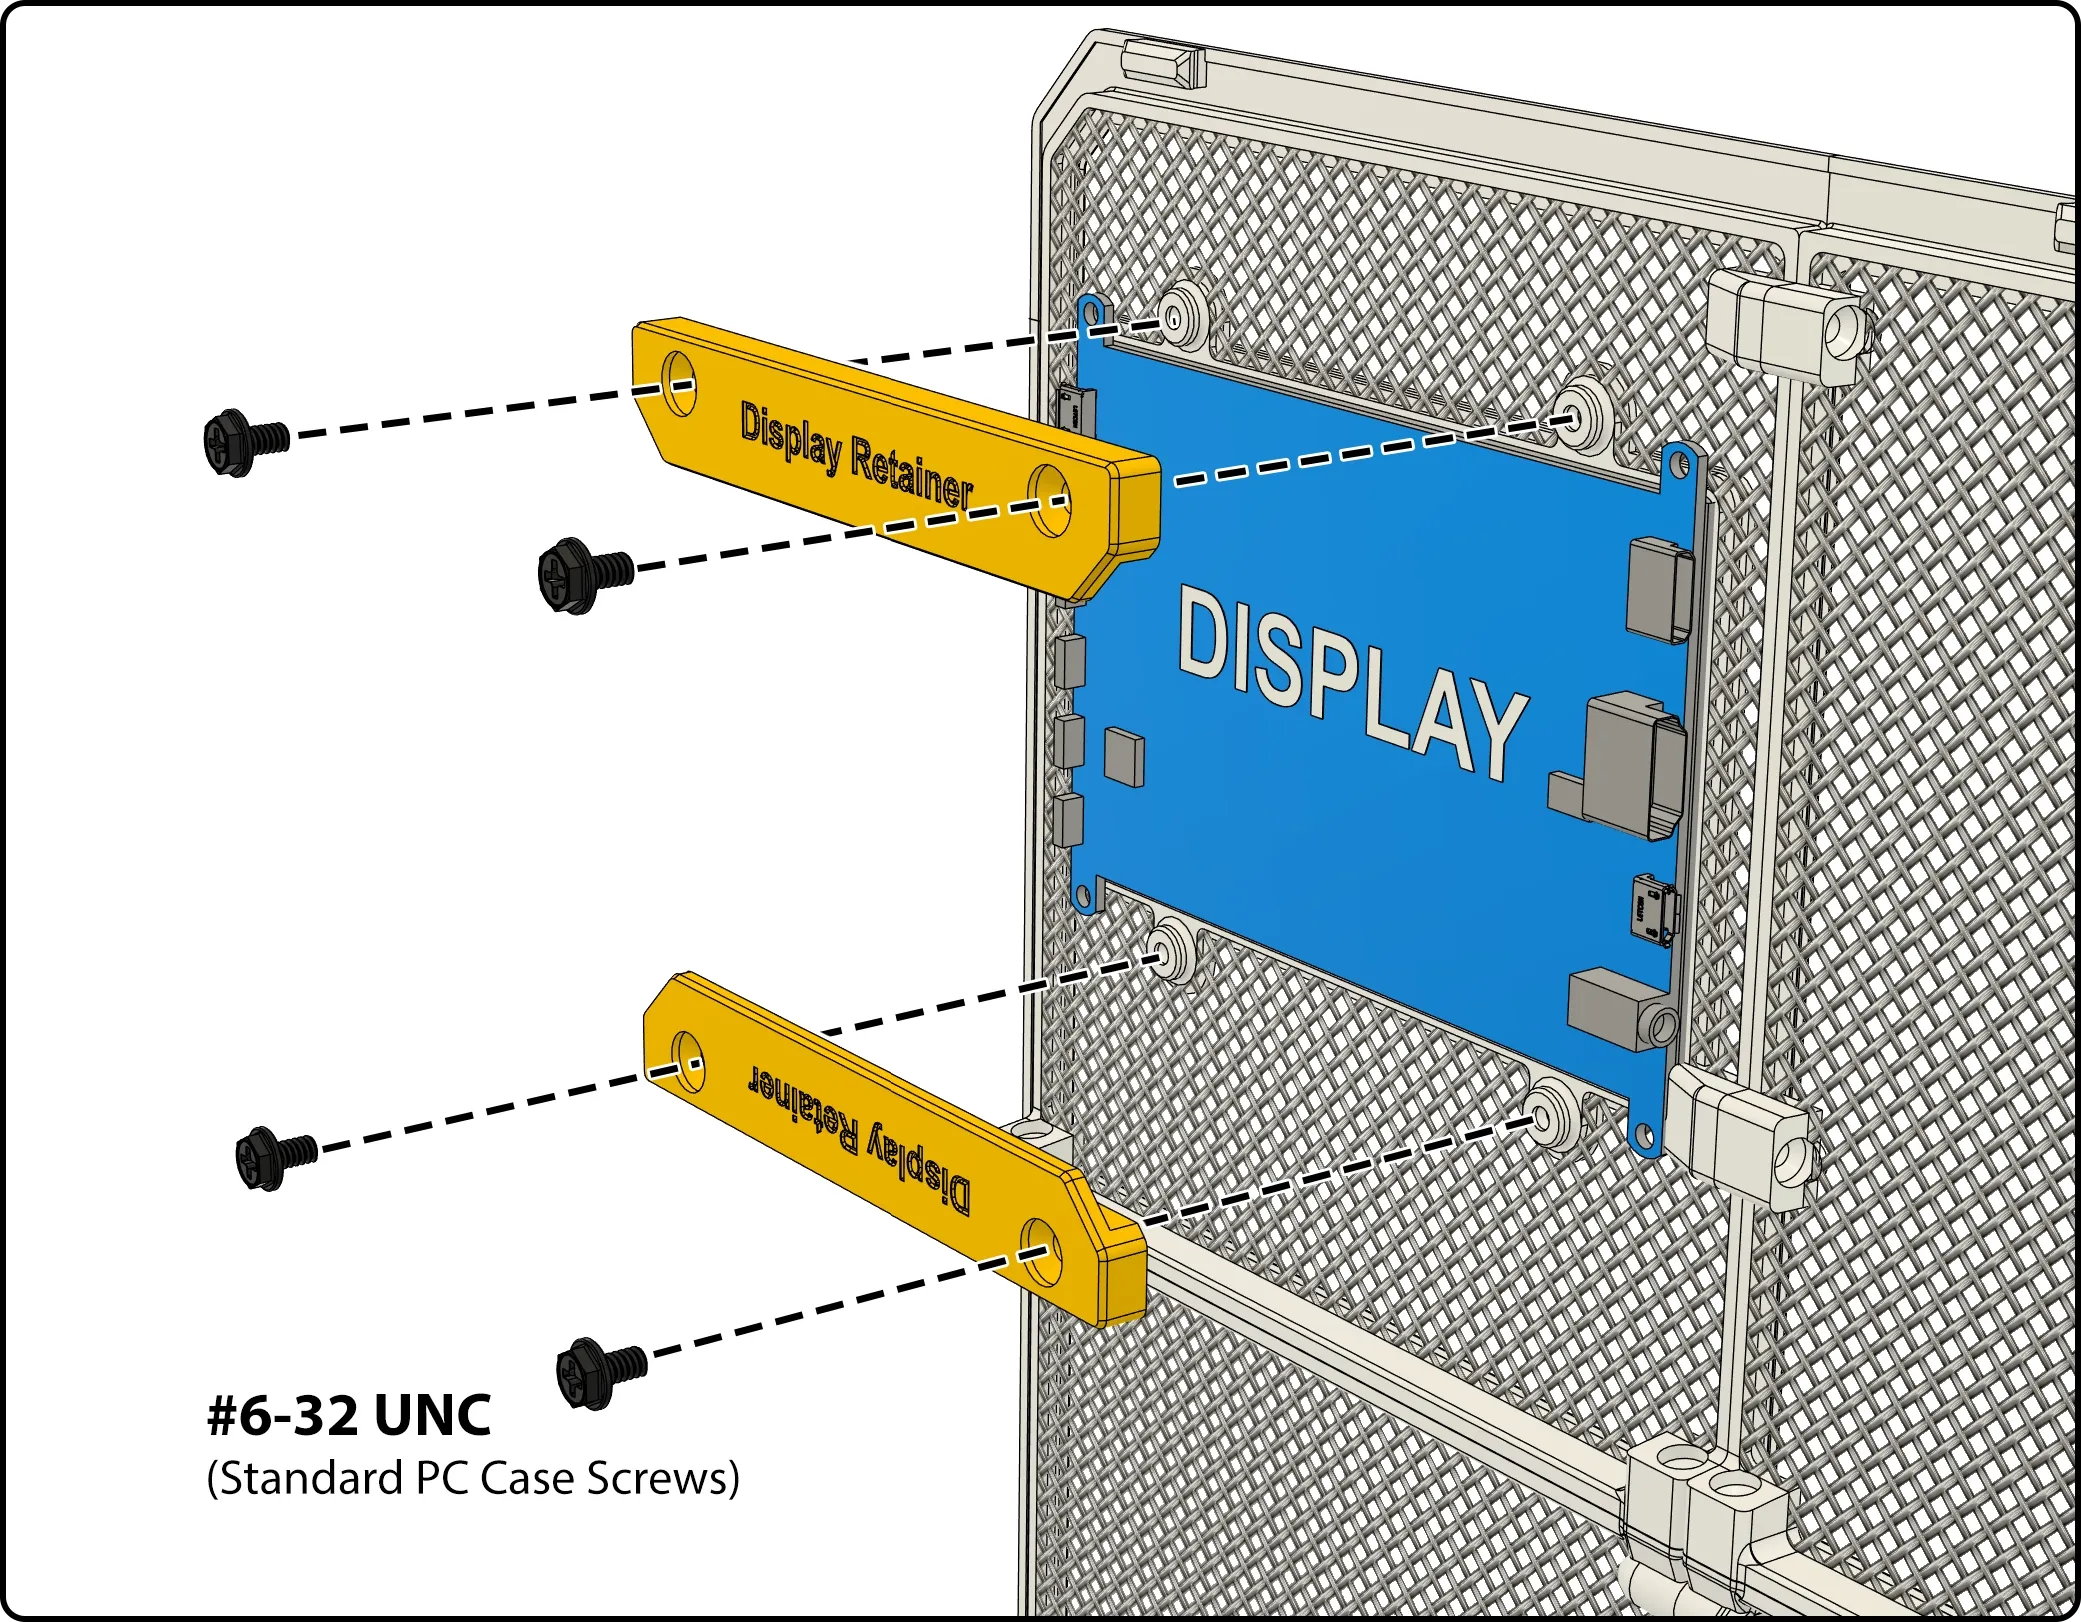
Note: The side panel with phone dock has been removed based on feedback - due to safety considerations regarding mounting battery-powered devices in a heated environment. 5" and 7" display mounts are recommended for status screens.
Transparent Side Panel Modification
This frame allows you to mount your own transparent material (acrylic or polycarbonate) for a clear side panel option. You will need to cut your material to the following dimensions and use cyanoacrylate glue (super glue) or two-part epoxy to bond your panel to the frame.
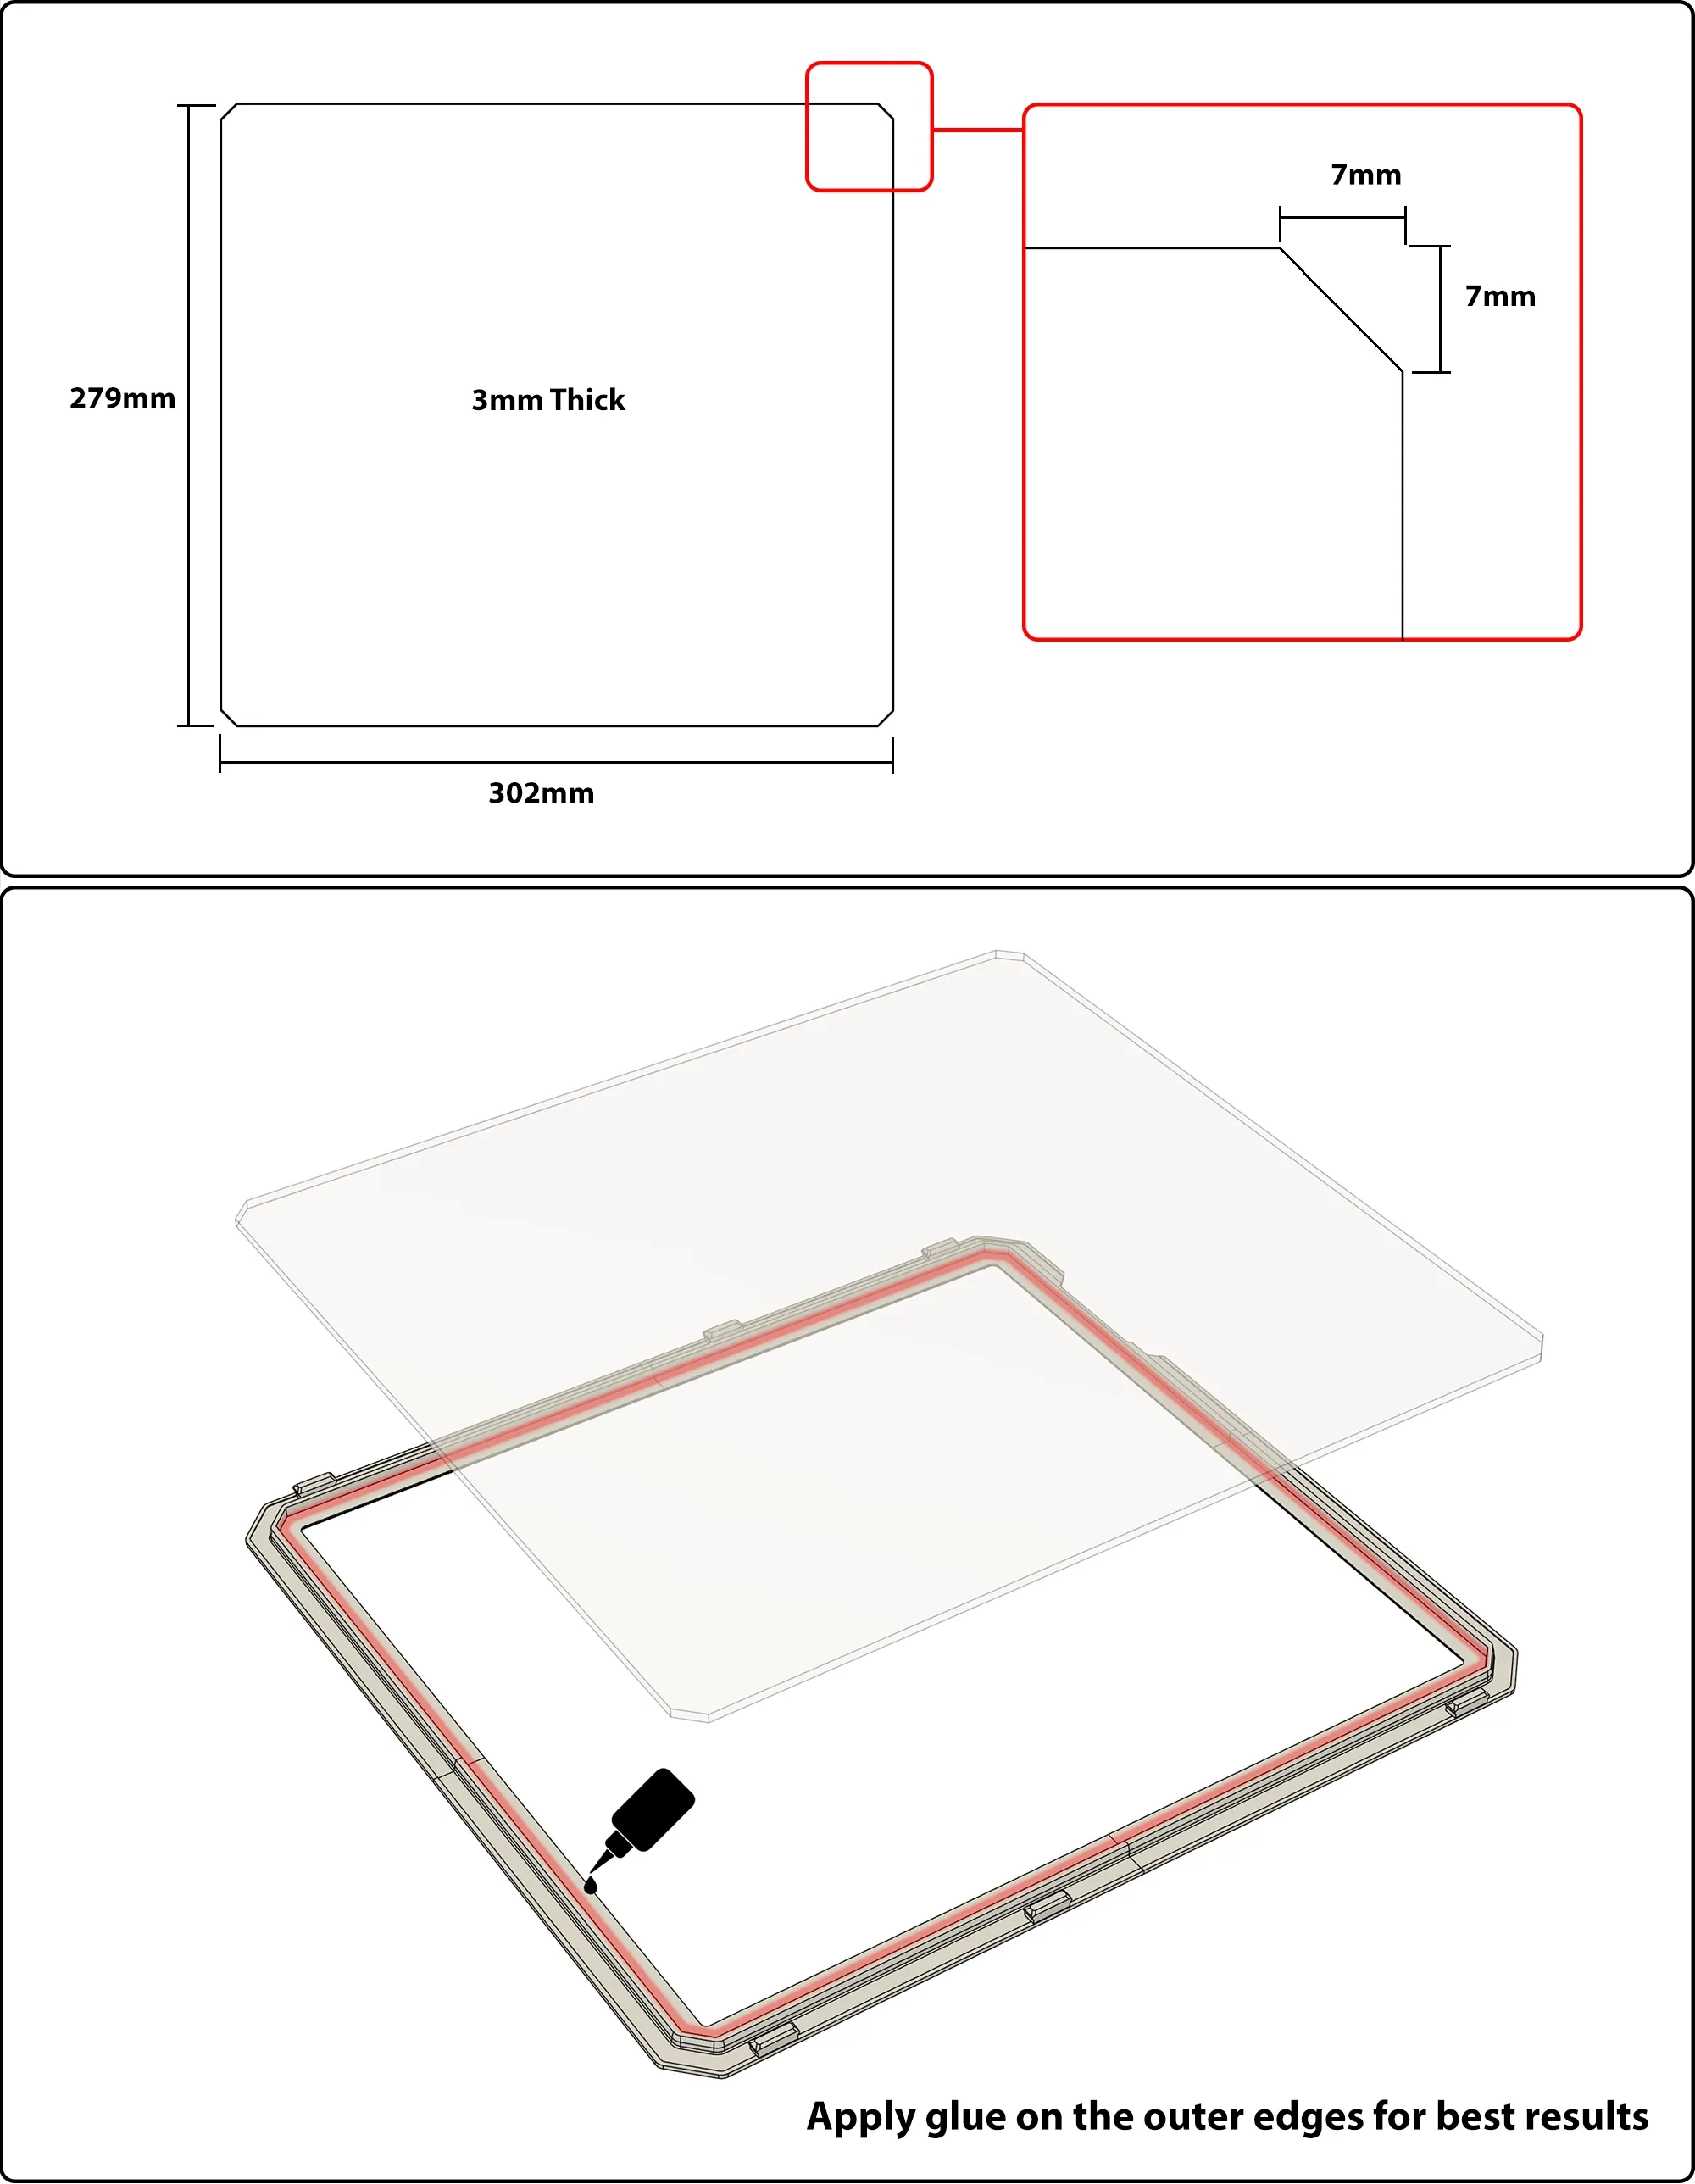
Note: Mesh panels are recommended for the best airflow. Ensure adequate cooling when using this solid side panel.
Update: 3 expansion pack size options. Material dimensions for expanded side panel options are as follows.
| Standard (No expansion) | 279 x 302 x 3mm |
| 80mm Expansion | 279 x 382 x 3mm |
| 100mm Expansion | 279 x 402 x 3mm |
| 120mm Expansion | 279 x 422 x 3mm |
Vertical Module
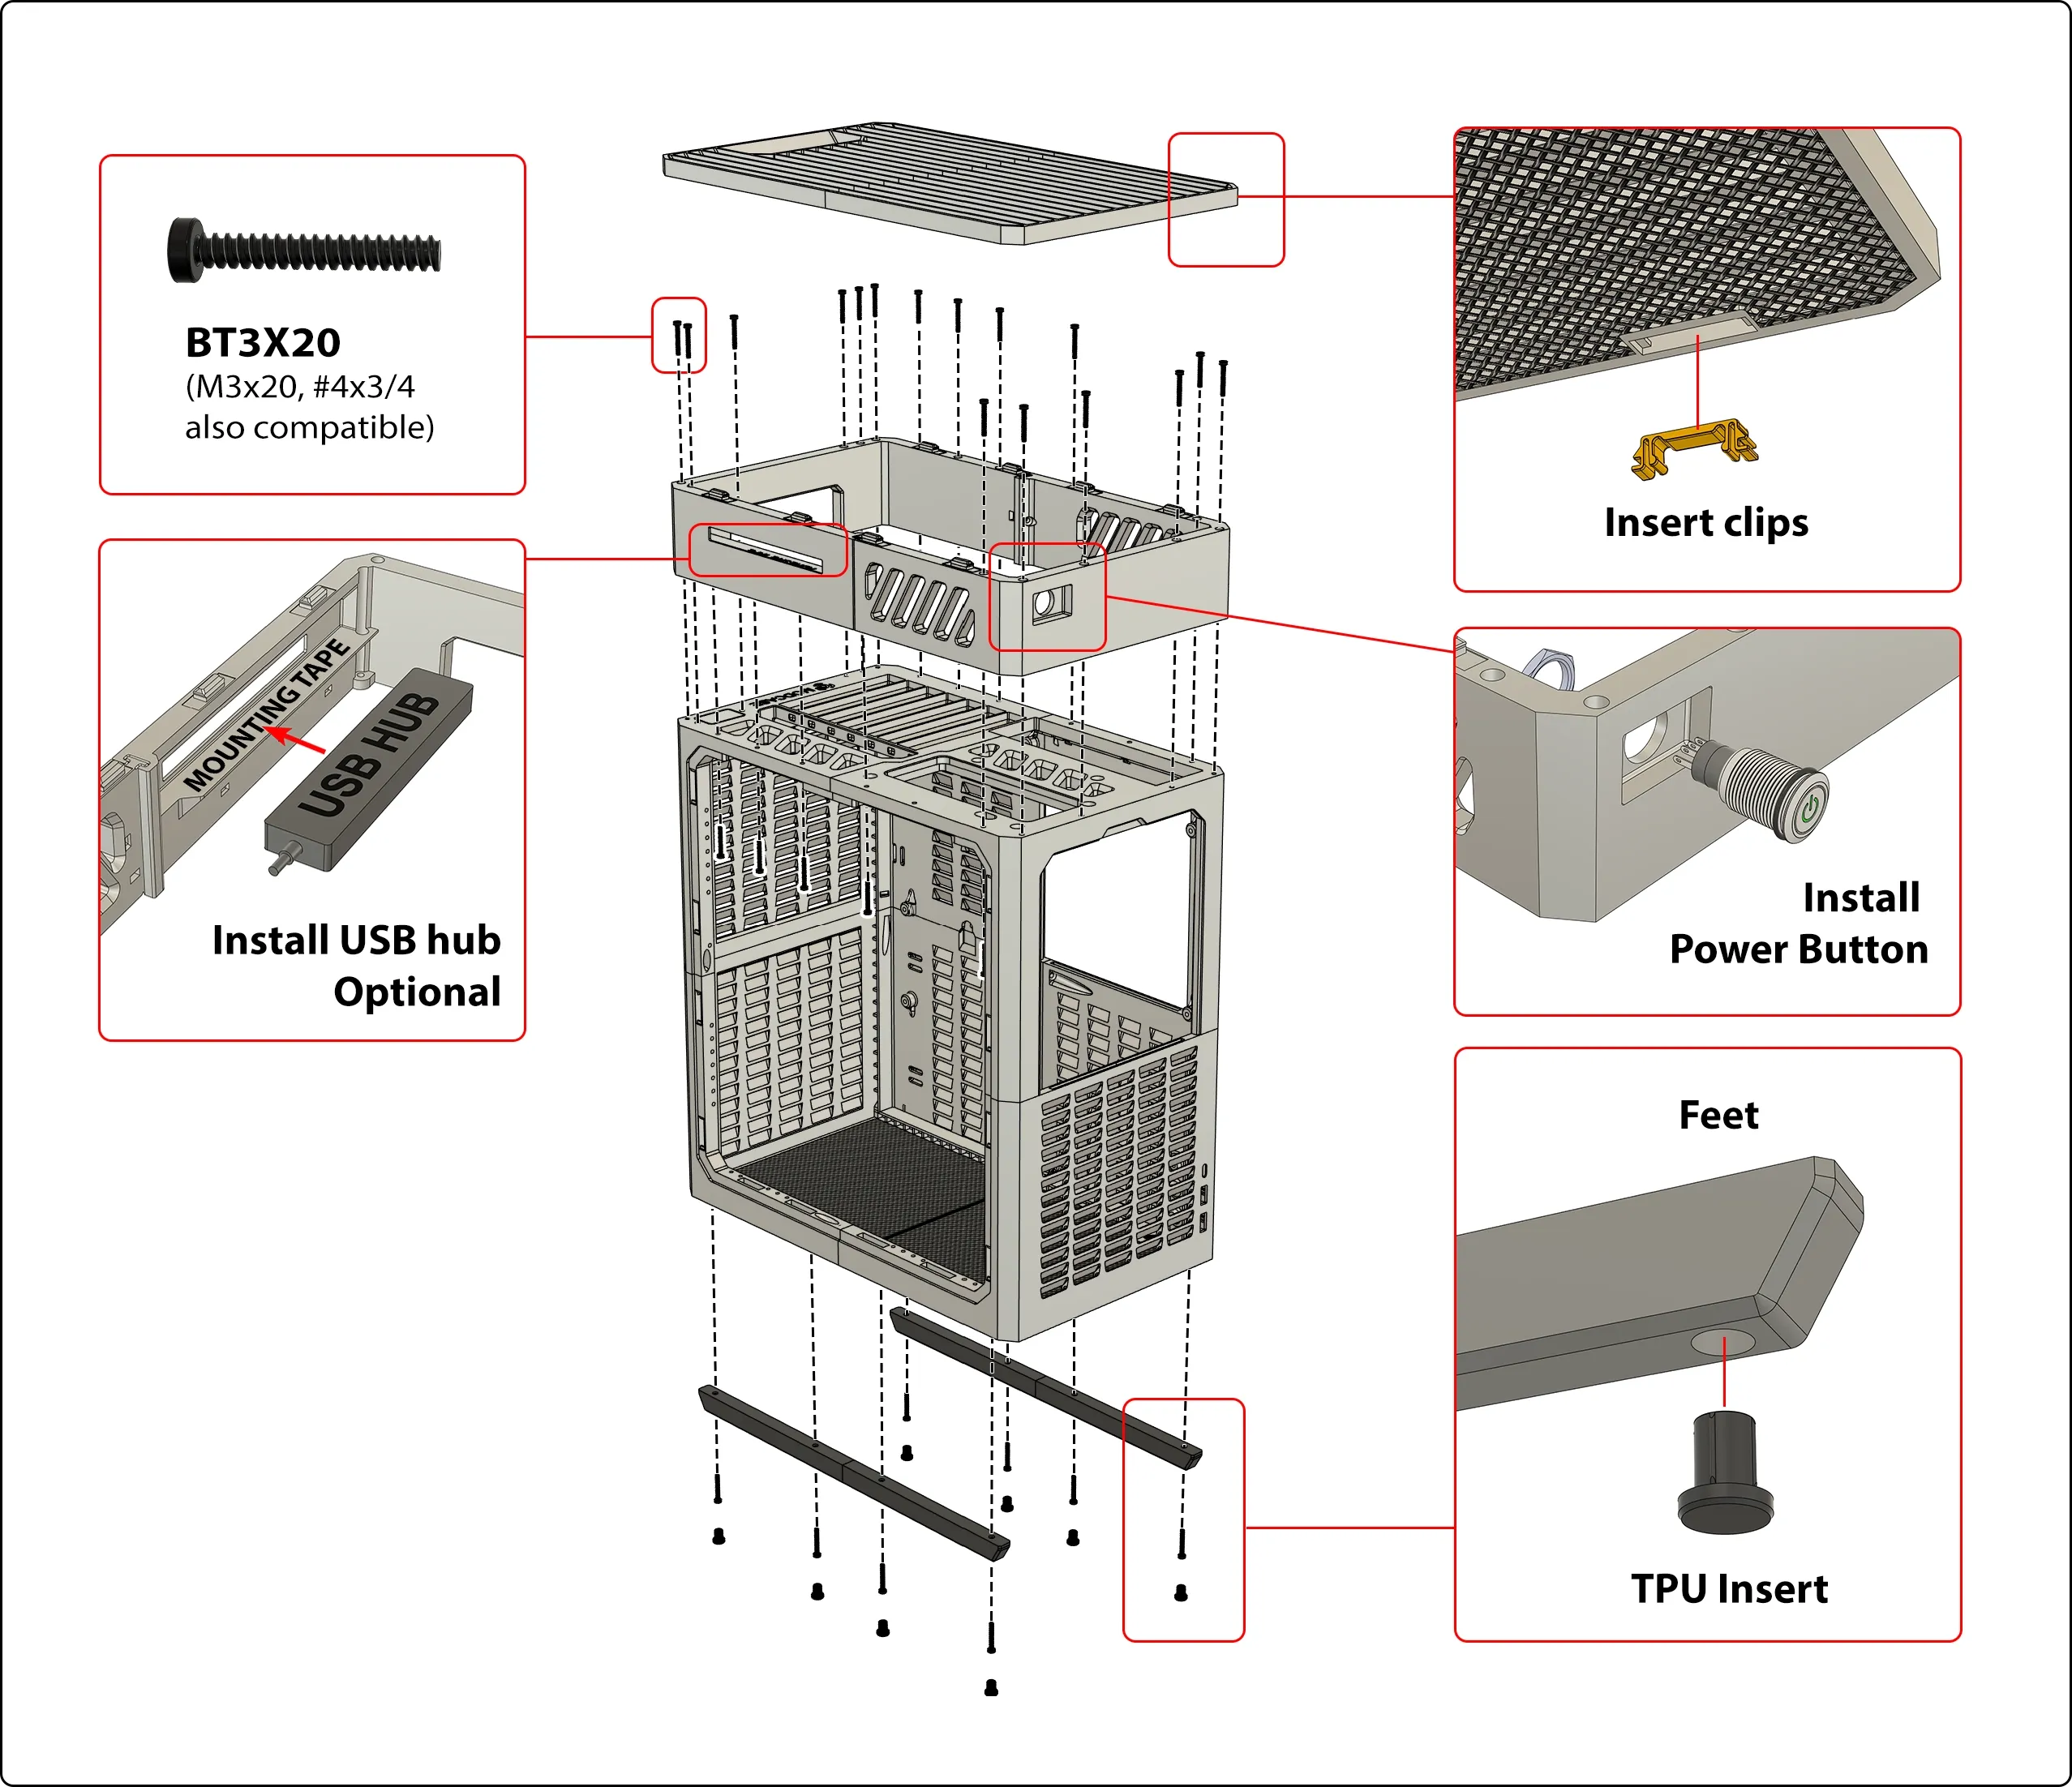
The vertical module adds a handle and allows you to use your case vertically for a minimal footprint. The top plate is removable for easy access to all your IO ports.
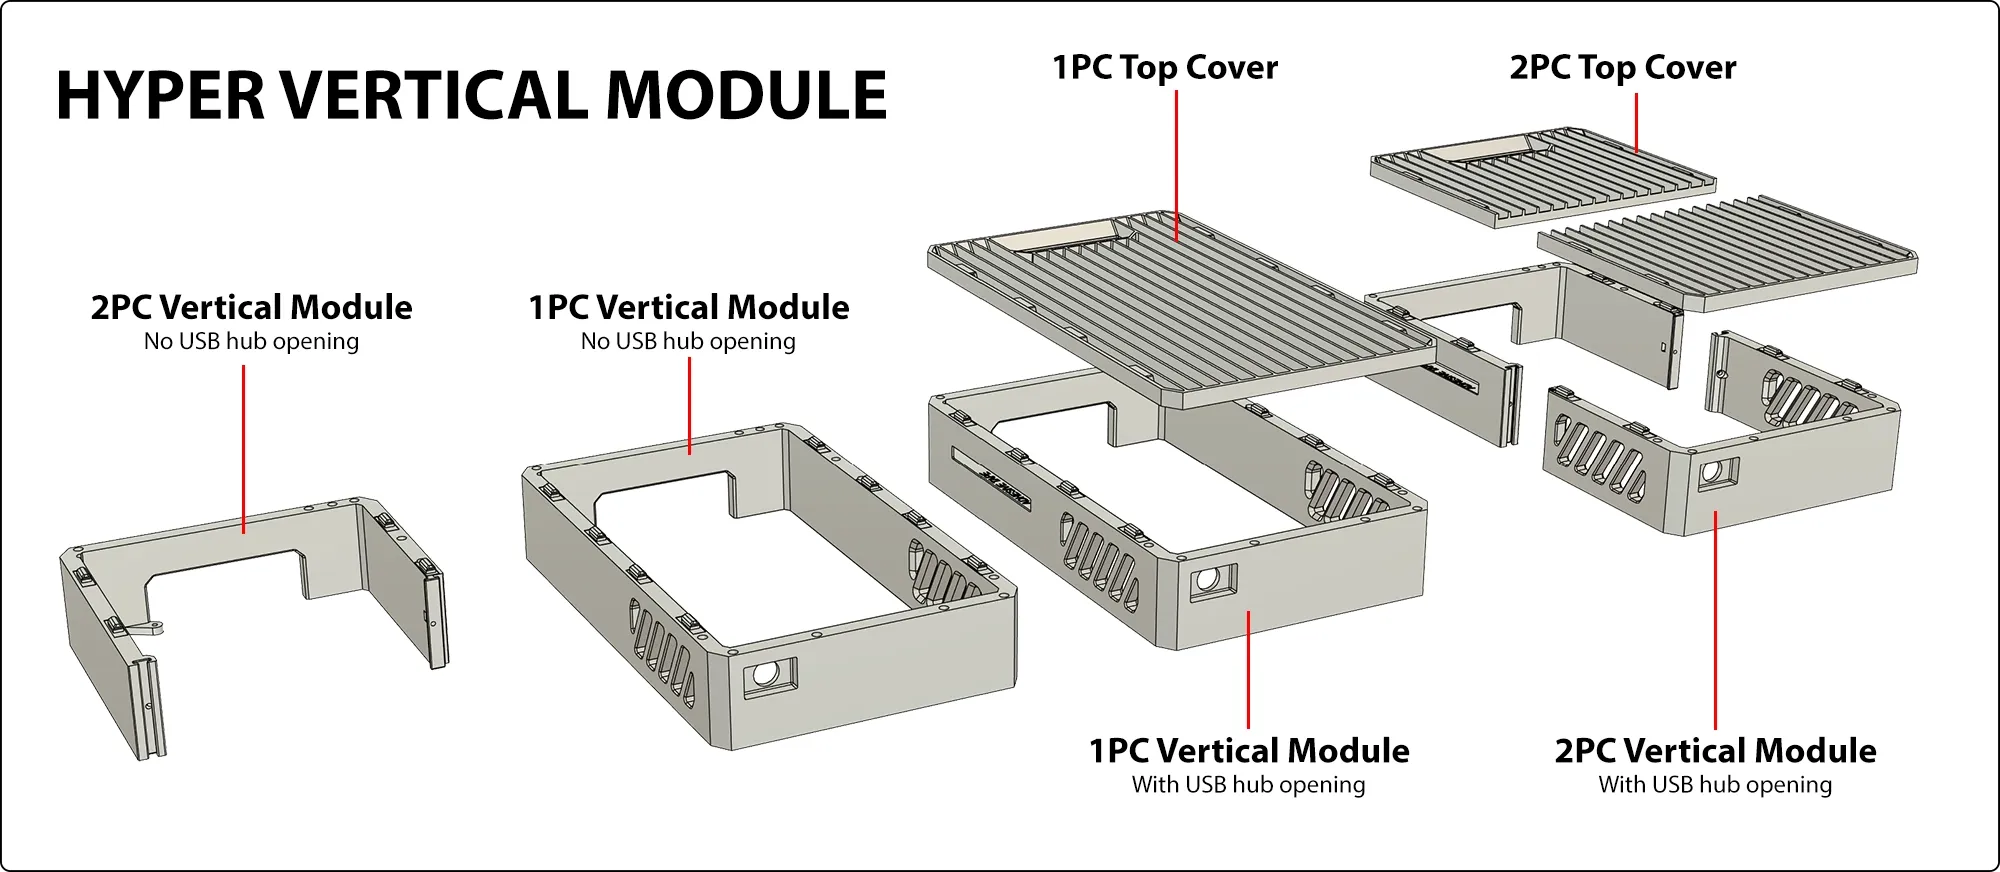
An optional USB hub mounting variant is included to expand your IO options. Use tape for mounting. This hub (Link) works well with an extension cable. Other hubs also work, the recommended maximum USB hub length is 155mm. Flat rectangular shaped hubs are optimal.
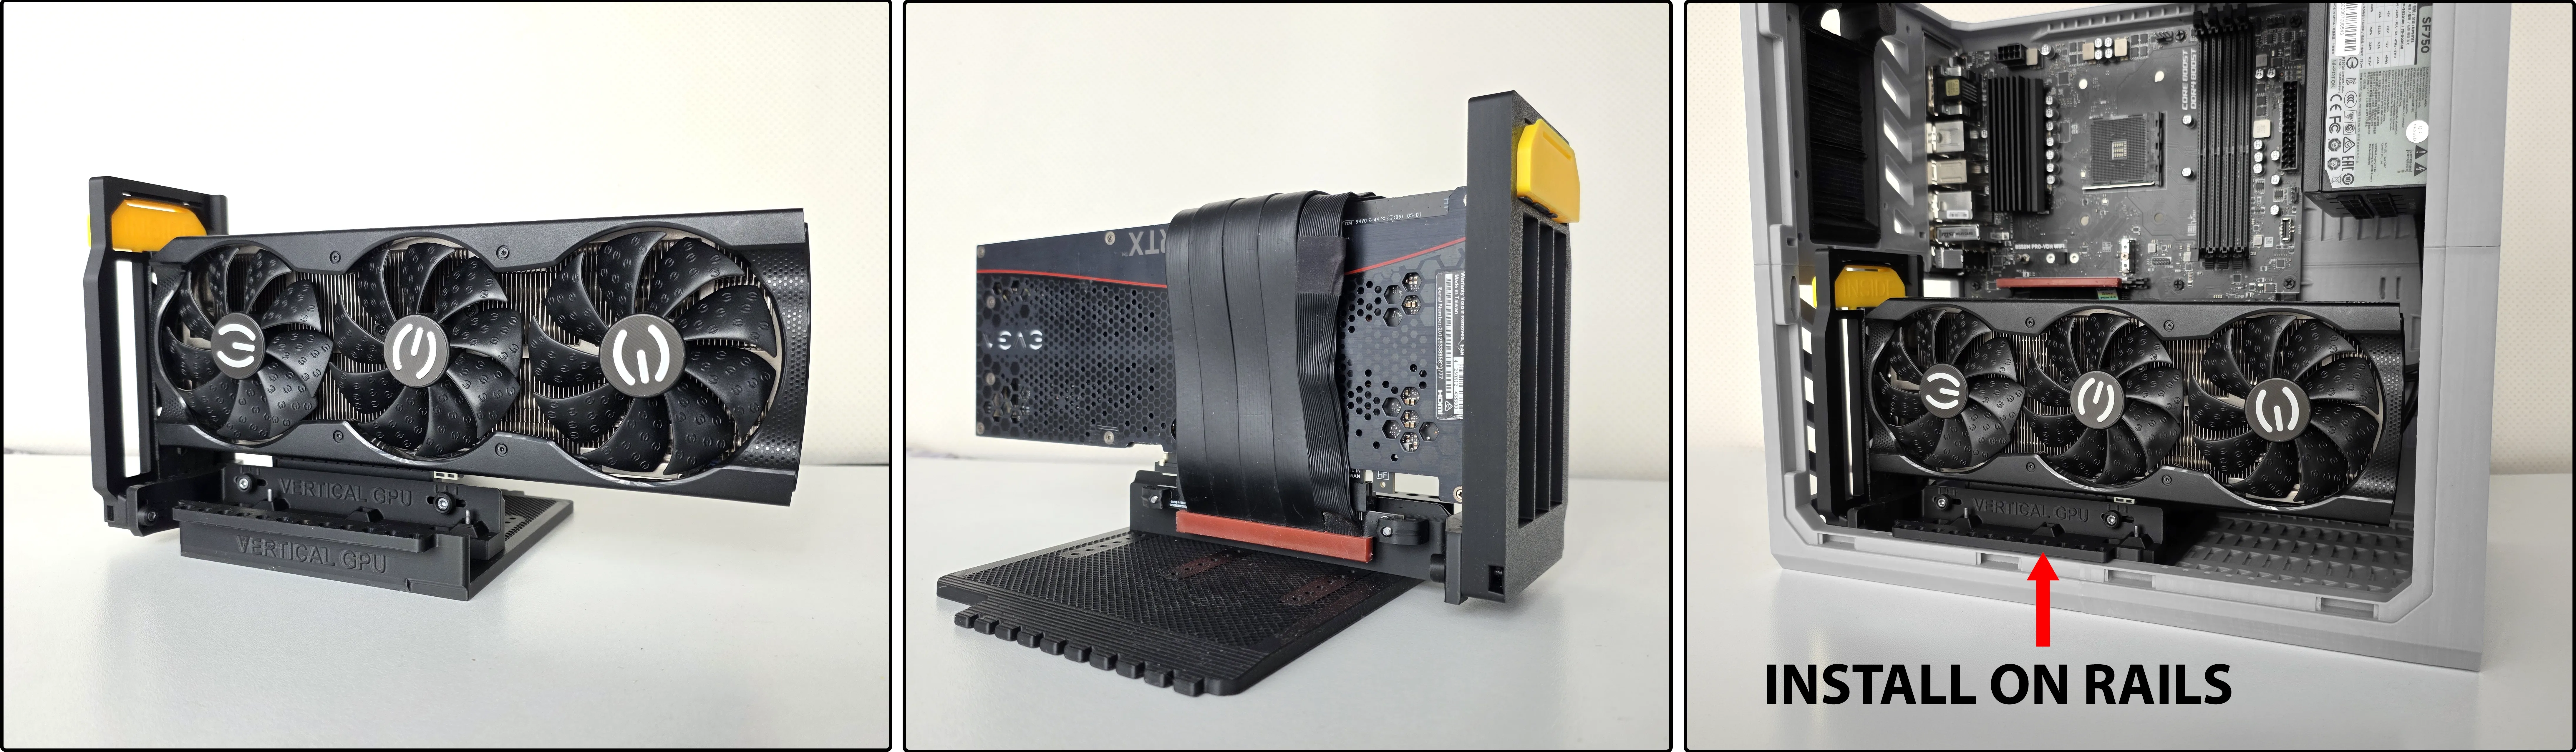
Vertical GPU Support
This vertical GPU support can be adjusted in 3 directions to fit your straight PCIE riser cable. It accounts for variations in mounting hole pitch and height on your cable.
All straight riser cables are supported. A length of 19cm is recommended. E.g. PCIE 4.0 Dual Reverse, or Linkup PCIE 5.0 Dual Reverse. (Since the motherboard end does not require a reverse connector, a single reverse riser cable still works better, but they may be harder to find.)

You need 2 M3x20 screws and 2 M3 square nuts for the riser mounting blocks. The rest can use self-tapping screws or M3 screws without nuts in the optional housings.
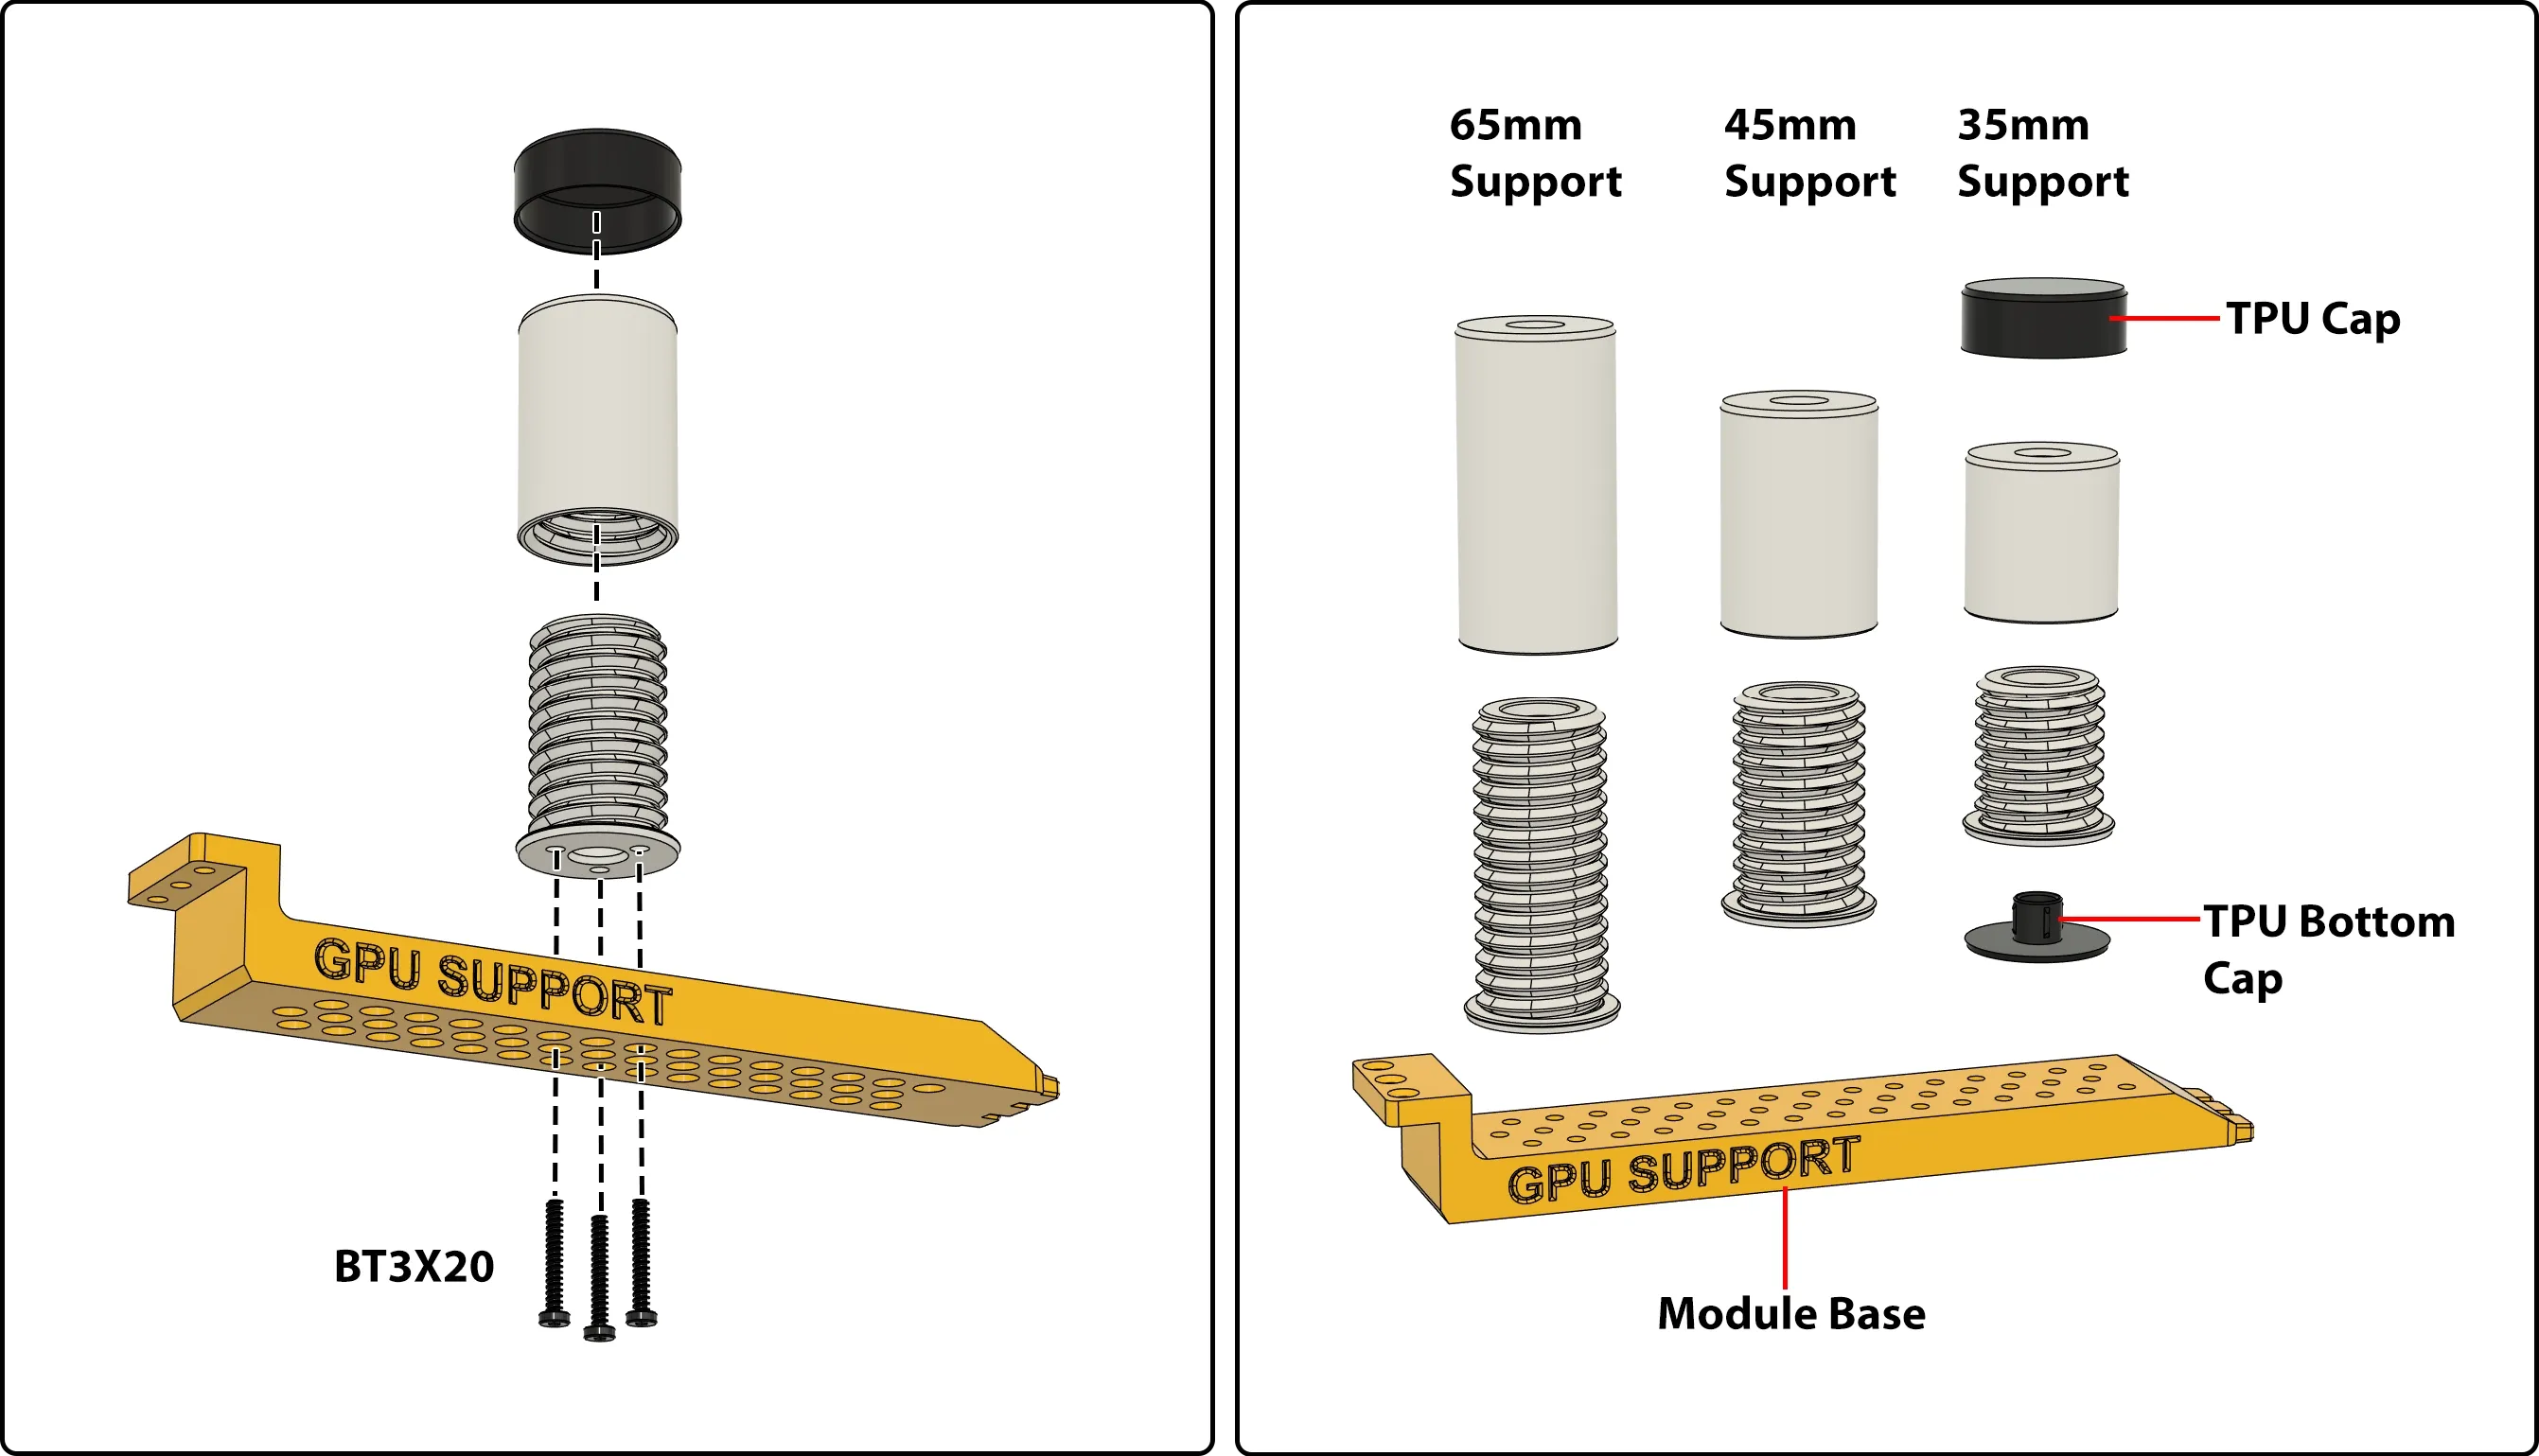
GPU Support Module
The HYPER GPU support is available in 3 lengths (35mm, 45mm, and 65mm) and can be mounted to the case with a rail-mounted base, or used standalone. Two styles of rubber end caps are included for soft contact with your components.
When mounted to the base on universal rails, the support will be securely fixed even when the PC case is moved frequently.
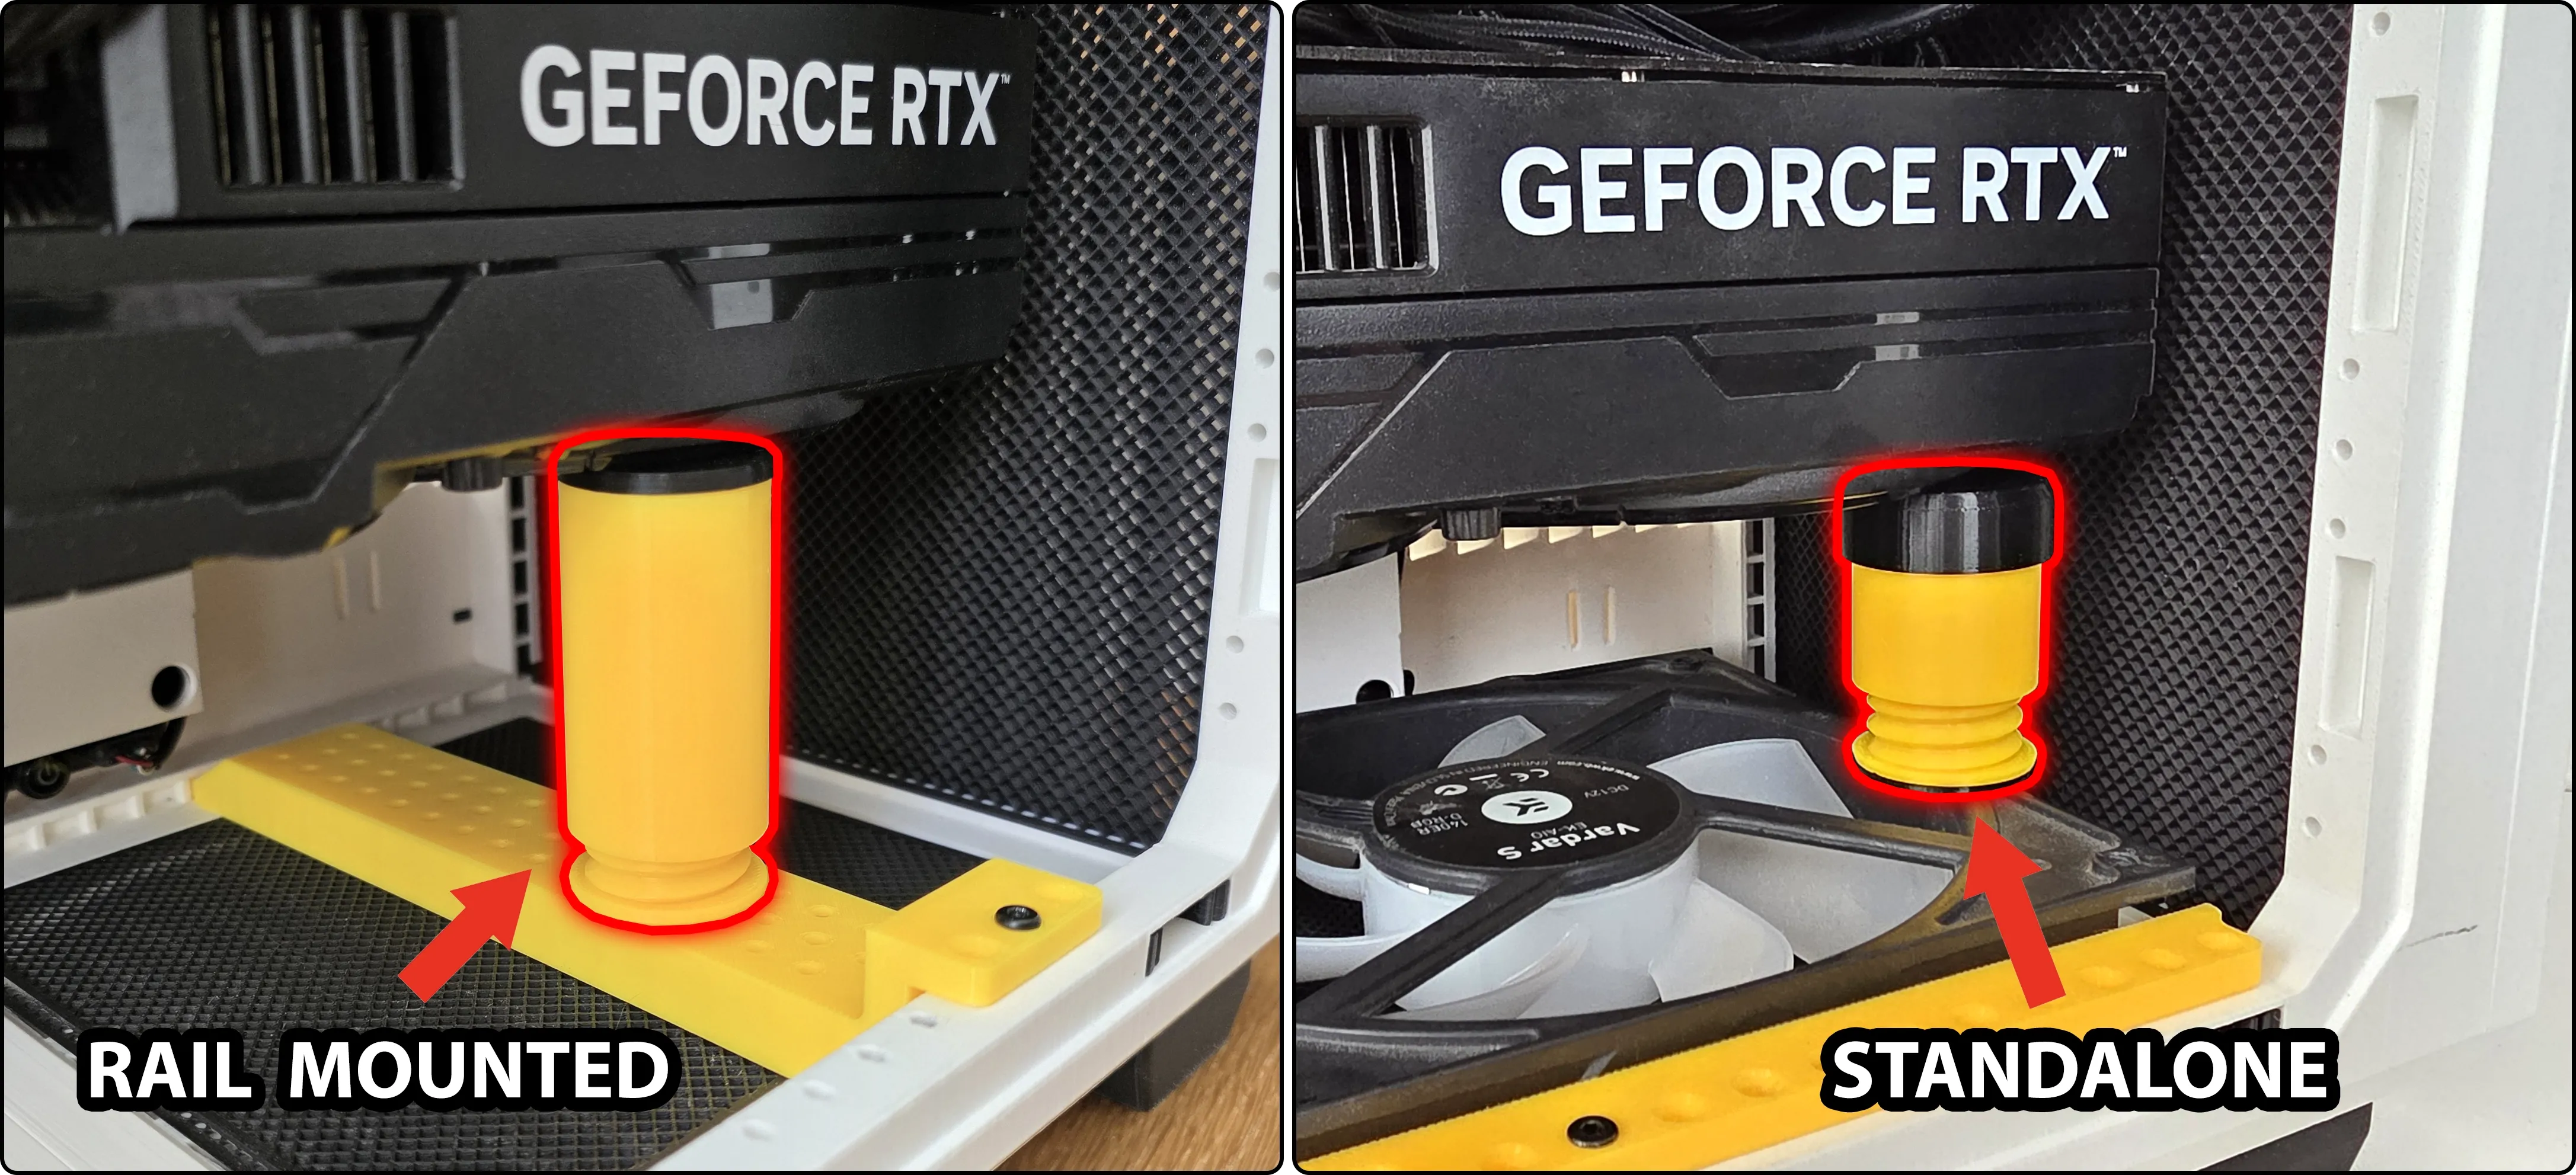
Optionally, the support can also be used standalone without the base, so it can be stacked on top of other components like a fan or drive.
Metal Nut Inserts
M3 square nuts (Link) can be inserted behind the holes. The captive nut insert is a backup option. Use them with M3 machine screws (Link).
CABLE MANAGEMENT
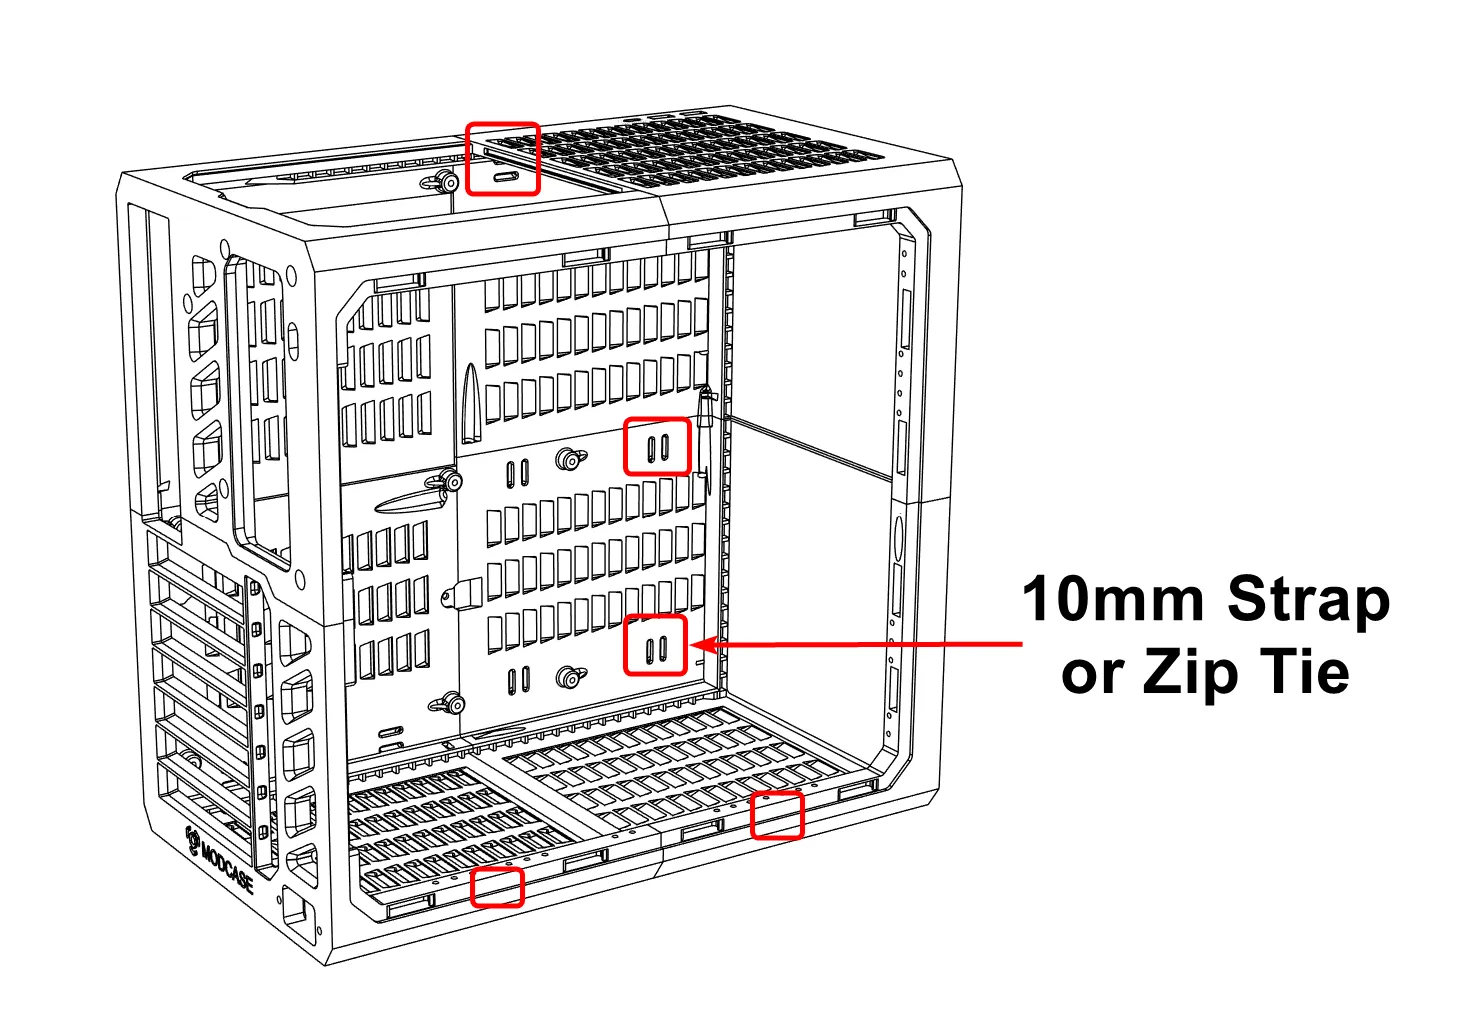
Slots are inside the case for 10mm wide cable ties or Velcro strips.
SPECIFICATIONS
| Parameter | Supported |
|---|---|
| Motherboard | E-ATX, ATX, mATX, ITX |
| GPU | 7 PCIE slots × 450mm long × 168mm high |
| CPU Cooler | Up to 168mm (Noctua NH-D15 confirmed) |
| PSU | ATX, SFX, SFX-L |
| Fans | 6× 140mm or 7× 120mm |
| Radiators | 120 / 140 / 240 / 280 / 360mm |
| Storage | 24× 2.5", 10× 3.5" (18× 3.5" w/ expansion*) |
| IO Ports | USB-C, USB-A ×2 |
| Dust Filters | All intakes. Customisable mesh density. |
| Dimensions | 353 × 338 × 202mm – 24L, ~1.9 kg |
*Expansion modules have been released, now unlocking 450mm GPUs, 360mm radiators, 18× 3.5" drives and more.
EXAMPLE BUILD
- AMD Ryzen 9800X3D
- NH-D15 CPU Cooler
- Palit 5070 ti 16g GPU
- NZXT B650 N7 ATX Motherboard
- SF1000W SFX Platinum PSU
- 64GB Dominator Ram
BOM - Bill Of Materials
| Part | Notes |
|---|---|
| BT3x20 Screws (40 pcs) | Also compatible with #4×3/4" screws and M3×20 machine screws (machine screws just require more turns to advance). All head types work: hex, button, pan, and flat. |
| Ø16mm Power Button | |
Optional
| Part | Notes |
|---|---|
| PSU Internal Extension Cable | For relocating the PSU to positions other than the rear. |
| USB-A Cable | Similar cables may work. |
| USB-C Cable | Similar cables may work. |
| Square Nuts | Captive nuts sit behind the hole and are extremely robust — would require pulling through the entire print to fail. Use with M3×20 machine screws. It is recommended to just start with screws. HYPER is designed for 20mm screws to have a deep thread engagement into the surrounding material so you might not need this fallback option. |
| M3×20 Machine Screws | For use with the captive nut option above. |
| Cable Ties or 10mm Velcro Strips | For cable management — slots are inside the case. |
| 5" Display / 7" Display | For use as integrated displays on supported frame and side panel options. |
| Clear Panel (acrylic or polycarbonate) | For clear side panel mod. 302 × 279 × 3mm with 7 × 7mm corner chamfers. See instructions for corner details and dimensions for expanded options. Purchase from local hardware or online cut to size plastics stores. |
PC Screws
HYPER uses standard PC screws for mounting components. (You may already have these.)
Shipping and Warranty
Shipping and Warranty
All in-stock products will be delivered within an average of 24/48 hours.
Italian Warranty with dedicated consulting support, contact us!